Table of Contents:
- Staff Data Entry
- Managing Staff Status
-
- Staff Details
- Nurse Delegation
- Supervision and Training
- Staff Competency Documentation
- Remote or Limited Access
Staff Data Entry
You can navigate to Staff > Staff to track important information about your team such as certifications/licenses, documents, incidents, health information, login history, and training. With the appropriate roles, you can also manage a user's access and permissions and run a variety of reports. You can track this information for all staff, whether or not they need to log into Residex.
Add Staff
With Staff Data Entry (Role 14) Navigate to Staff > Staff > + Add Staff Member to add a new staff member.
📘 Generic Logins
Residex strongly discourages the creation of generic login names that would allow multiple different people to log in under one account. While we understand the perceived convenience, doing so reduces accountability and does not create a legal record of service provision.
- You will be prompted with a form requesting information on the individual staff member.
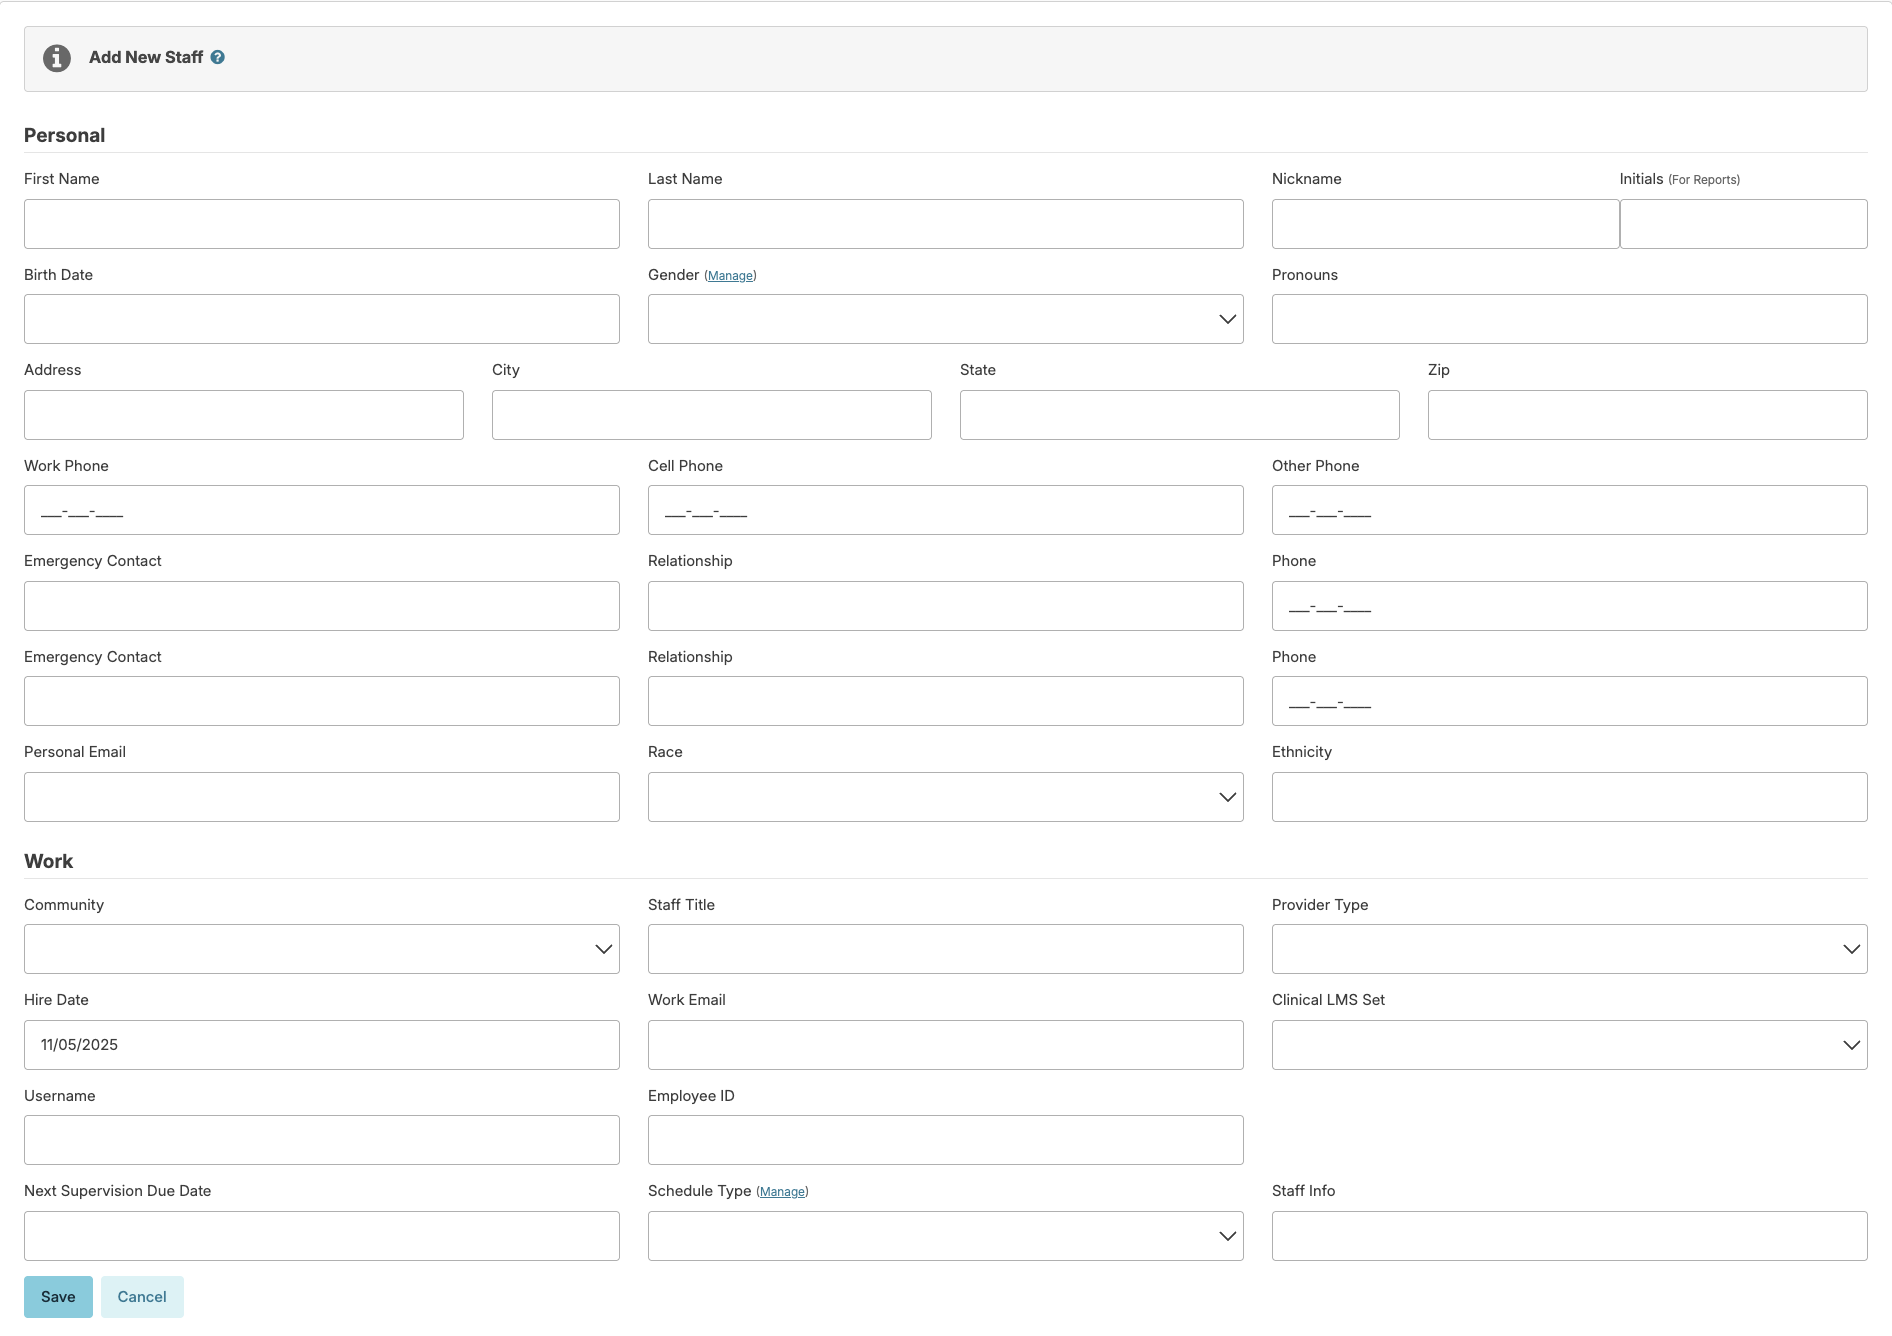
- Some fields are required while others are optional. However, completing all fields is encouraged for a comprehensive file.
- Information contained in the staff initials field will appear in certain reports such as a completed MAR and treatment records. These reports also contain a key clearly identifying staff. If two staff have the same initials, Residex will alert you and allow you to modify.
- Provider Type is used to organize staff into groups based on the roles they play in your facility. Provider types are customizable for your organization, as are the reports available for each provider type. When selecting a provider type, keep in mind that this is an order of hierarchy. For example, you will be restricted from viewing the 'To Do' list for an HHA/RA if you were given a provider type that falls below the HHA/RA in the hierarchy. Likewise, the HHA/RA will be unable to access the 'To Do' list for the Administrator or RN. There are also charting rules set in place that, for example, allow a nurse to document late services further back than an HHA/RA can.
- Press Save to finish entering the new staff member.

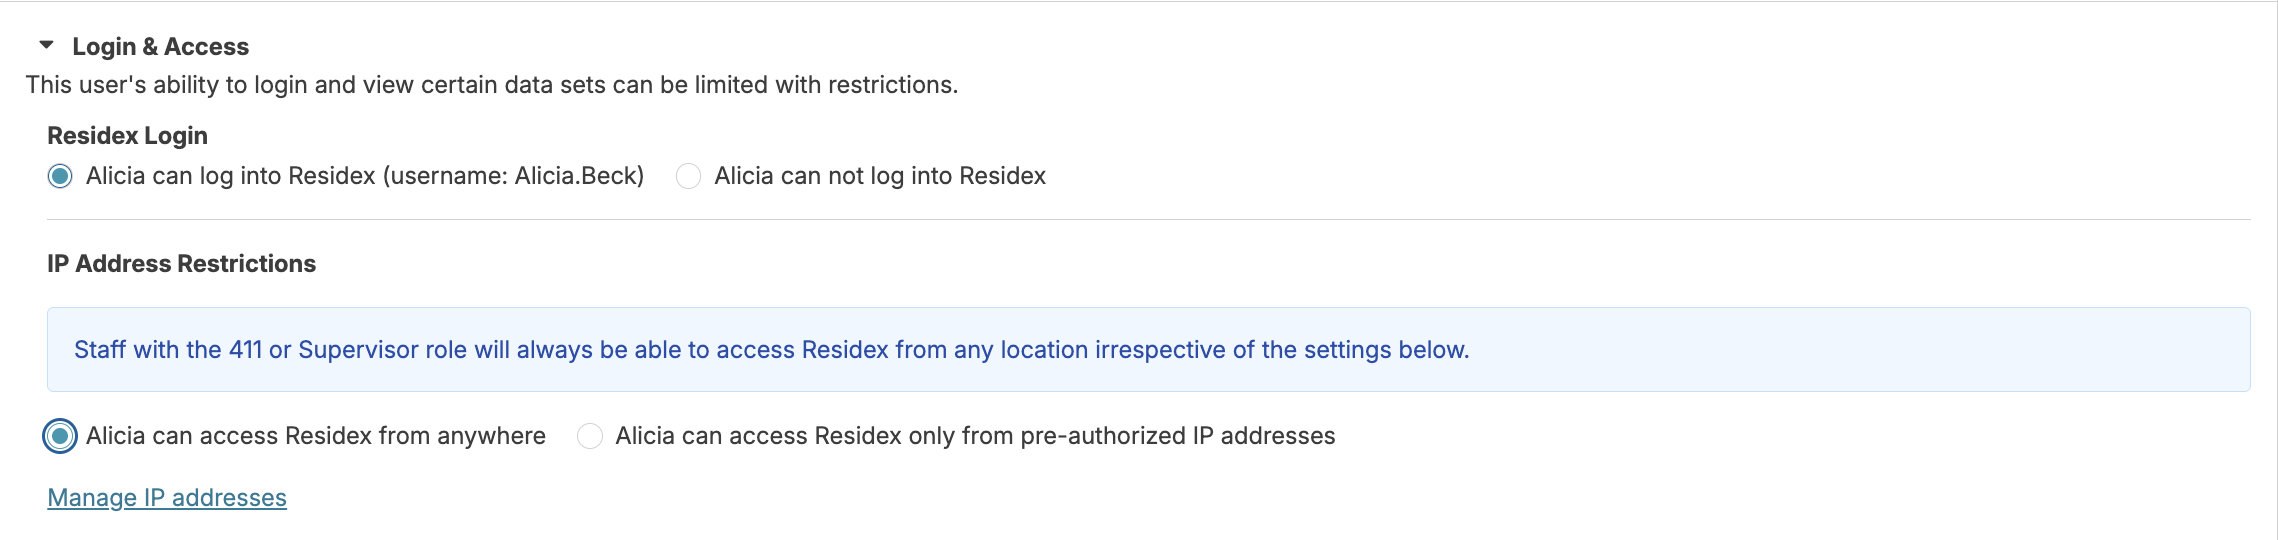
If you have Staff Data Entry (Role 14) AND Staff Security Manager (Role 15) you will be immediately directed to the Security > Login & Access screen, where you can grant (or revoke) a user's ability to login to Residex by selecting (staff name) can log into Residex. Depending on your facility's settings, you may need to specify a temporary password for the user upon initial access, at which point they will be required to change their password and enter a backup phone number. Select the following to learn more about securing your account.
❗️You MUST toggle staff to CAN log into Residex and ensure that on their profile screen it says Residex Account: Yes in order for them to have access.

IP Address Restrictions allow you to specify if a user can access Residex from anywhere, or only from pre-authorized IP addresses. This will require your restricted users to be connected to your network on-site before they can log into Residex. The Supervisor (Role 13) will override this setting. Staff with Multiple Database Access should NOT have IP Restrictions. IP Restrictions will result in the inability to log into Residex.
Multiple Database Access is only visible if you have either Supervisor (Role 13), Administrator Assistant (Role 410) or Administrator (Role 411) and you have access to the multiple databases intended to grant access to.
From the Database where the staff person is entered AND active, navigate to their staff profile > Security > Multi-Database Access. You will see a dropdown that displays the databases you as an administrator have access to. Select the database you wish to give the staff access to and save. This process will add that staff record to the new database with the same roles as the current database with the exception of Administrator (Role 411), Administrator Assistant (Role 410), and Emergency Downloads (Role 911) which must be added manually.
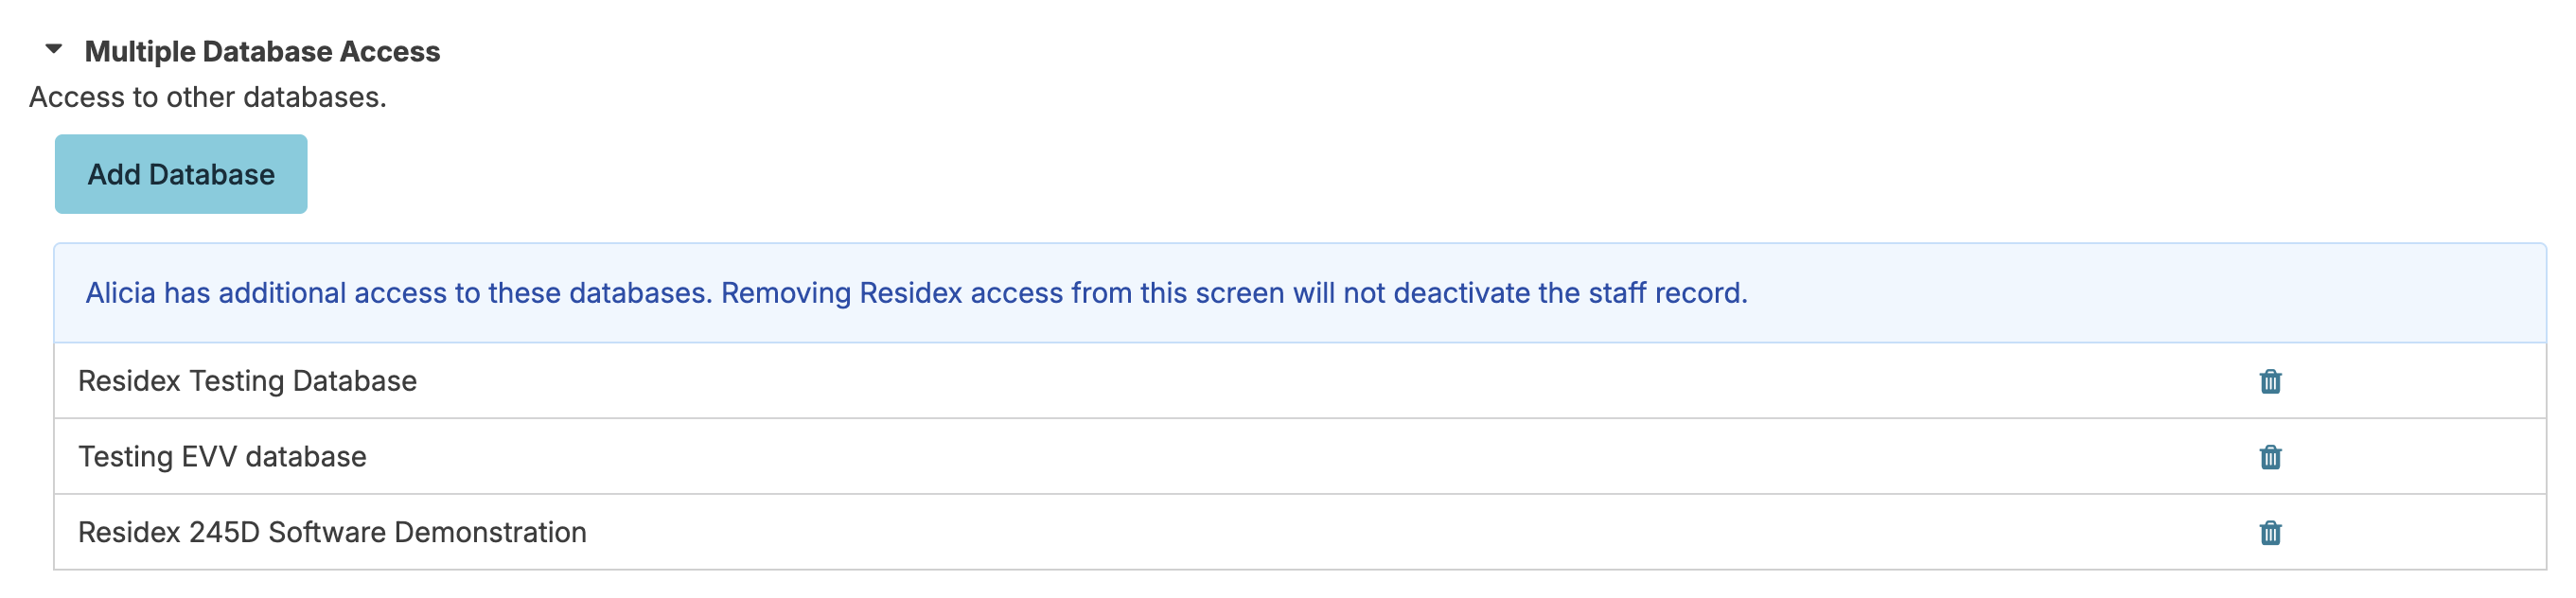
If the staff person is already entered in the second database (active or inactive), their name will appear in a dropdown from which you can select and save. The staff member's username from the current campus will be the chosen username. The staff record will be activated and granted multi-database access in the same step.
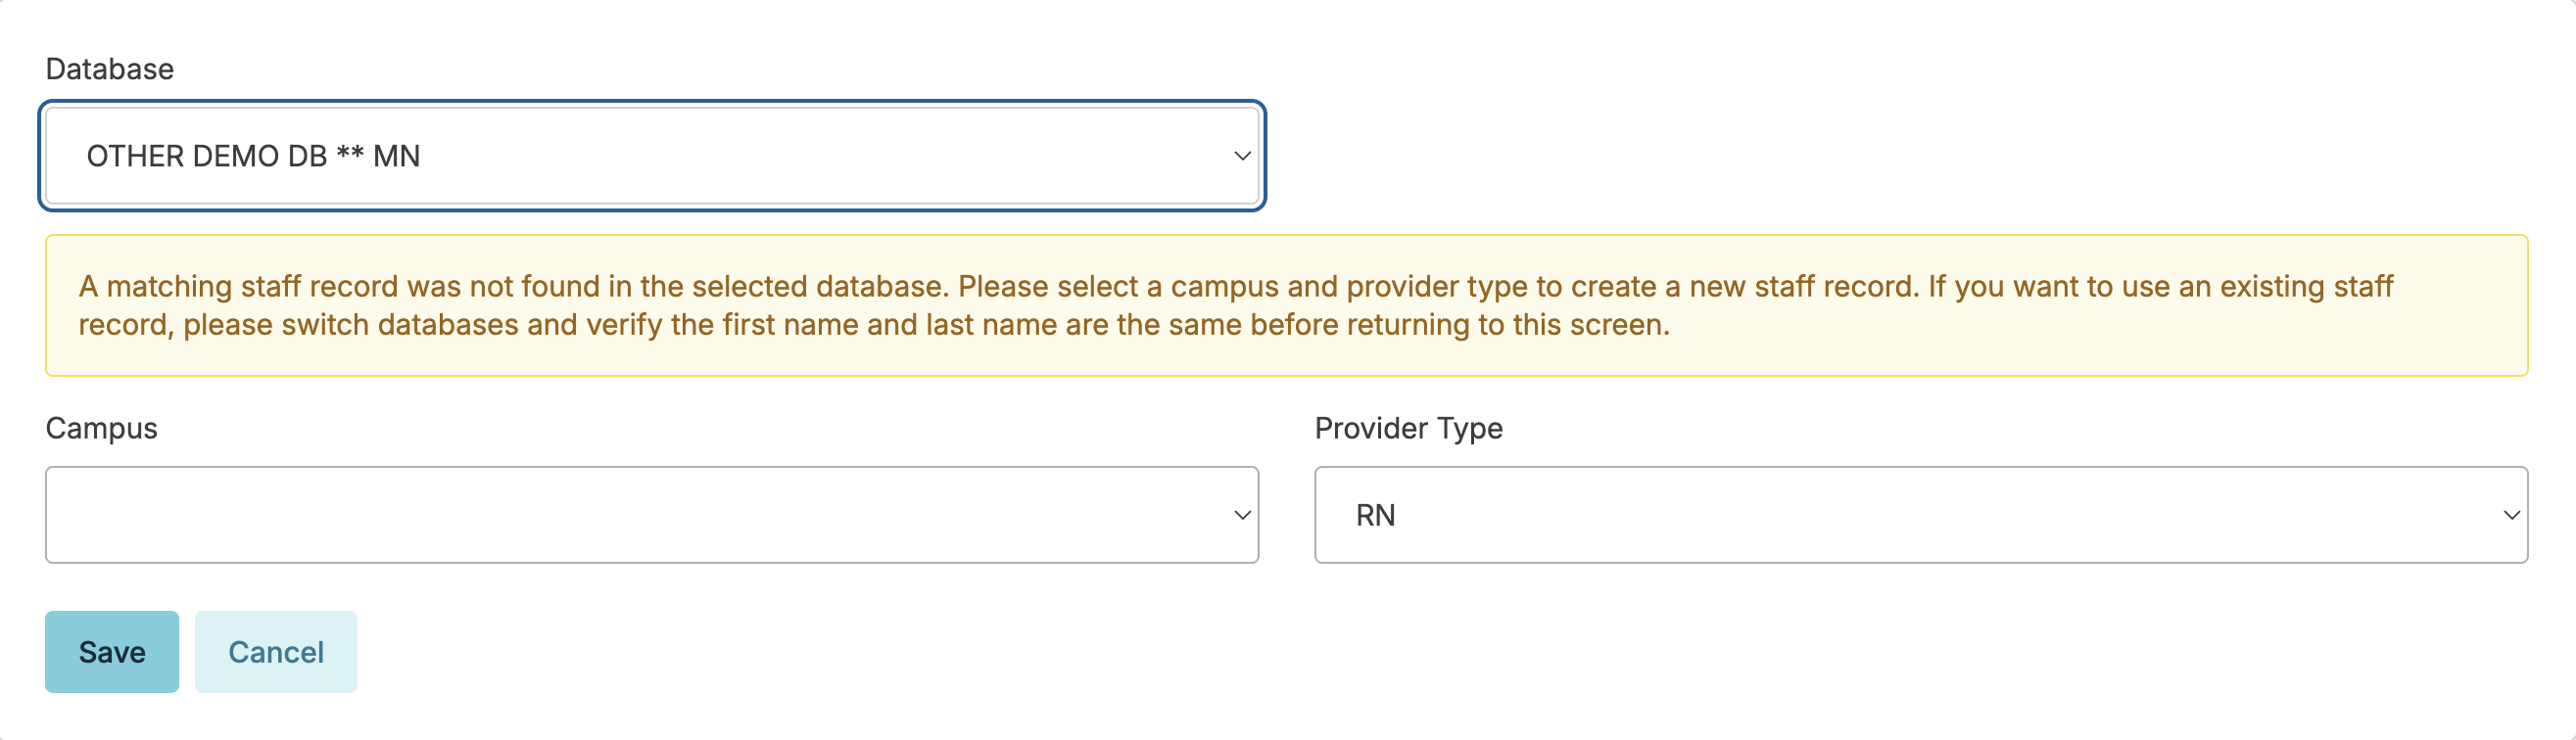
The name must be identical in both databases. If not, a message will direct you to check and edit the entry in the 2nd database to have the first and last names match completely.
Resident Data Access
Limited Resident Access
You can restrict users to accessing only certain residents. This feature is typically used to grant access to third-party care providers like hospice staff, therapy staff, or rounding providers, or to state surveyors for focused record audits. This feature restricts these users from viewing residents to whom they have not been given permission. Residents discharged within the last three years will also be available to grant access to, if desired. Only selected active residents will be viewable from the dashboard/login report, resident profile, clinical drop-downs, etc. Report permission is controlled by the provider type chosen.
These limited access users should be added like other staff members, using first name/last name (never a generic login). Select an appropriate provider type, using the provider type 'Surveyor' specifically for state surveyors; this will allow you to limit surveyor access to only specific reports. Once the profile has been created, proceed to Security to give access. From Resident Data Access, select the (staff name) has access to specific Residents option, then identify those residents to whom they should be given access.
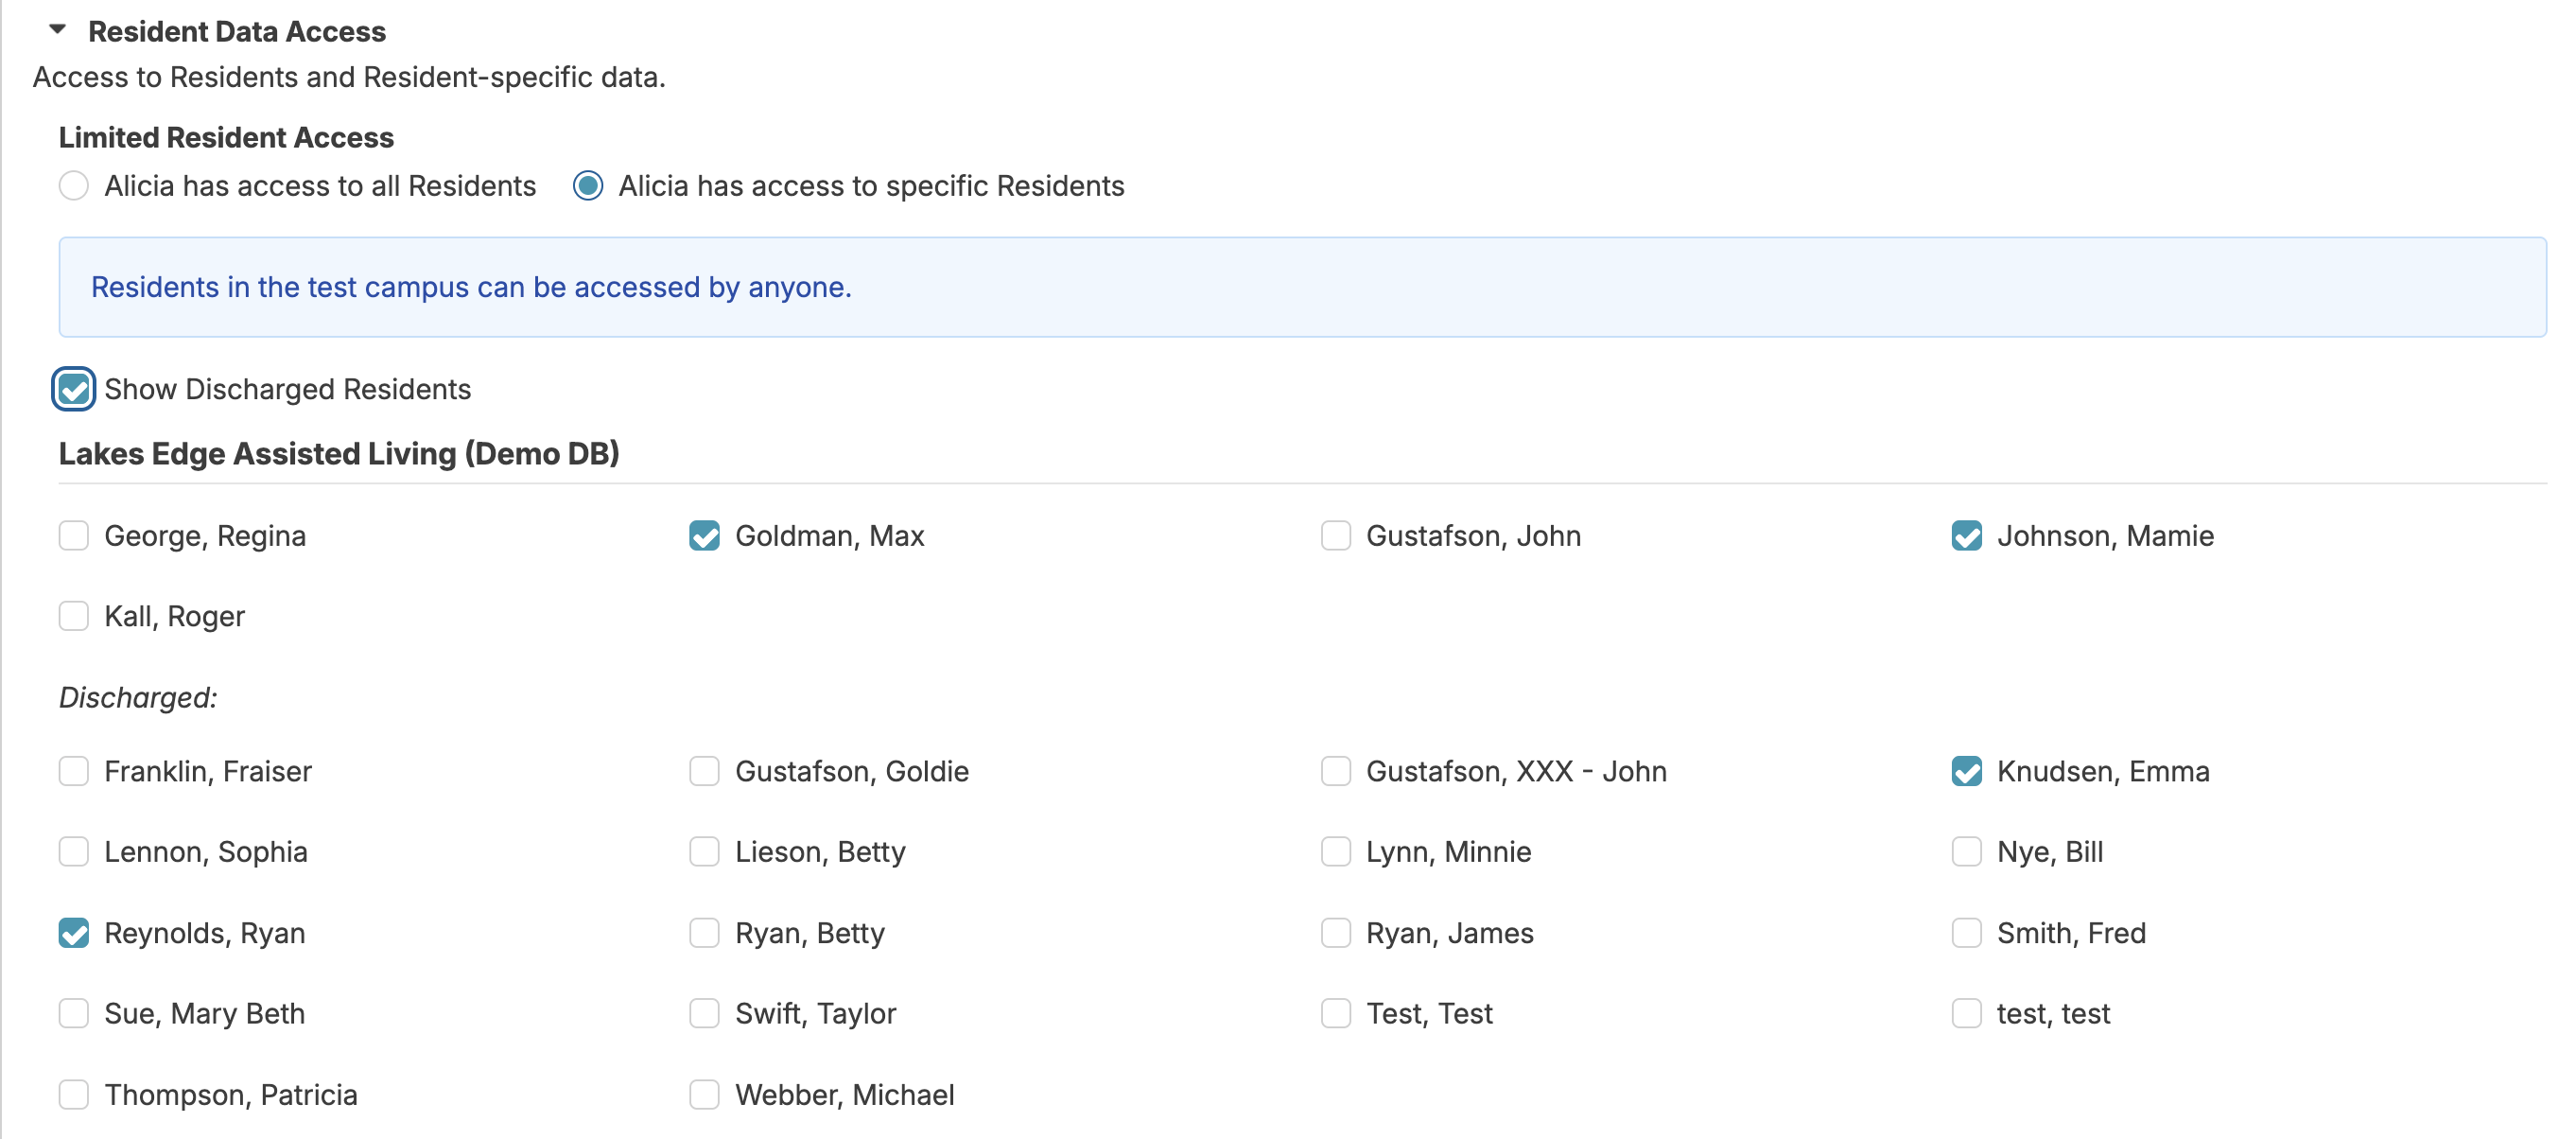
You may then choose to grant roles (not recommended for surveyors) such as Notes (Role 5) if you have chosen to allow them to enter a hospice or provider note. If no roles are granted, their ability to enter data is restricted. Access to reports is controlled by provider type.
Assigning Roles
Residex Roles allow you to fine-tune each staff person's ability to view and edit data in Residex. It is typical for a nurse or administrative user to have many of these permissions, and unlicensed staff to have fewer.Resident Data Access:

Staff Data Access:

Billing/Financial:

Faxing/Files:

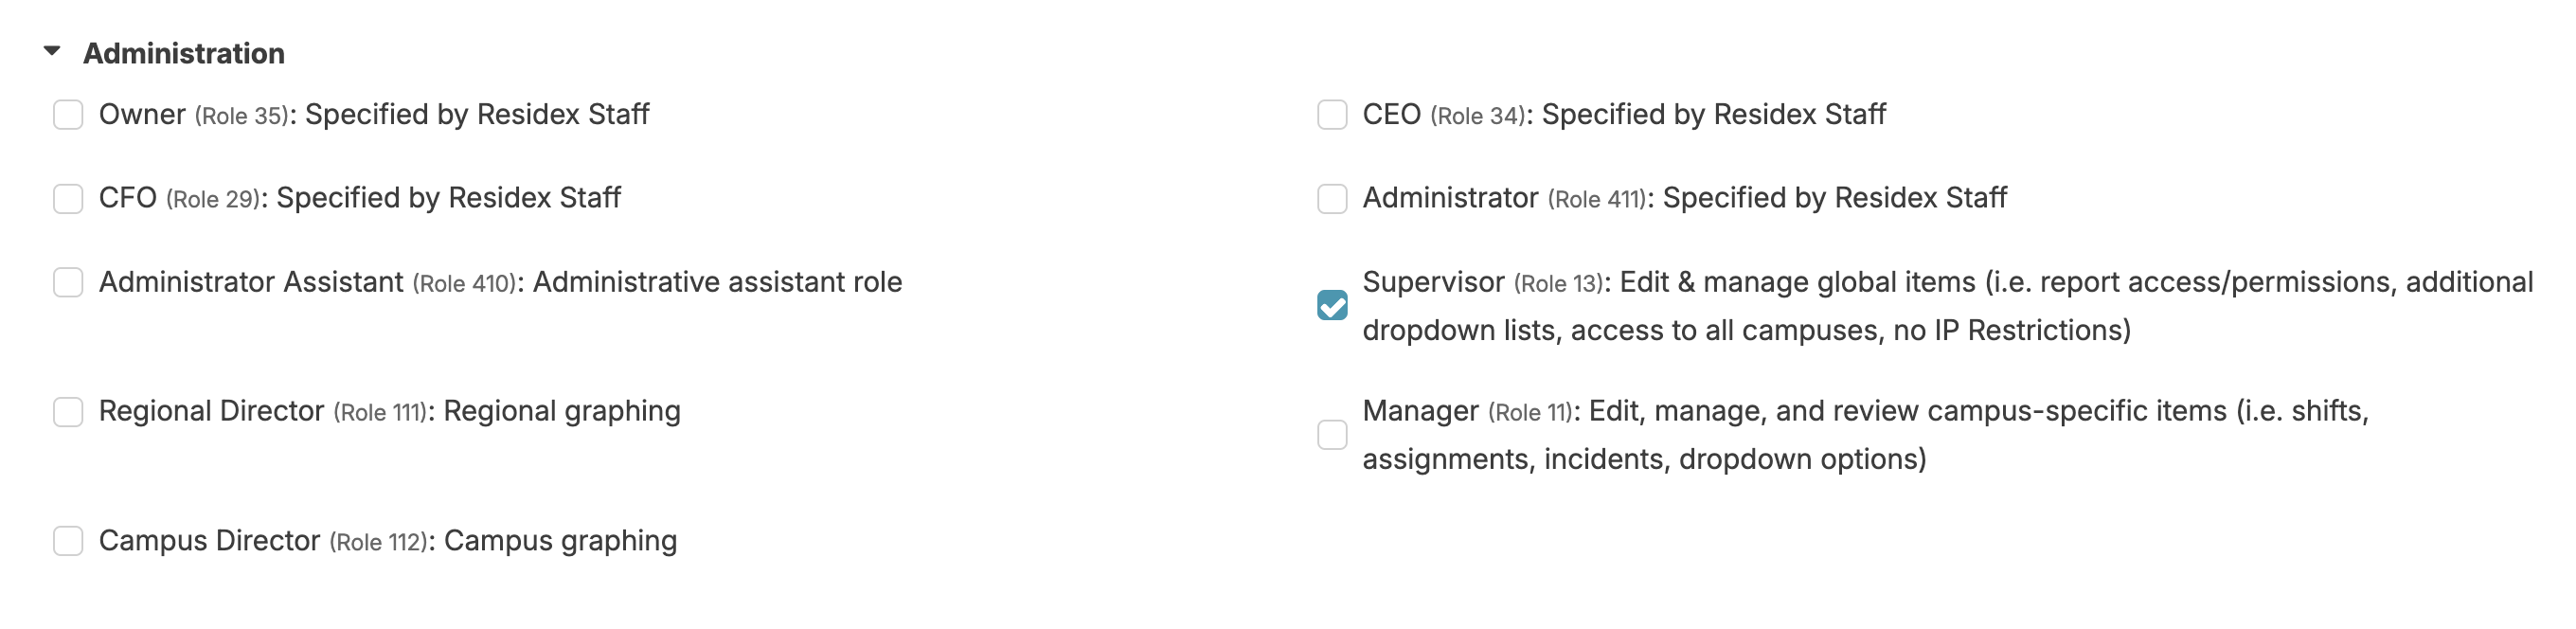
Administration:
Other Roles:

Role Templates
Pre-set role templates can be set up, allowing a set of roles to be automatically added based upon the provider type of the staff person. This can standardize access and speed up the process of entering new staff.Most roles can be set up using the template, though some roles carrying greater access and accountability must be manually added, including Clinical (Role 19), Staff Security Manager (Role 15), Manager (Role 11), Supervisor (Role 13), Billing Supervisor (Role 23), Staff Data Entry (Role 14), and Billing (Role 4).
Managing Staff Status
Residex offers various tools to efficiently manage your team's employment status and essential staff information.
Reset Password
Residex support staff cannot reset passwords and will refer staff back to their supervisor. Staff with both Staff Data Entry (role 14) and Staff Security Manager (role 15), can use the Reset Password button in the staff profile to assist the user if they are locked out or forget their password. To prevent the need to contact your supervisor, users can navigate to their name icon in the upper right-hand corner > Settings and enter a backup phone number that can be used in resetting their password.
Deactivating a Staff
Deactivating a staff member who has permissions to log into Residex will immediately revoke that user's ability to log in. To deactivate staff, navigate to the staff person's profile > click Deactivate staff button under the staff profile and enter termination:
- Date
- Reason
- Note
The staff member will no longer be active but their profile will still be accessible from the 'inactive' staff list, where they can be reactivated if needed. When a staff member is deactivated, no data is deleted
Reactivating a Staff Member in Residex
If a staff member has been deactivated, you can reactivate their account through the Staff module. Follow the steps below to restore their access.
-
Navigate to Staff > Staff from the main navigation menu.
-
Enable Inactive Staff View by toggling on Show Inactive Staff to display staff members who have been deactivated.
-
Search for the Staff Member Use the search bar to look up the staff member by their last name.
-
Open the Staff Profile Click on the staff member's profile from the search results.
-
Reactivate the Account Click the Reactivate User button to restore the staff member's account and access.

The staff member's account will be reactivated, you will then need to navigate to Security in their profile and toggle them to "can log in".
-
If the staff member does not appear in the search results, confirm that the Show Inactive Staff toggle is enabled.
-
Contact your system administrator if the Reactivate User button is not visible, as you may not have the required permissions.
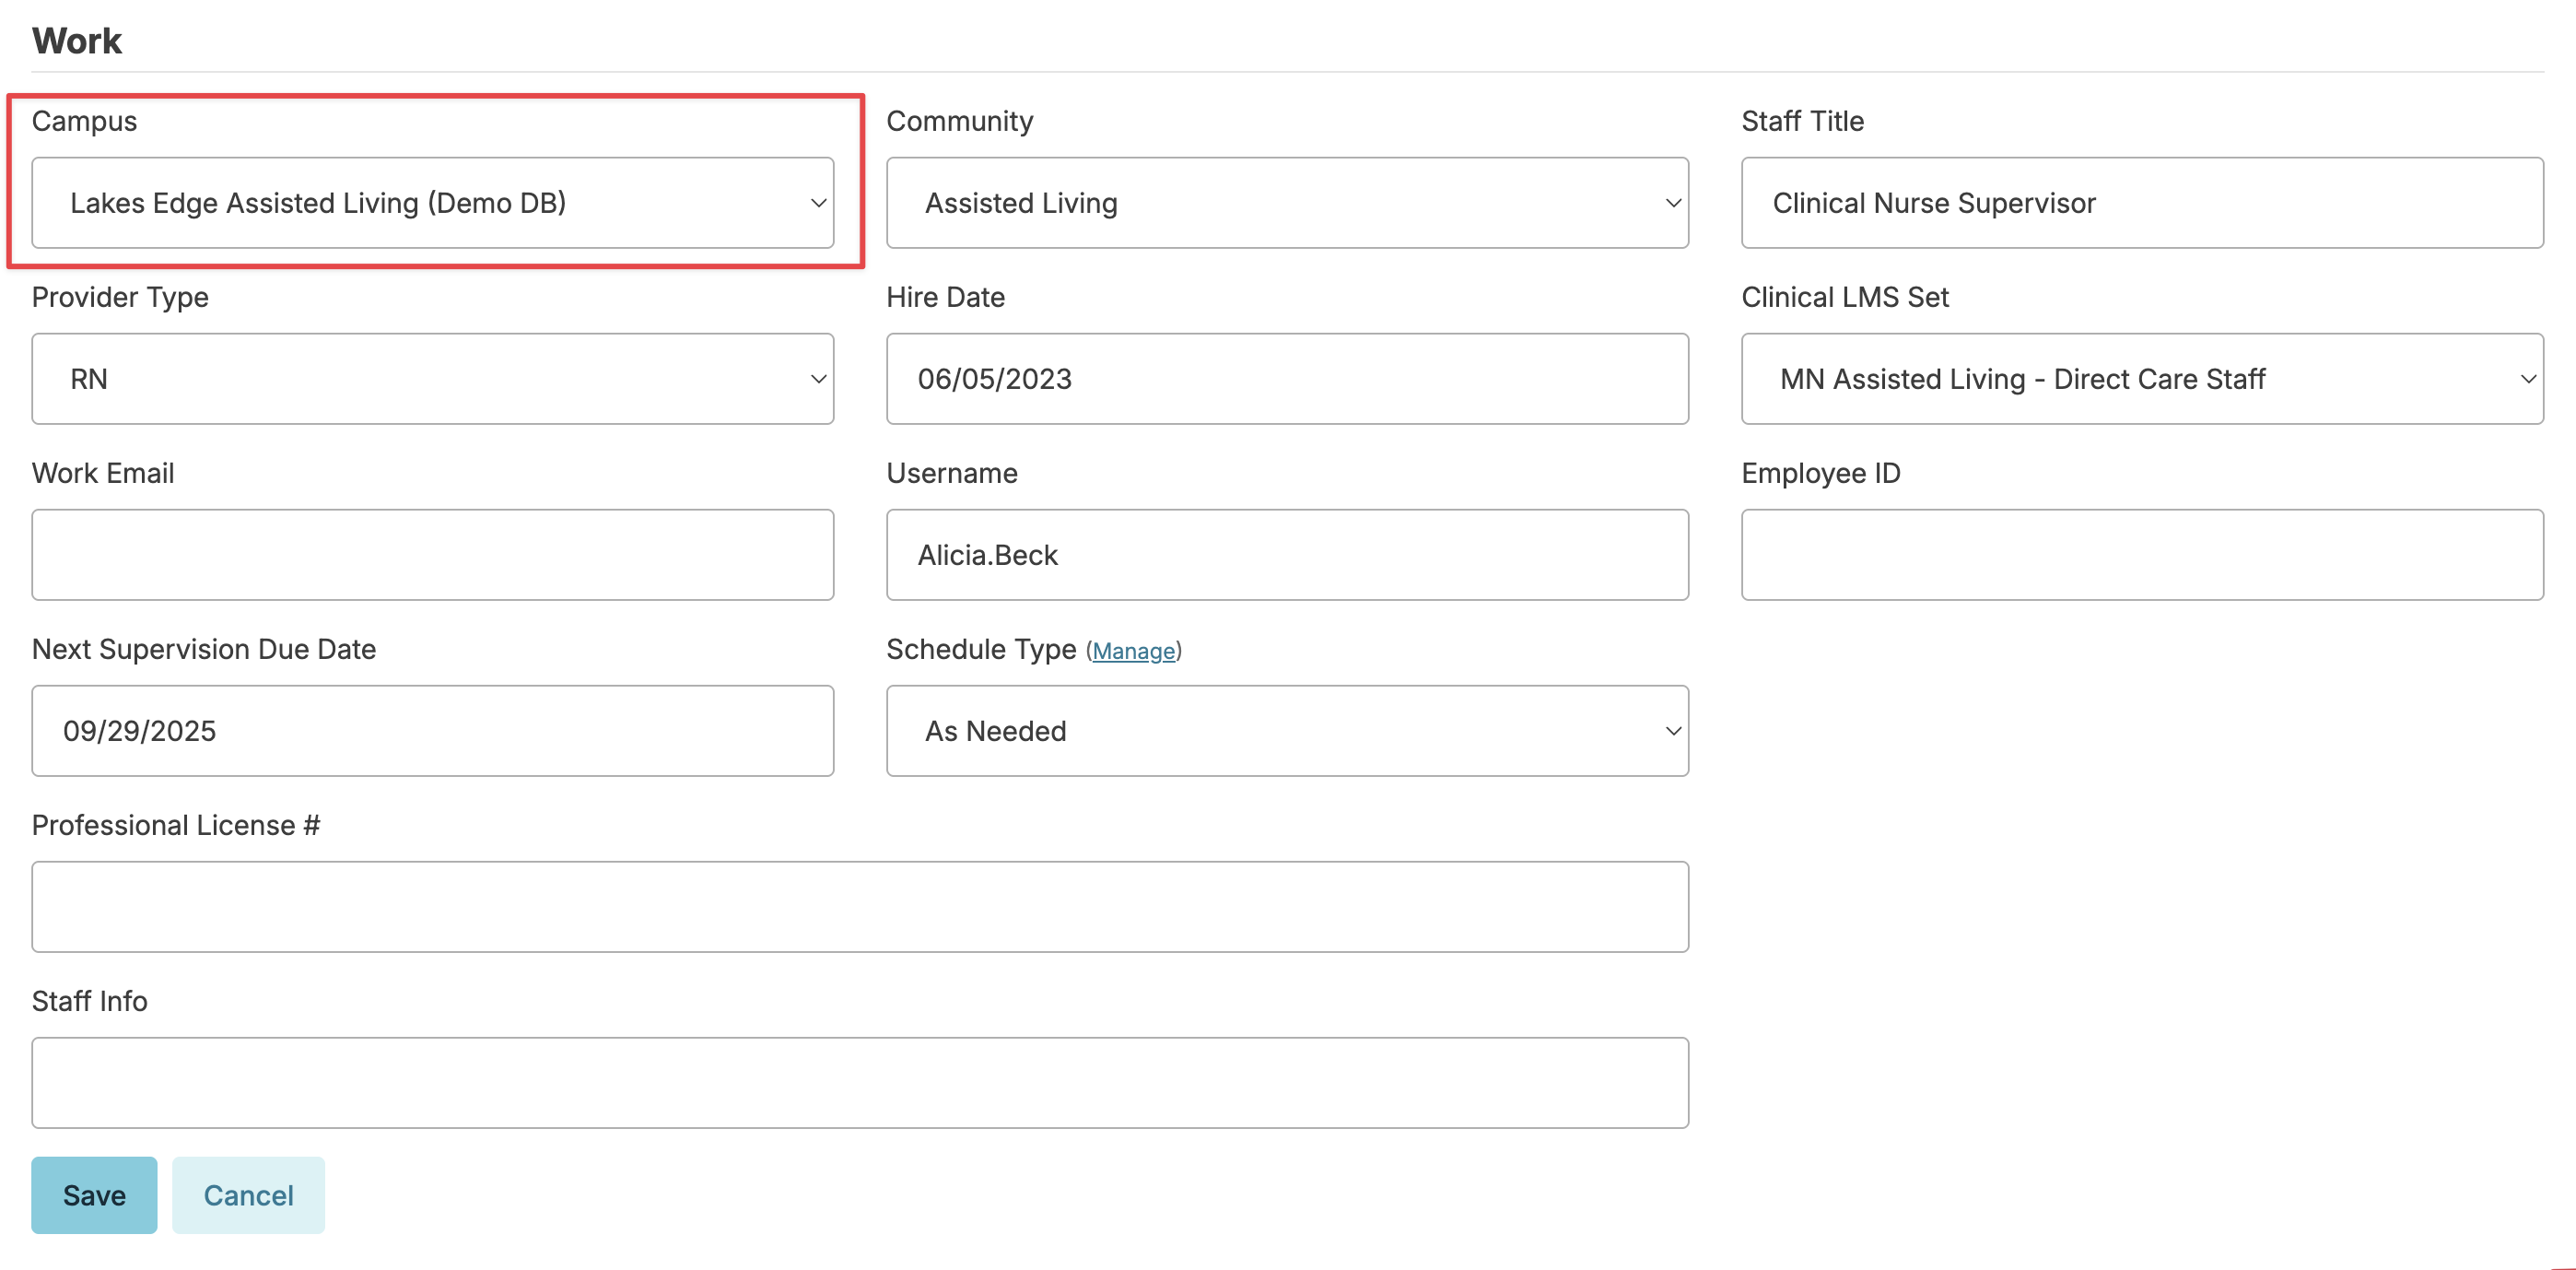
Transfer to Another Campus
You can move a staff member to another home within your organization by navigating to their profile > selecting Update Profile > and updating the Campus selection. A transferred staff will only have access to the selected campus unless they have specifically been granted access to multiple campuses under their staff profile > Security. If you have access to more than one campus, your staff profile will only display in the campus identified in your staff profile.
Populating and Removing Care Plans
Users with Staff Data Entry (Role 14) permissions can manage care plan assignments for staff directly from the staff profile. This includes populating care plans for new staff and removing care plans that are not applicable.
Populating Care Plans
To populate care plans for a staff member, navigate to their staff profile and click the Care Plan Reviews button. This screen displays two sections:
- Unreviewed Care Plans – Care plans that have already been populated and are awaiting staff review and acknowledgment.
- New Care Plans – Care plans that are available but have not yet been populated to the staff member.
To populate care plans for a new staff member:
- Navigate to the staff profile and click Care Plan Reviews.
- In the New Care Plans section, individually select the care plans the staff member should review, or scroll to the bottom of the list and click Toggle All to select all available care plans.
- Click Populate All Selected.
Once populated, the care plans will appear on the staff member's Today > Assignments screen for review and acknowledgment, and will move to the Unreviewed Care Plans section.
Note: Only care plans for residents the staff member has access to will appear in the list to populate.
Removing Care Plans
If a staff member does not need to review a particular care plan that has already been populated, you can remove it from their profile:
- Navigate to Care Plan Reviews > Unreviewed Care Plans.
- Check the box in the upper right corner of each care plan to be removed, or click Toggle All to select all.
- Click Delete All Selected at the bottom of the Unreviewed Care Plans section.
- A report, Care Plans Deleted - By Campus, can be used to see care plans populated to staff, and then deleted, for the chosen campus
When Care Plans Appear in the New Care Plans Section
The New Care Plans section will typically only contain care plans in the following situations:
- The staff member is new and care plans have not yet been populated to their profile.
- A care plan was manually removed from the Unreviewed Care Plans section.
Populating Policies
You can also populate policies by clicking the Populate Policies button. You can populate all policies, a specific category of policies, or individual policies. Once populated, policies will also be available on the staff person's Today > Assignments screen for review and acknowledgment.
Add a photo for the staff member
To add or change a photo of an individual staff member.
- Click the Change photo link on the staff profile
- Drag and Drop a photo from your computer into the target window or use the Upload button to find a photo from your device.
- Crop, center, and/or rotate the photo if necessary
- Press Save to finish
Add Tags
Tags are simply labels that can be added to staff profiles that will allow you to pull reports and filter by tag. Staff tags might include a reference to participation in certain committees, special qualifications, etc.
Staff Details
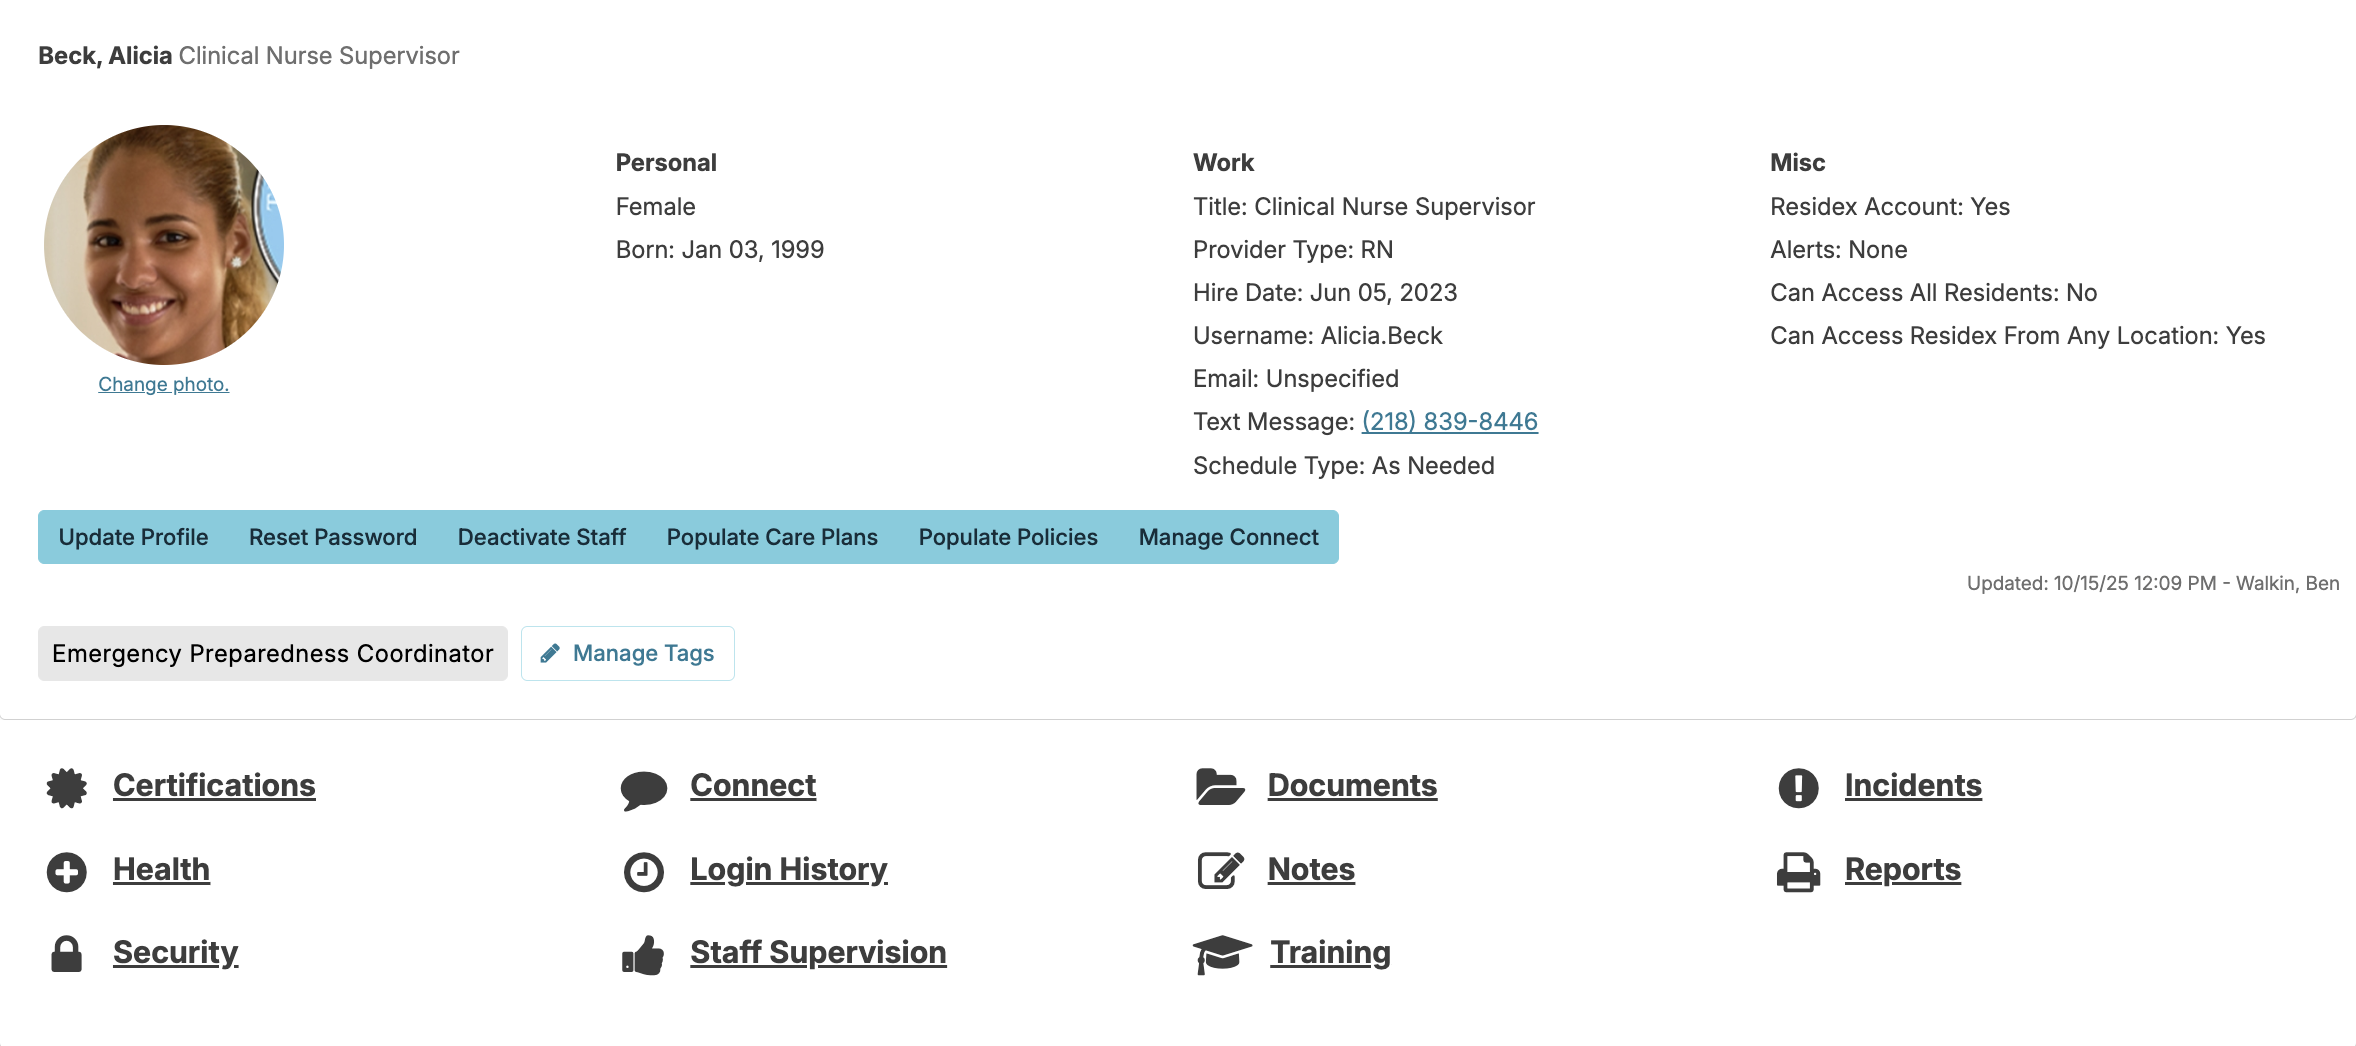
Residex provides a suite of features beyond the basic staff profile to manage key information about your staff. Navigate to Staff > Staff and select a staff profile to view the following items:

Certifications
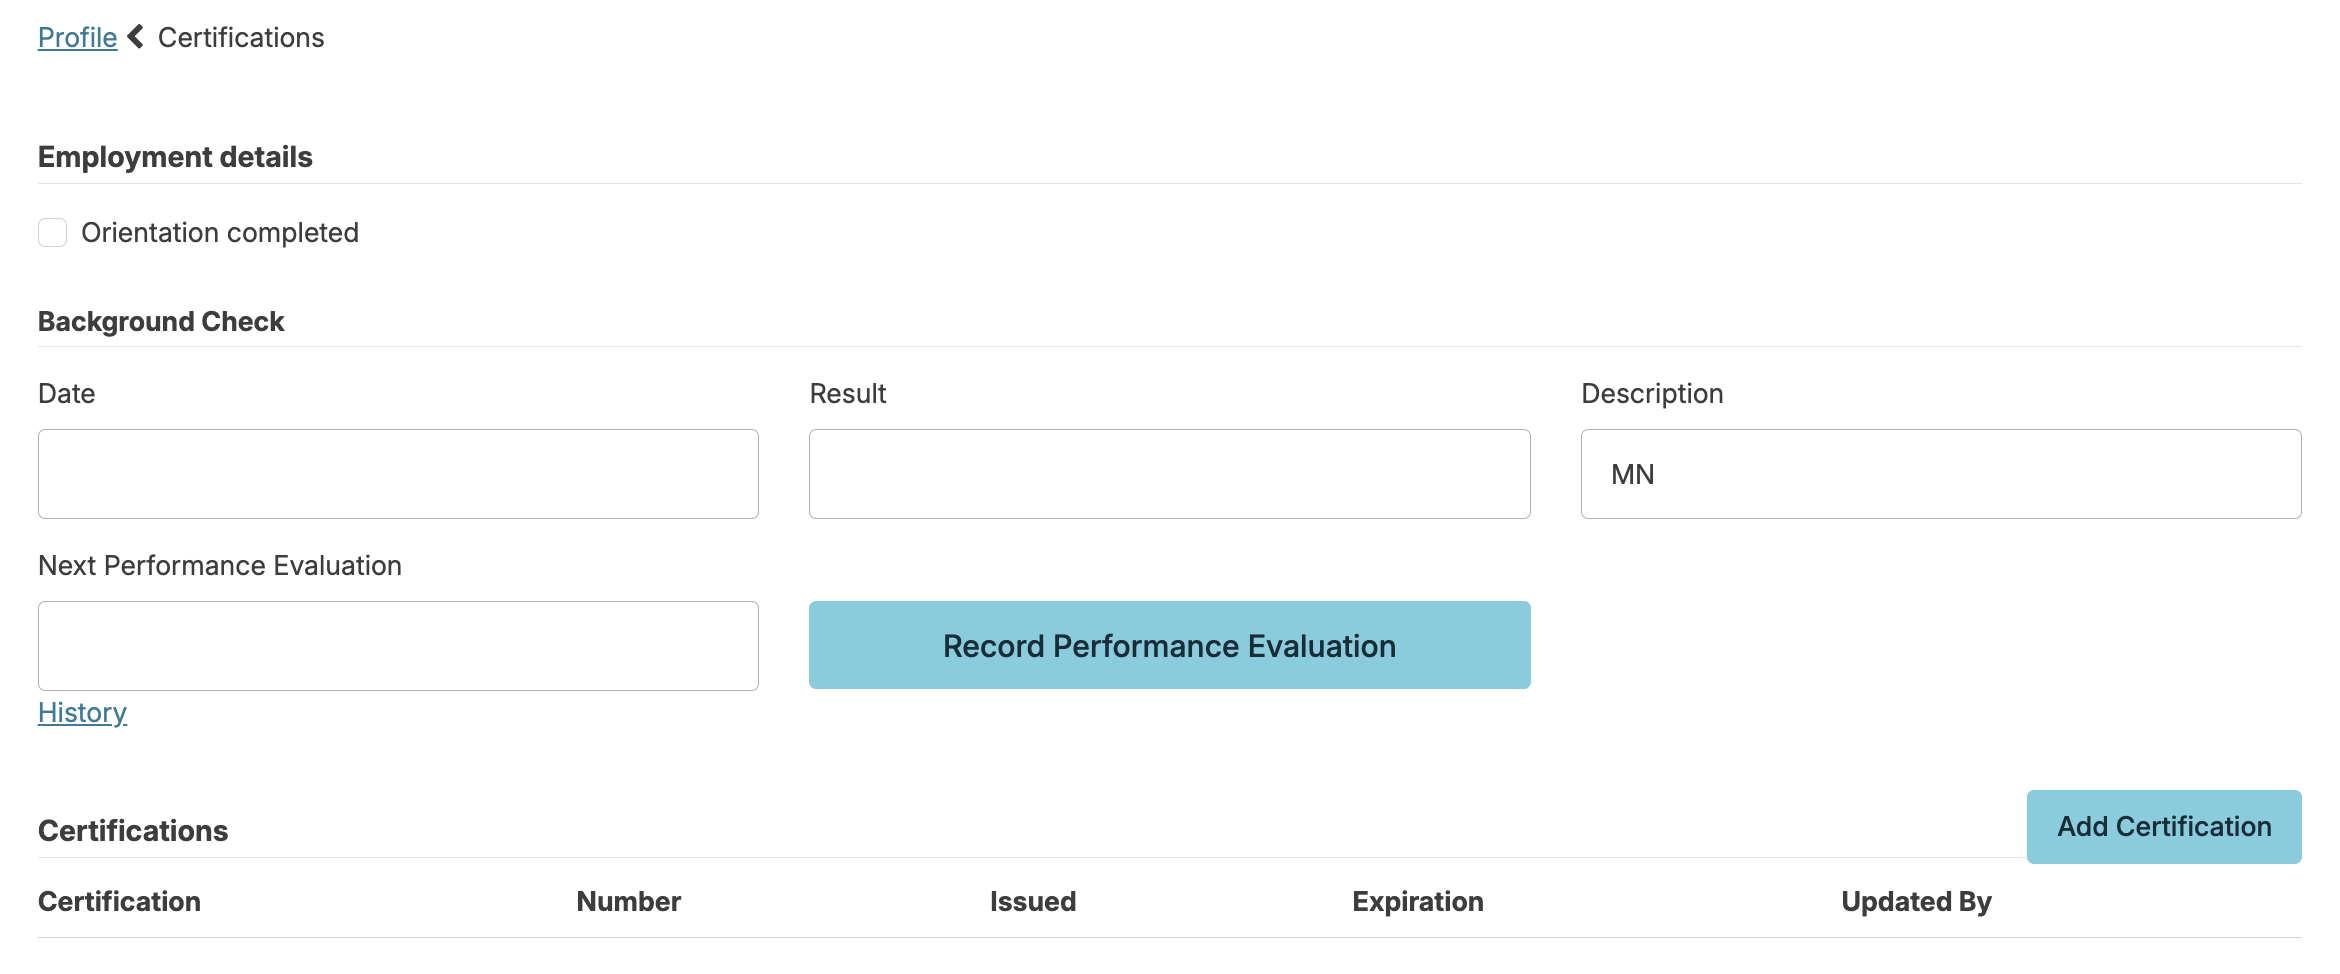
Staff profile > Certifications allows you to keep track of key details about a staff member's qualifications, such as professional licenses, staff orientation status, driver's license, auto insurance, background checks, and CPR certifications.
- Staff Orientation completed - When this checkbox is selected, the date the orientation is completed will be saved. This date can be edited if needed
- Background check results
Record background check information by entering the date, results, and description. Click the Add Check button to add additional background checks as needed." - Performance evaluation & history
To set up a performance evaluation schedule:- Enter a date in the Next Performance Evaluation box
- The Staff Performance Evaluations Due report (available in the Staff dashboard dropdown) will remind you when evaluations are coming due
- When the evaluation is due, click the Record Performance Evaluation button and enter the completion date
Update the Next Performance Evaluation date to schedule the next review
Optional: You can also use the staff incident feature with the Staff Performance Evaluation incident type to record detailed performance information."
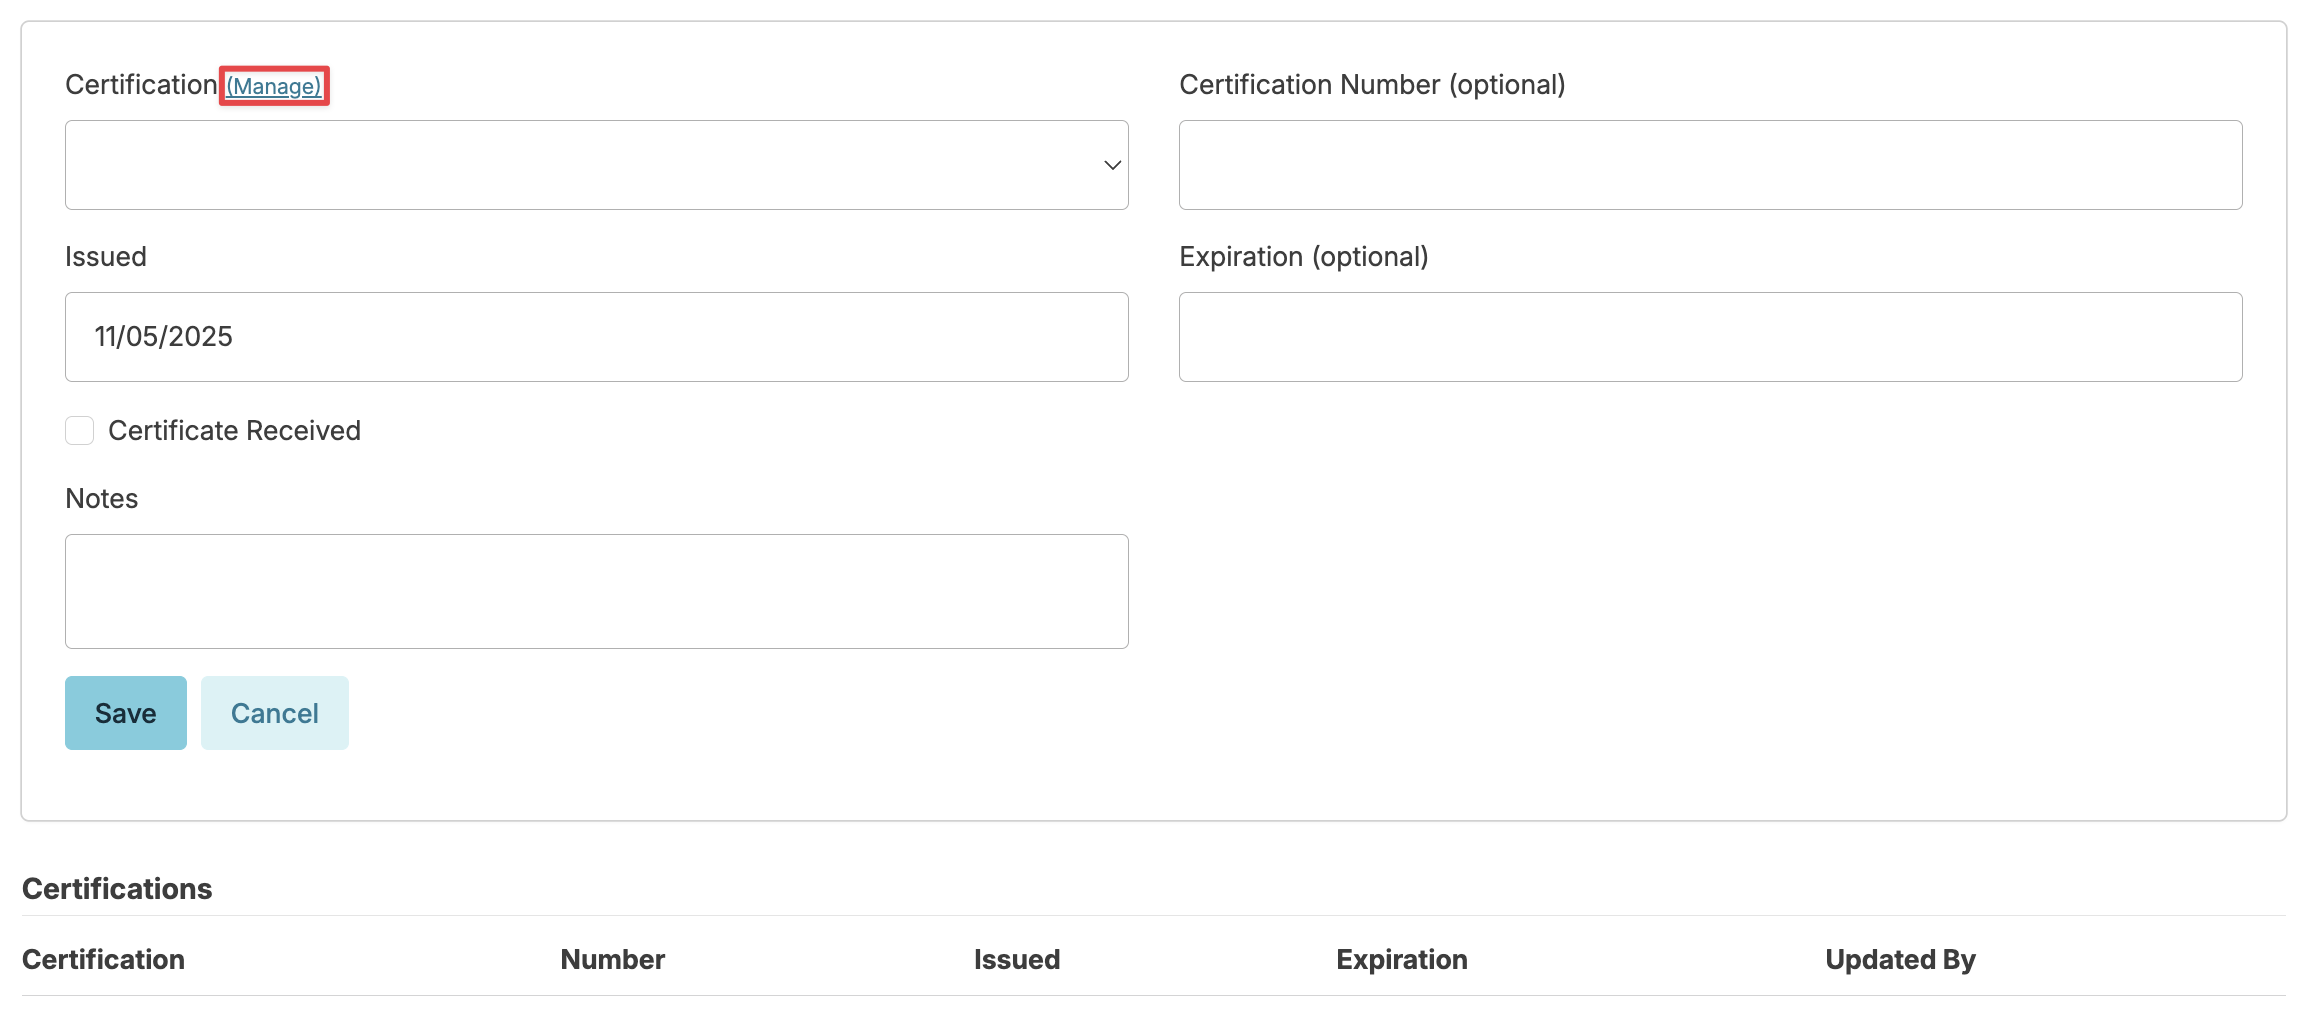
- Certifications - Allow for maintaining up-to-date records and reminders for when a certification is expiring
The staff member's Certifications will display in a list:
- Use the Add Certification button to record new certifications or
- Click on any item in the list to update it's details or delete it.
- Alerts and Dashboard/Login Report notifications can be scheduled that will notify administrators when certification renewals are coming due, based on the expiration date entered here.
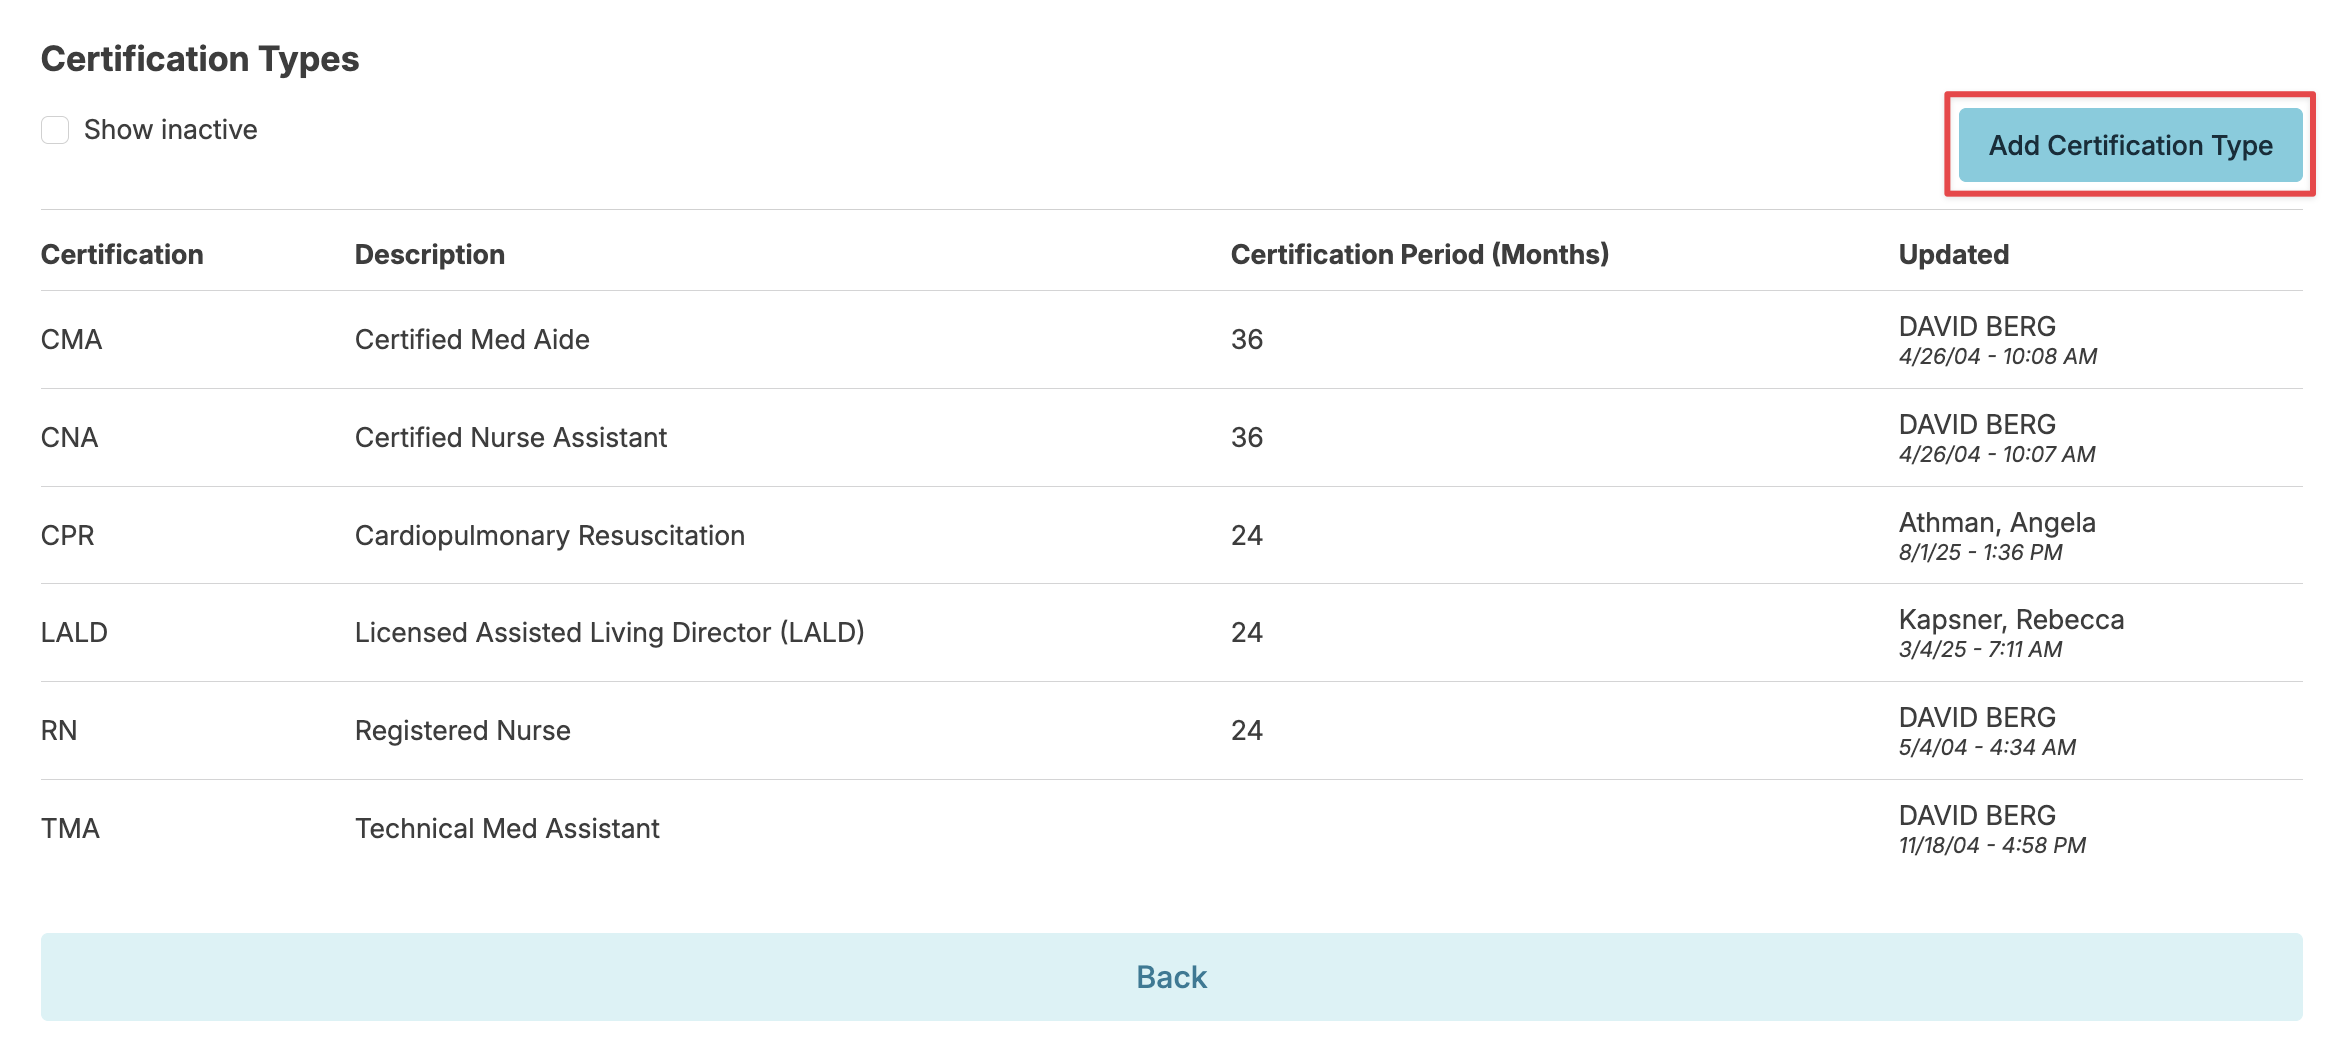
- Administrative users can manage certification types, maintaining a custom list for your organization, by clicking on the Manage button when recording a certification.
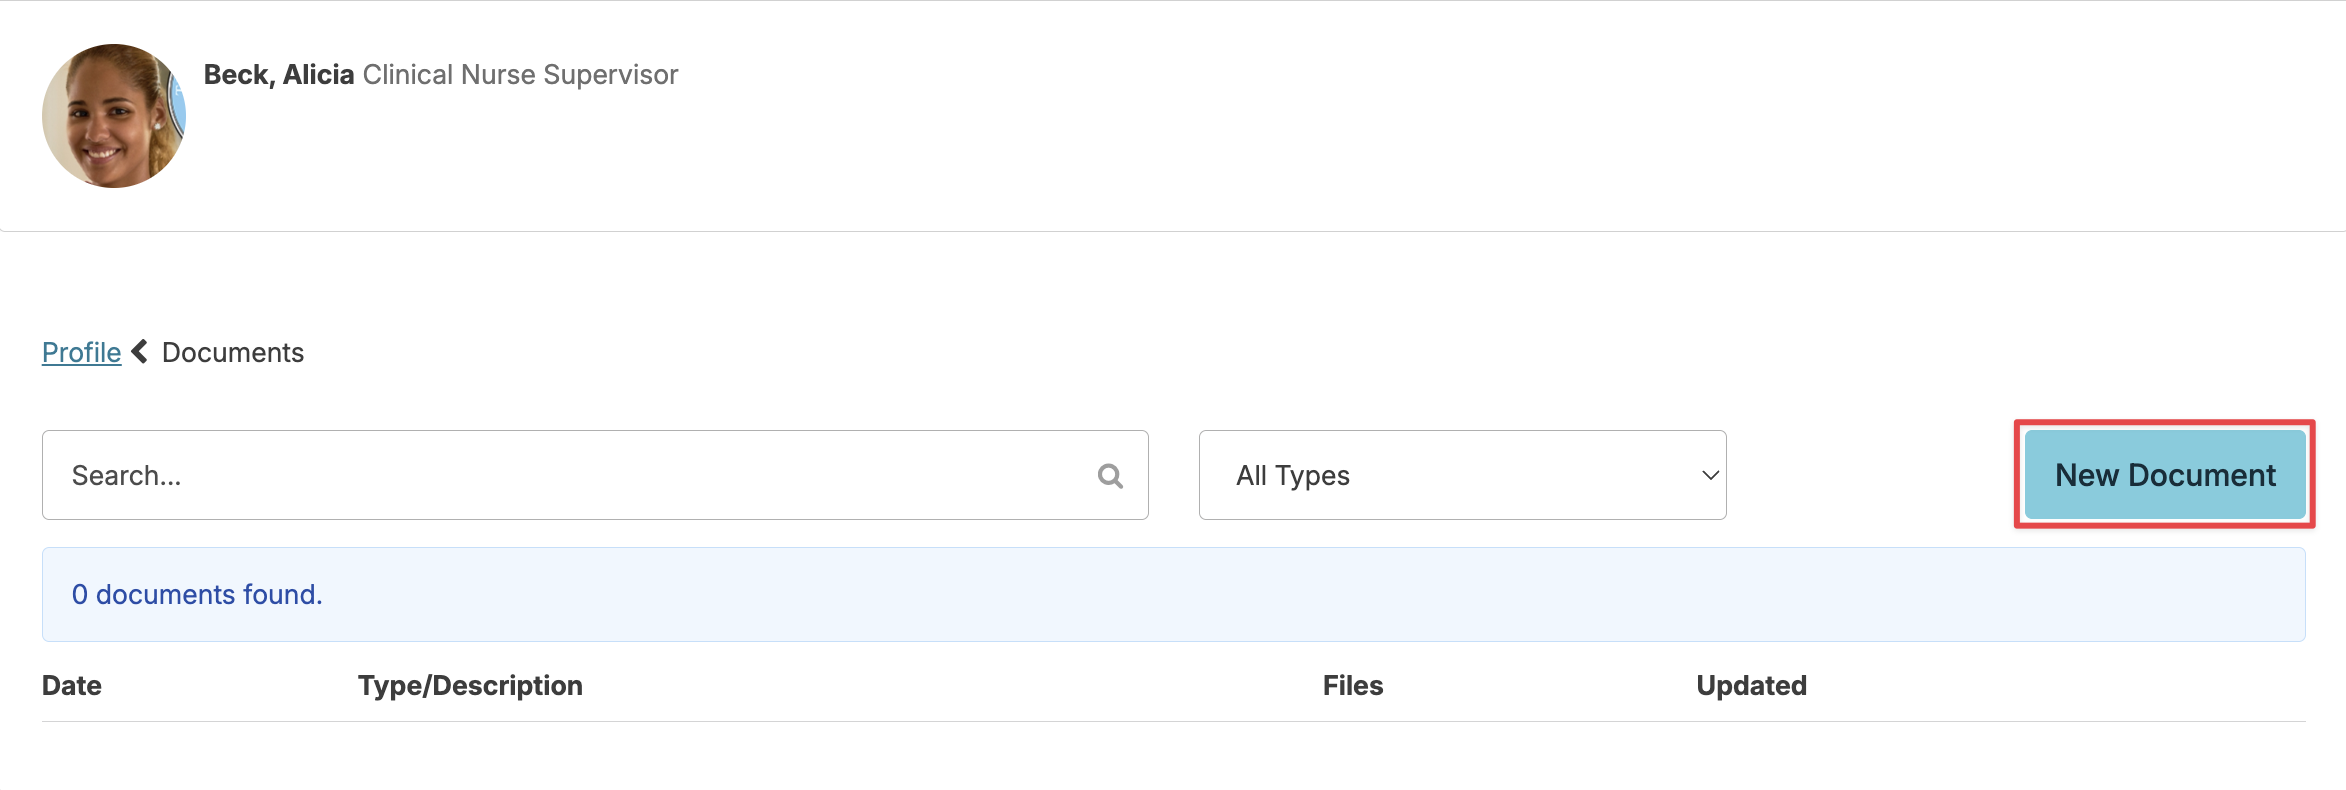
Staff Documents
Staff profile > Documents stores employment-related files (agreements, W-4 forms, etc.) and functions like the resident Documents section. Documents can be edited or deleted by the uploader, Manager (Role 11), or Supervisor (Role 13). Users with Administration Role 411 can manage staff document types by navigating to Admin > Document Types.
From the Documents screen, you'll see files available at your access level. Click any document to view, delete, or edit details. To add documents, select New Document > drag-and-drop or upload from your device > add labels and categories > Save.
Health
Staff profile > Health allows you to track staff-specific health details that relate to their ability to provide care, such as:
- Allergies
- Tuberculosis Testing - Scheduling due dates, recording test results, viewing history, and documenting chest x-rays
- Vaccination History - Administrator (Role 411) users can manage the types of vaccines being tracked. Staff can record administration dates, vaccine types, administered/declined status, plus details like manufacturer, injection site, and additional information.

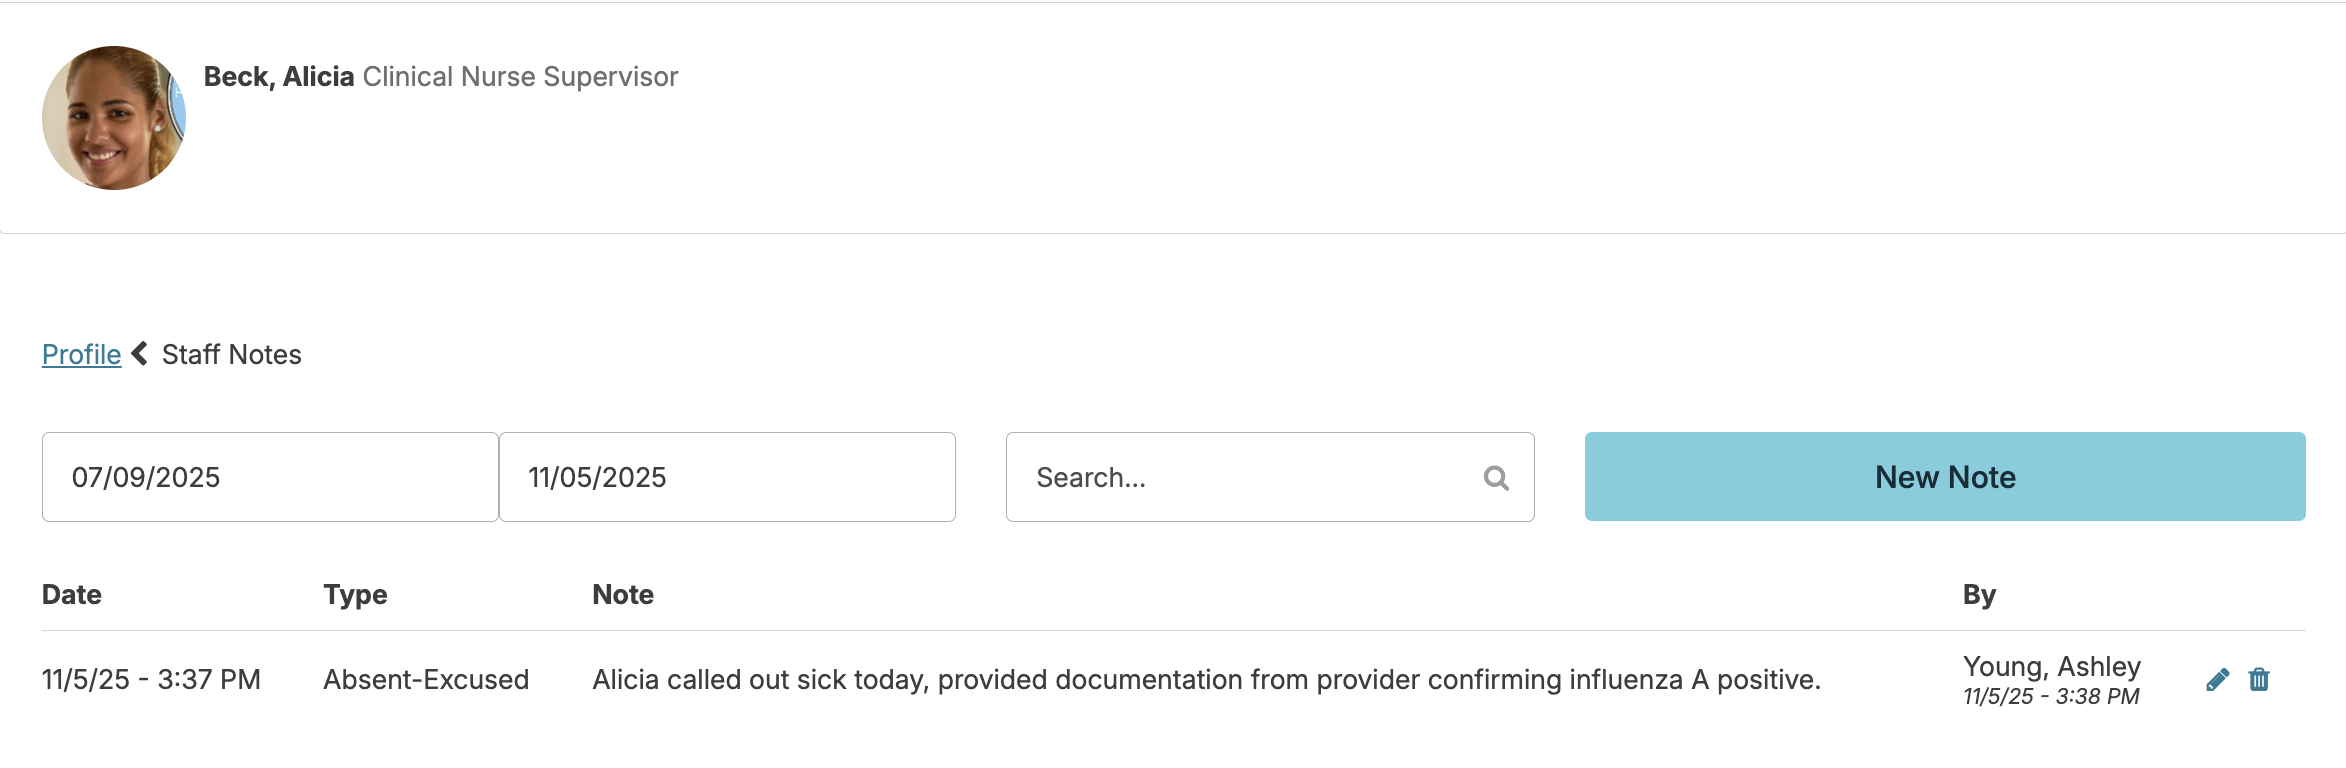
Notes
Staff profile > Notes allows users with appropriate permissions to document staff-related notes (e.g. attendance issues, conversations, disciplinary actions, etc.) This feature looks and works much like resident notes.
- The Notes screen will allow you to view the history of previously recorded staff notes, filter by date range and search for specific text.
- The New Note button allows authorized users to record additional notes and associate them to a relevant note type.
- Users with Administrator (Role 411) can click the blue Manage next to the 'Type' dropdown menu to add, or edit note types and/or their templates. Note types that have never been used can be deleted.
- Notes can be edited by the author for a specified period of time (determined by your organizations custom settings by using the pencil icon to edit).
- A note can be deleted by its author using the trashcan icon to delete.
- Notes can be mass added by entering the note for one staff > click the box next to Add this note to additional staff > select individual staff members or check the box next to Toggle all to select all staff members to copy the note to.
Manage Note Types
Users with Administrator (Role 411) can manage note types from the Admin > Staff Note Types screen. This includes adding new notes types, adding note templates, and managing which provider types can view and/or enter note types.
You can create a new note template by selecting the Add Note Type button or update an existing note template by selecting the blue pencil to the far right of the specific note type you wish to edit. Creating note templates, or outlines, can prompt staff to include certain details when entering a note. Structured notes like this are handy for admission notes or care conference notes.
Resident note types allow you to:
- Organize resident notes
- Pull notes of specific type(s) into relevant reports
- Limit access to certain note types to only administrators
- Create a structured note template of required elements for staff to follow when entering notes of that type.
To Manage Note Types navigate to Admin > Staff Note Types
Select a Type to edit:
- Make a Type Active/Inactive
- Setup structured Note Templates
- Limit Visibility of Notes belonging to the Type to Administrators only
Add a new type by selecting the Add Note Type button.
Training
Staff profile > Training provides a personalized training record that includes:
- Training Summary - Shows clinical LMS or in-service training completed
- Clinical LMS - Shows completed clinical LMS courses and total contact hours
- In-Service Training - Shows completed in-service training and total contact hours
- Competencies - Shows competency history and allows for new competency documentation
- Meetings - Shows a summary of meetings and meeting details
- Residex LMS - Shows Residex LMS courses assigned and course status

Nurse Delegation
It is the responsibility of the RN to ensure staff are trained and competent before services and treatments can be delegated to them. We'll discuss how Residex offers the nurse several tools to accomplish delegation and safe patient care.
Orientation
Staff orientation should be complete, informative and as efficient as possible to get new staff out on the floor. Residex offers several tools:
- Policy/Procedure Review - Certain Policies and Procedures can be pushed out to new staff to review and acknowledge. Just click the Populate Policies button in that new employee's staff profile. Staff review and acknowledge that procedure from the Today > Assignments screen, and the report 'Policies Reviewed One Staff' will display those completed reviews.
- Staff Training - Document staff training by navigating to Staff > Staff > staff profile > Training > In-Service Training. You may choose to make one entry to document an orientation or break it down by topic. Curriculum can be saved as a campus document.
Competency Testing
Staff Competency Testing - Any policy/procedure classified as a type with the term 'procedure' in the name will automatically be visible to document as a competency from the staff profile > Training > Competencies screen. Document the successful demonstration of delegated skills here.
Supervision
- Staff Supervision - In the staff profile allows the nurse to intermittently document the supervision of staff performing a delegated task or service. Set next due dates and receive reminders to do those at appropriate intervals, or choose to document a new supervision if the staff person is involved in an incident or error.
- Get reminders for annual performance reviews from the Dashboard/Login Report, 'Staff Evaluation Reminders.' Gather data for the review from staff supervisions and reports such as 'Staff-Related Incidents' or 'by provider' reports.
Communicating Ongoing Changes and Concerns
Surveyors may ask 'how do you alert your staff to changes in the service plan/plan of care/resident condition? Residex offers a number of ways staff can be informed and remain in-the-know.
- Services and medications added to the resident service plan are flagged as 'New' on the Today > Assignments screen for 7 days.
- The Dashboard/Login Report can include report options such as 'Med Changes in the last 3 days,' 'Service Additions and Changes,' 'Vitals Out of Range,' alerting staff of these changes.
- The Login Report can also include the last 3 days of Resident Notes entered.
- The 'Master Care Plan' that is pushed out to staff with the completion of each clinical reassessment, flags changes in the resident condition and care plan.
- Staff meeting minutes and attendance can document information shared. If the staff weren't able to attend? Send minutes as a snap message.
- The 'Ongoing Orders' field from the resident profile will display in every service for that resident, keeping need-to-know information front and center.
- Bulletins added for a resident appear in the Resident Profile, in any service for that resident, and can appear in the Dashboard/Login Report. A report 'Bulletin History by Resident' will show all bulletins for that resident in a selected date range.
Supervision and Training
Record Staff Supervision
Whether required by state licensure rules or conducted as a best practice, the ability to document supervision of unlicensed, direct-care staff performing delegated nursing services is an important practice, and can be done in Residex.
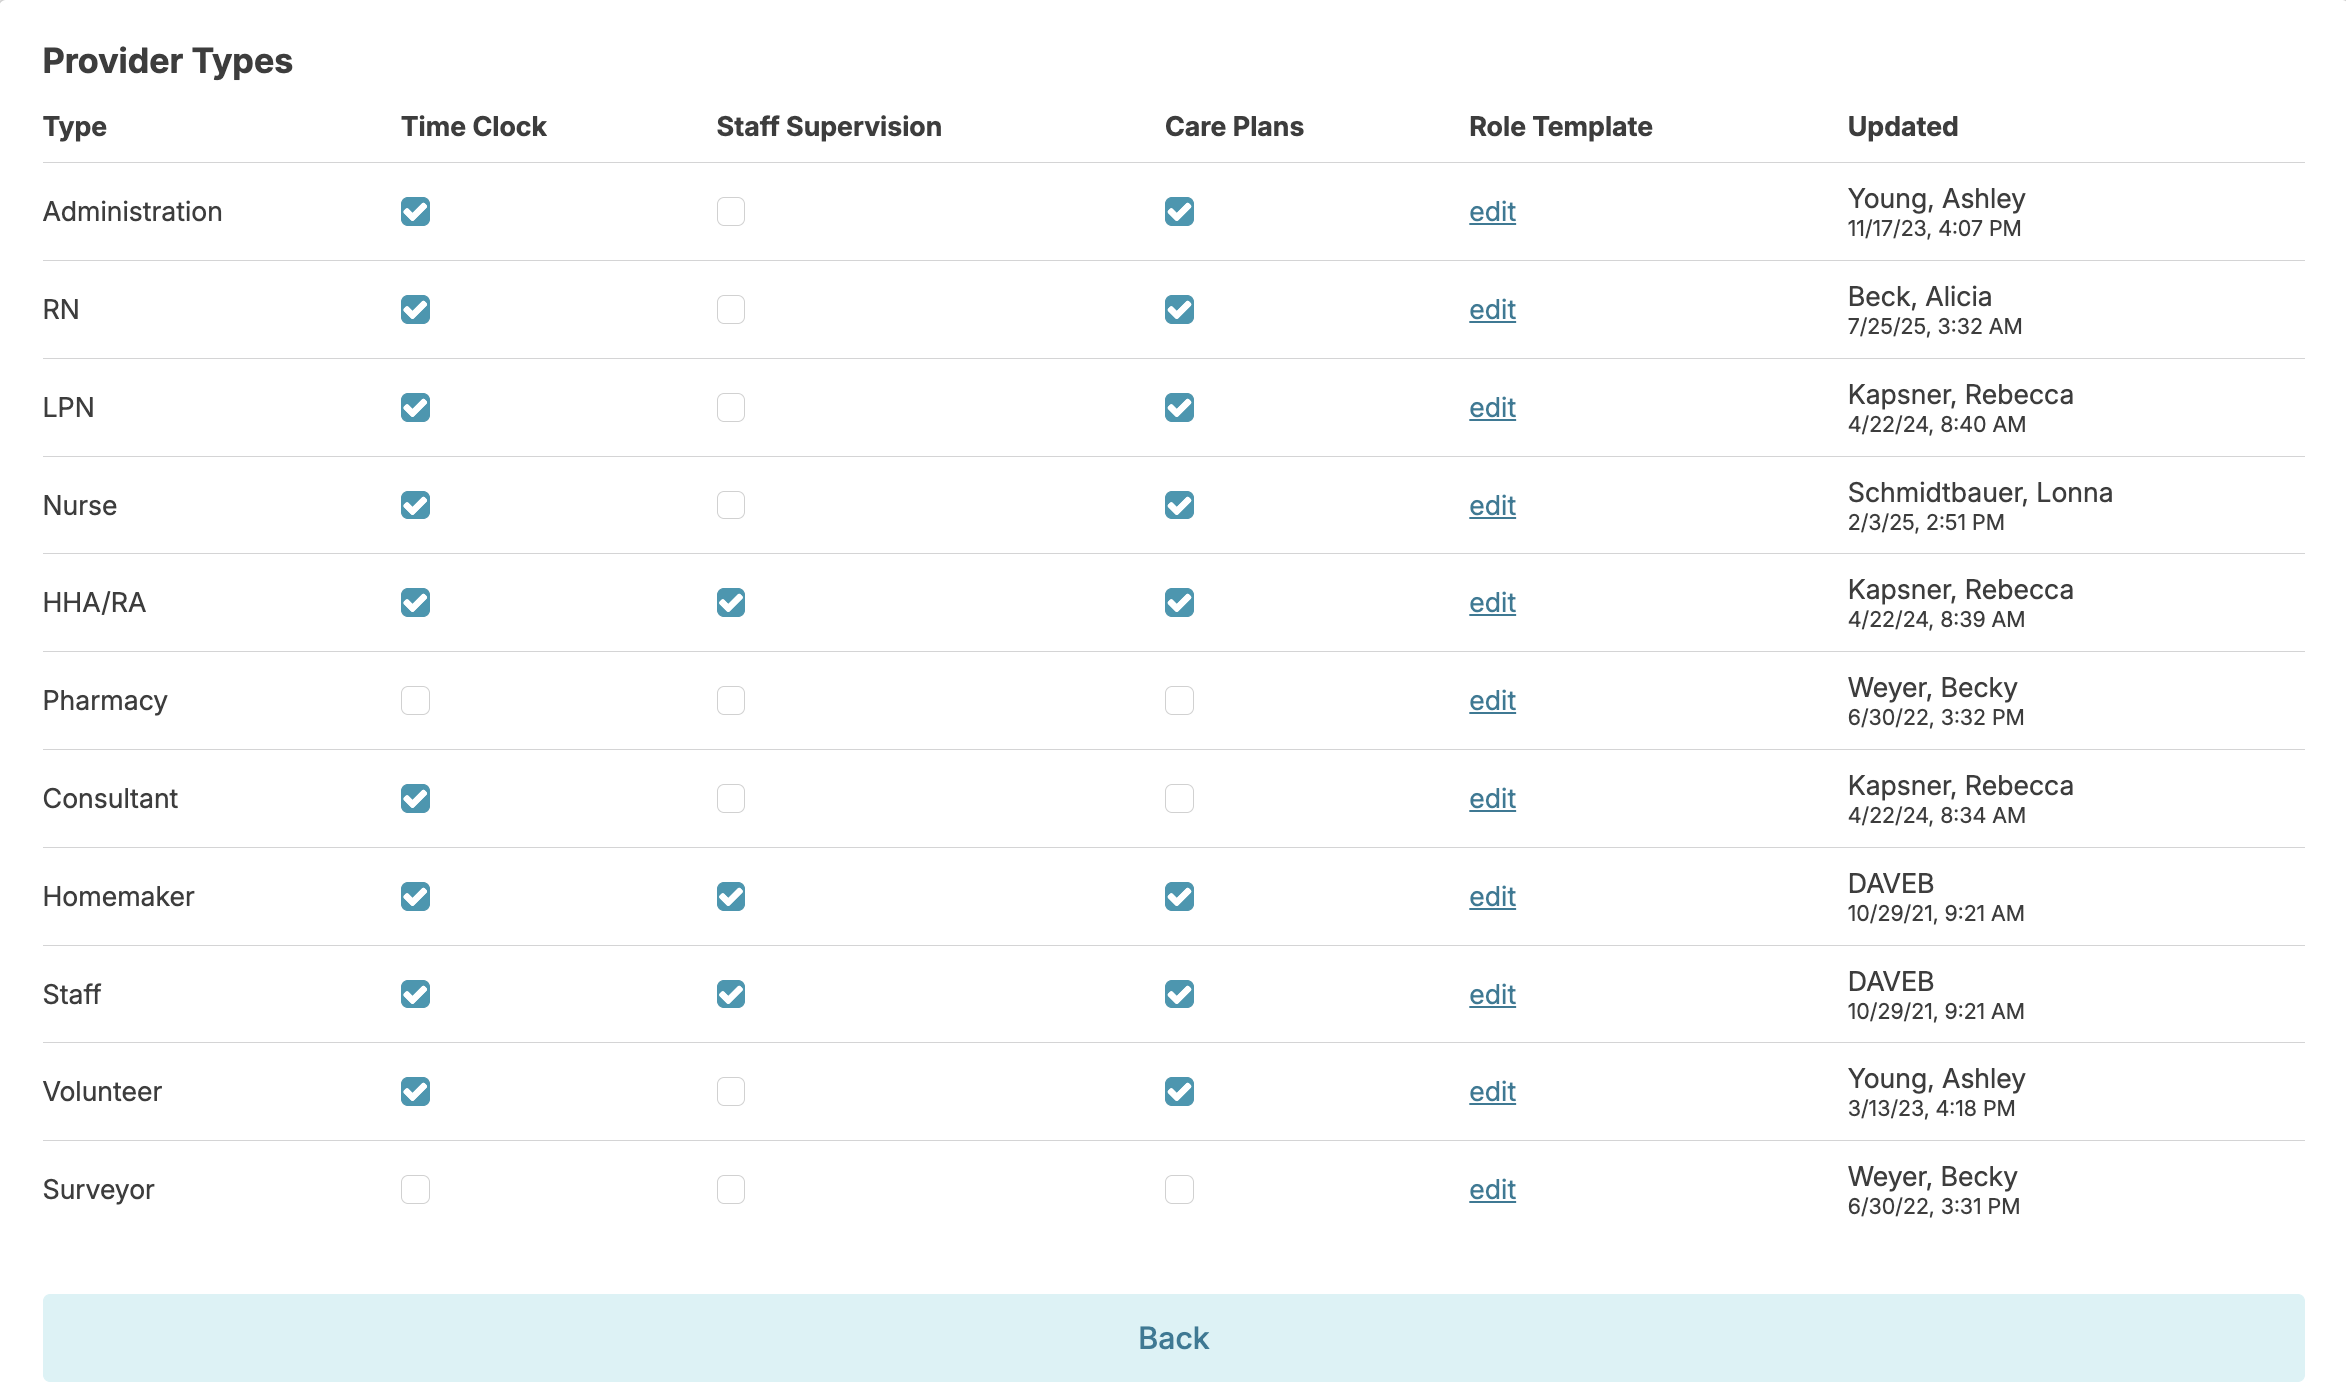
First, you can specify which provider types will require supervision in your database. Users with Administrator (Role 411) can manage this by navigating to Admin > Provider Types and selecting the box next to each provider type for Staff supervision.
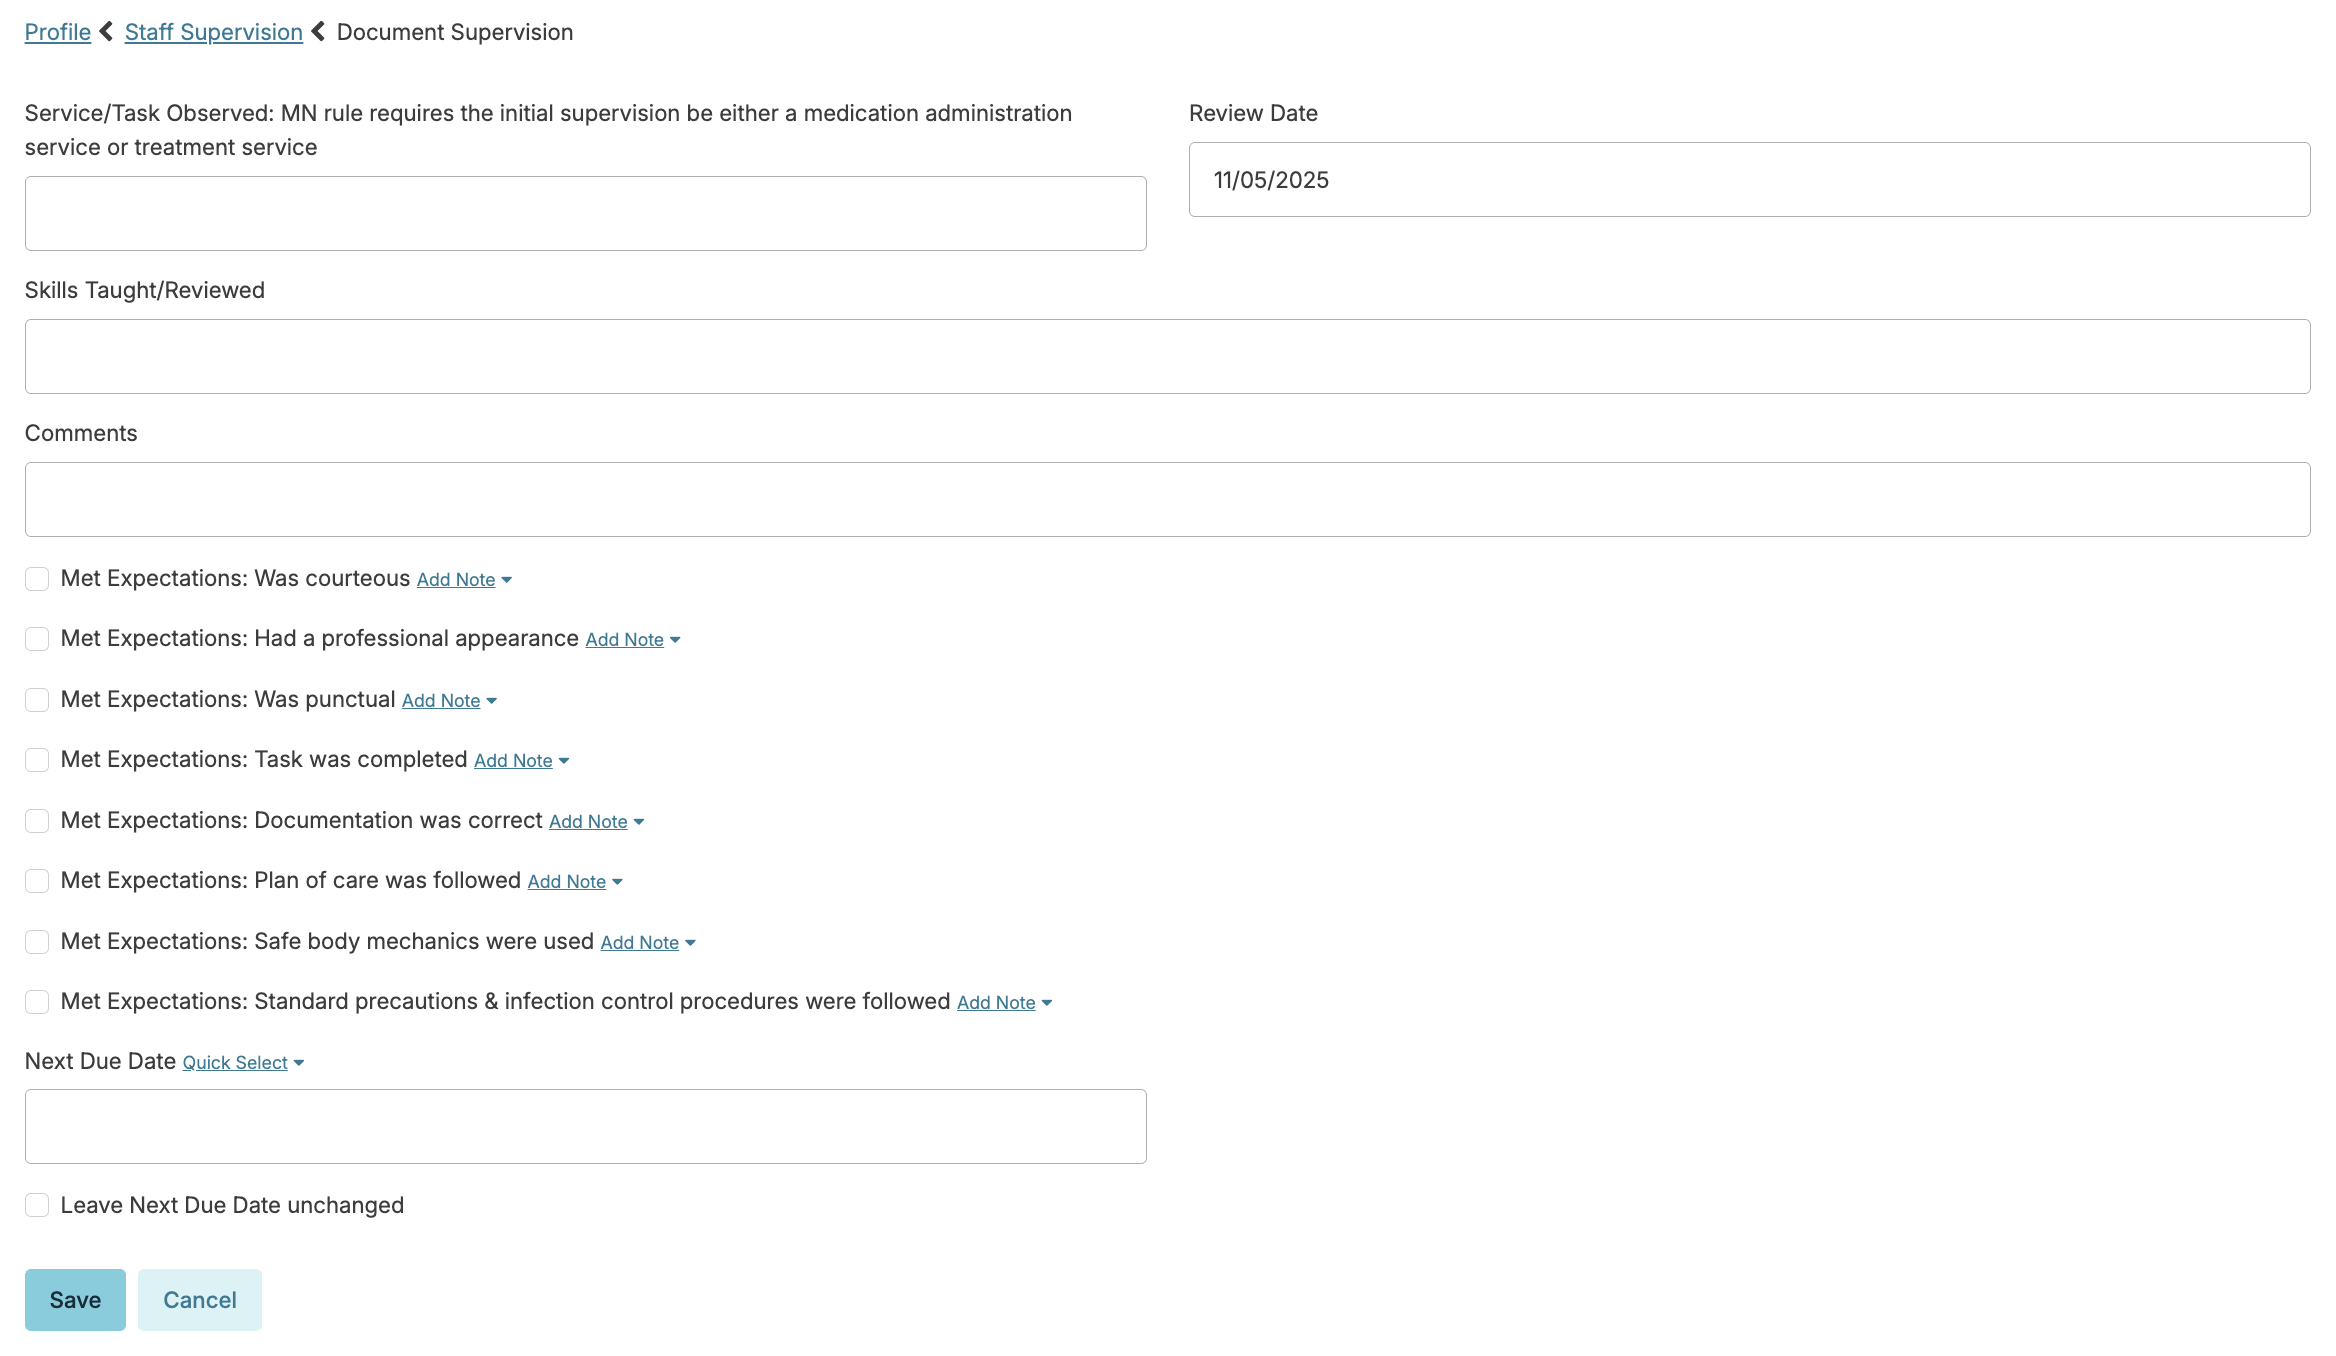
To document the supervision of a staff, navigate to Staff > Staff > staff profile > Staff Supervision.
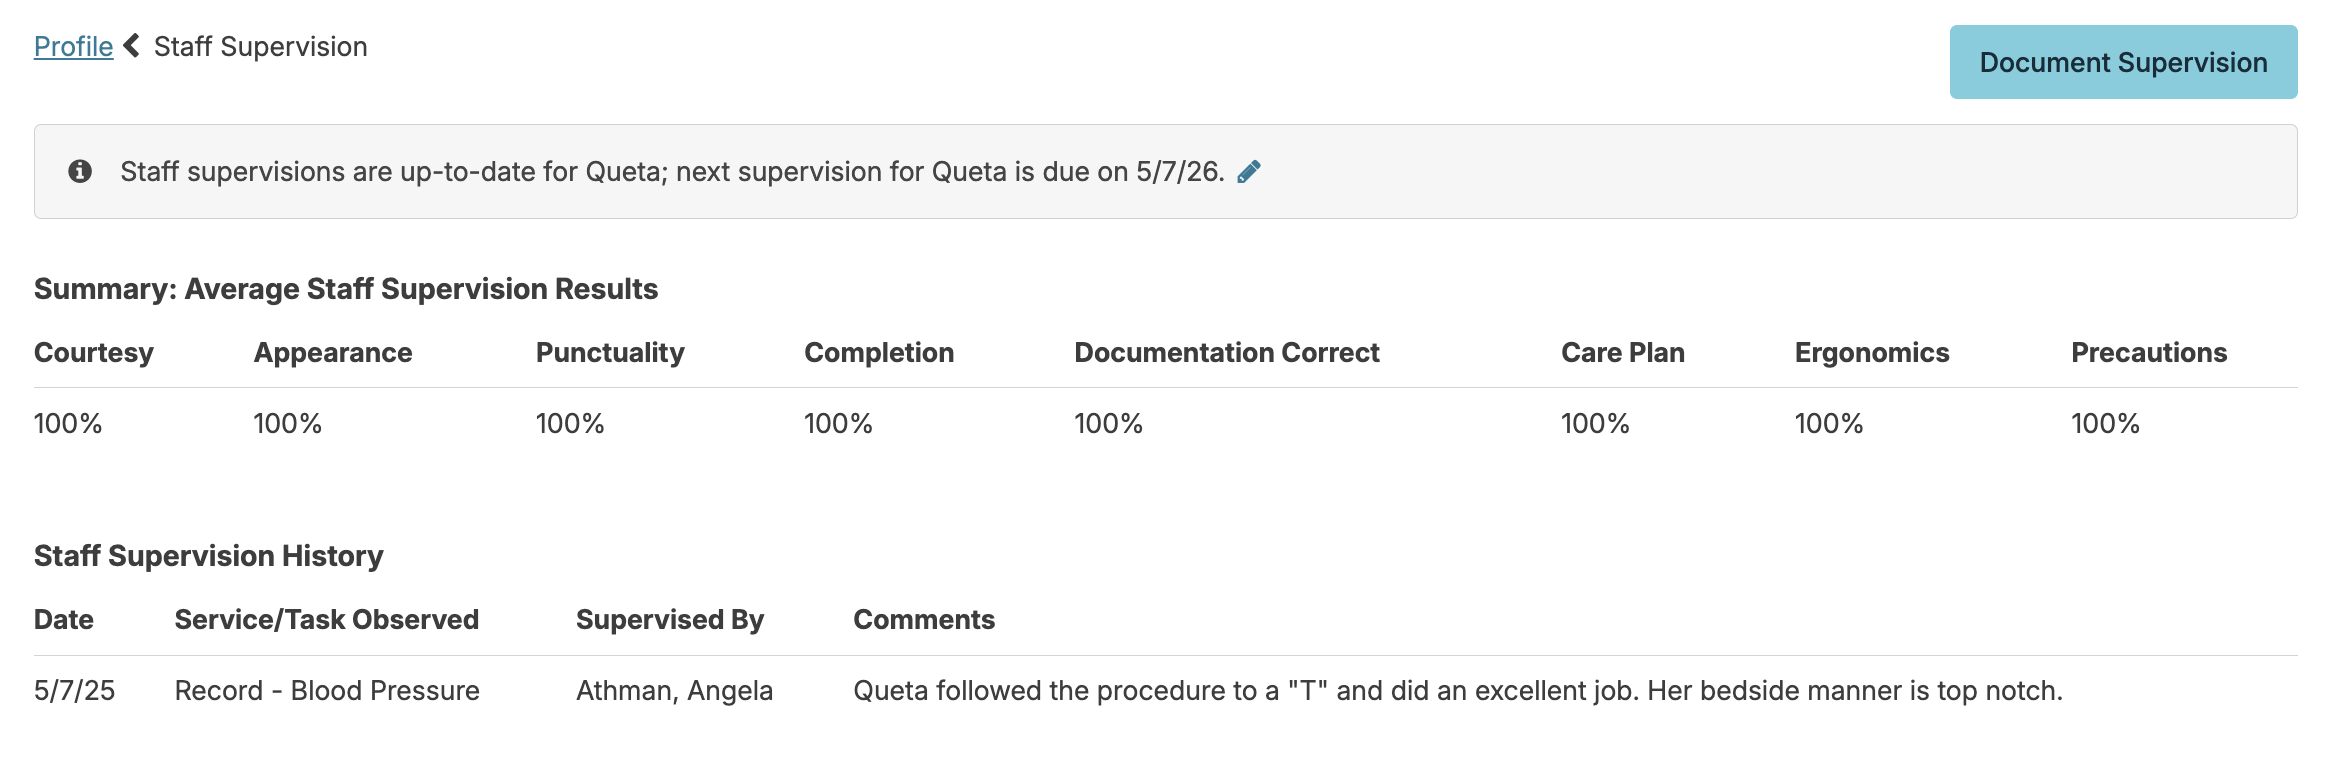
On the staff supervision screen, you will see a summary of past supervision results. You can click on any historical supervision to view the details or add notes, or press the Document Supervision button in the upper right to record a new supervision.
- When recording a new supervision, you can describe what the staff member was supervised in doing, when the supervision was recorded, what teaching you provided (if any), any comments /notes, specific expectations met (or not), and schedule the due date for the next Supervision for the staff member.
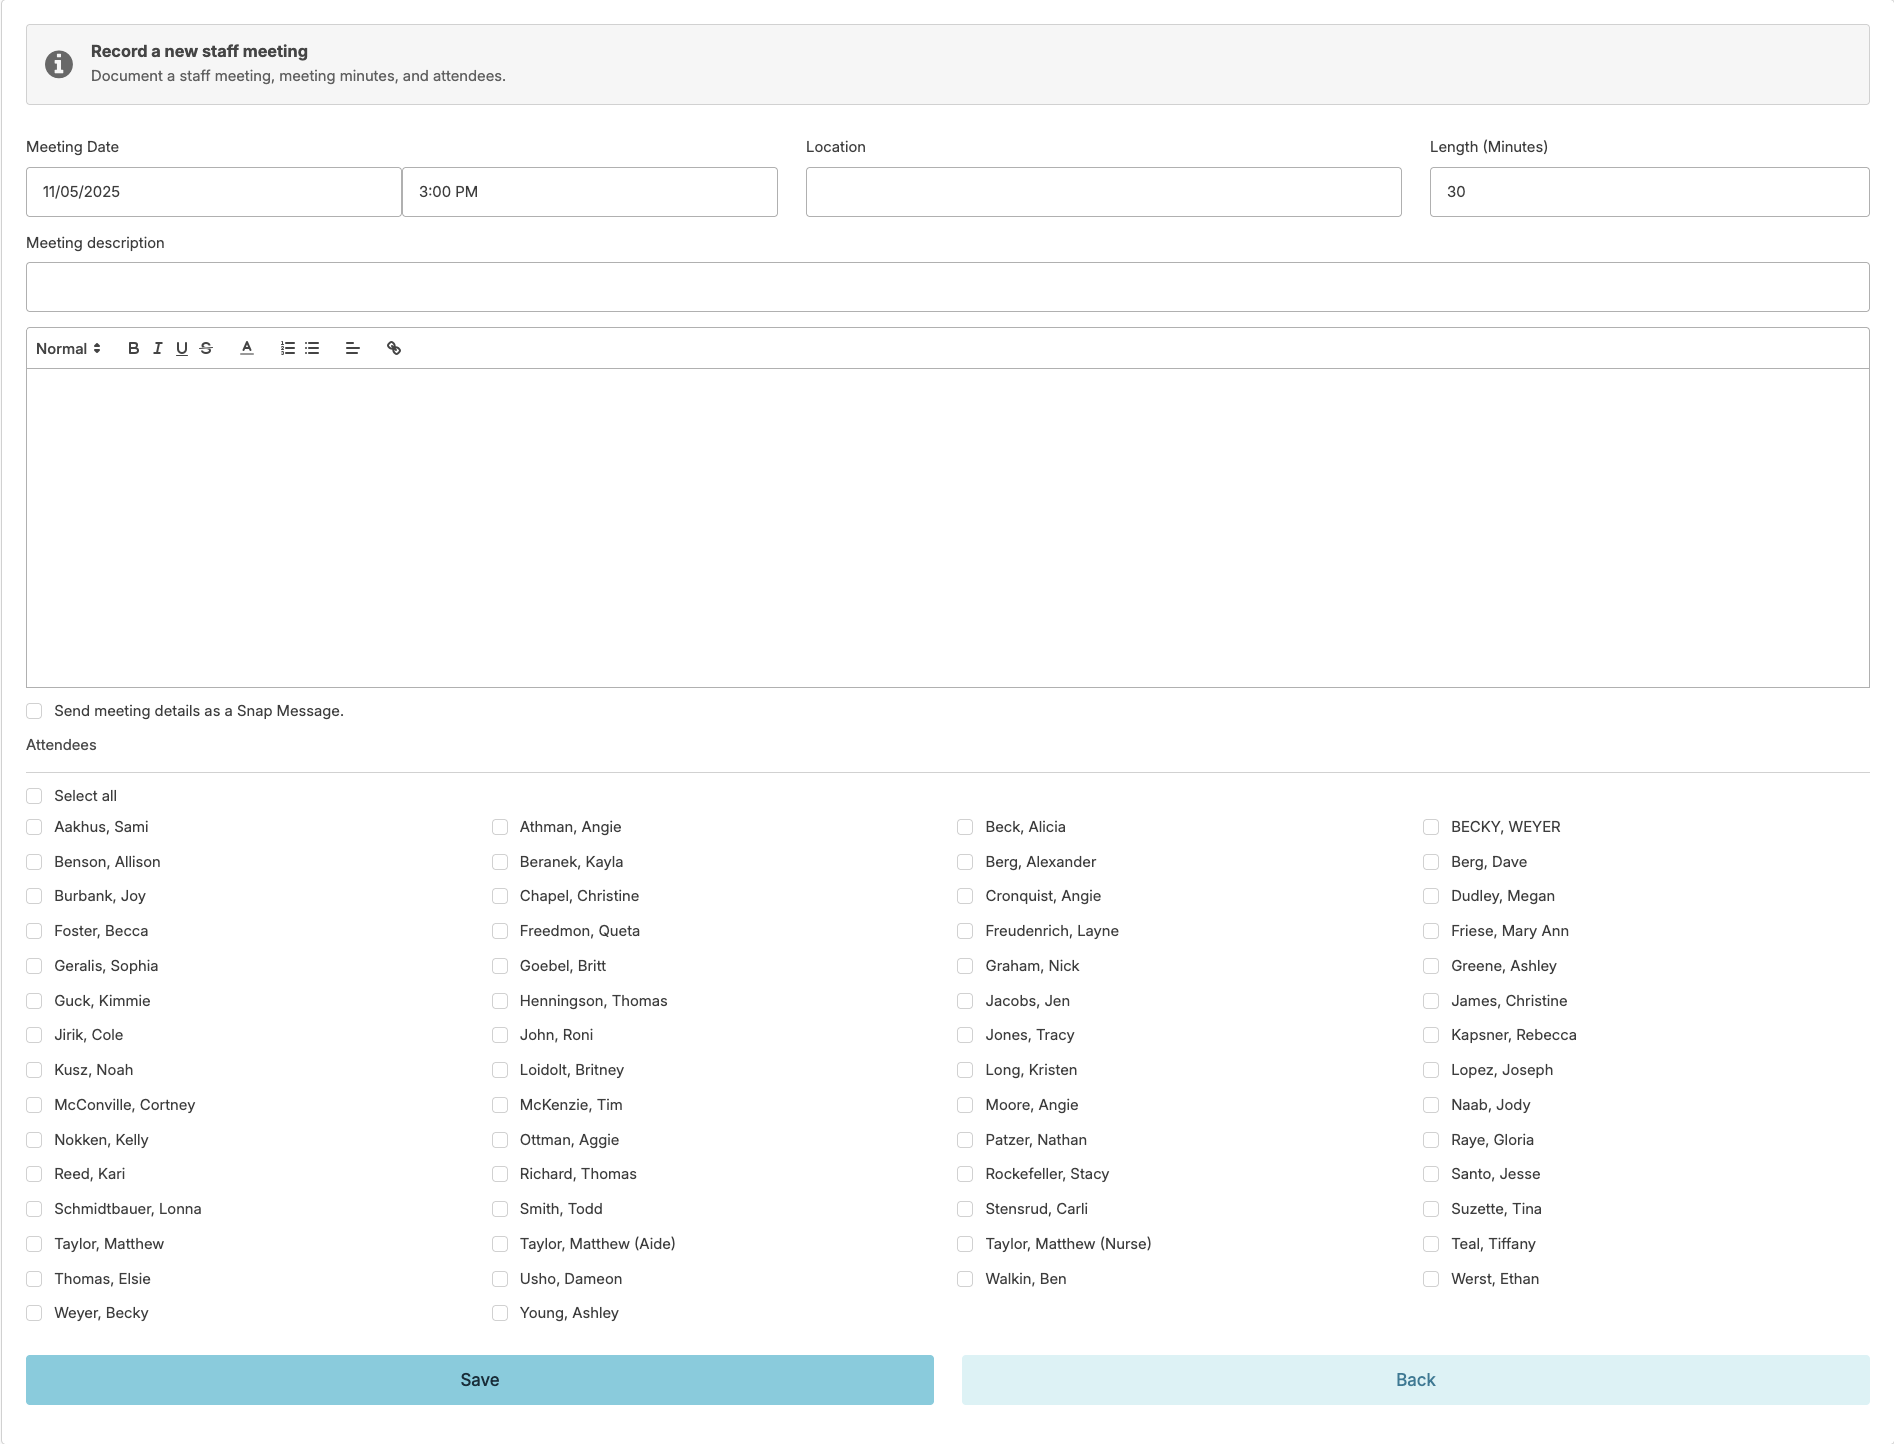
Staff Meetings
You can document staff meetings on topics such as routine operations, quality management activities, or long-range planning by navigating to Staff > Staff Meetings > Add Meeting or Staff > Staff > staff profile > Training > Meetings > New Meeting. From the staff profile, you can view the meeting attendance history for that staff member.
To document a meeting:
- Enter the meeting date and time, location, length (in minutes), description, and meeting notes.
- From there, you can select all of the staff members who attended the meeting and send the meeting notes to any/all staff.
- When you select Send meeting details as a Snap Message and click save, you will be brought to the snap message screen. You can select which staff needs to see the meeting notes. This allows you to send a message to everyone even if they did not attend the meeting.
In-Service Training
Managing Training Types in Residex
Training Types in Residex allow you to categorize and track staff training accurately, ensuring that the correct hours are reflected in staff profiles and training reports. Properly configuring a training type is especially important for specialized training such as dementia in-service sessions, which must be set up correctly in order to appear as Dementia Hours on the Training Summary tab within the Staff Profile.
Add a New Training Type
Before recording any in-service training, you must first create and configure the training type. This is done through the Manage Training area.
-
Navigate to Staff > In-Service Training.
-
Locate the Manage link next to Training and click it.
-
Click Add Training.
-
Complete the following fields:
-
Category – Select the appropriate category for the training.
-
Training Name – Enter a clear, descriptive name (e.g., Dementia Care In-Service).
-
Default Hours – Enter the standard number of hours for this training type.
-
Core Training – Check this box if the training is a core requirement.
-
Annual – Check this box if the training is required annually.
-
Site Mandatory – Check this box if the training is mandatory for your site.
-
Dementia – Check this box to ensure the training is counted toward total dementia hours and reflected accordingly on the Training Summary tab in the Staff Profile.
-
Description – Enter a brief description of the training content or purpose.
-
-
Click Save.
Important: The Dementia checkbox is what determines whether completed training hours are tallied as dementia hours on the Training Summary tab in the Staff Profile. If this is not checked at the training type level, the hours will not be counted toward the dementia total, even if the training covers dementia-related content.
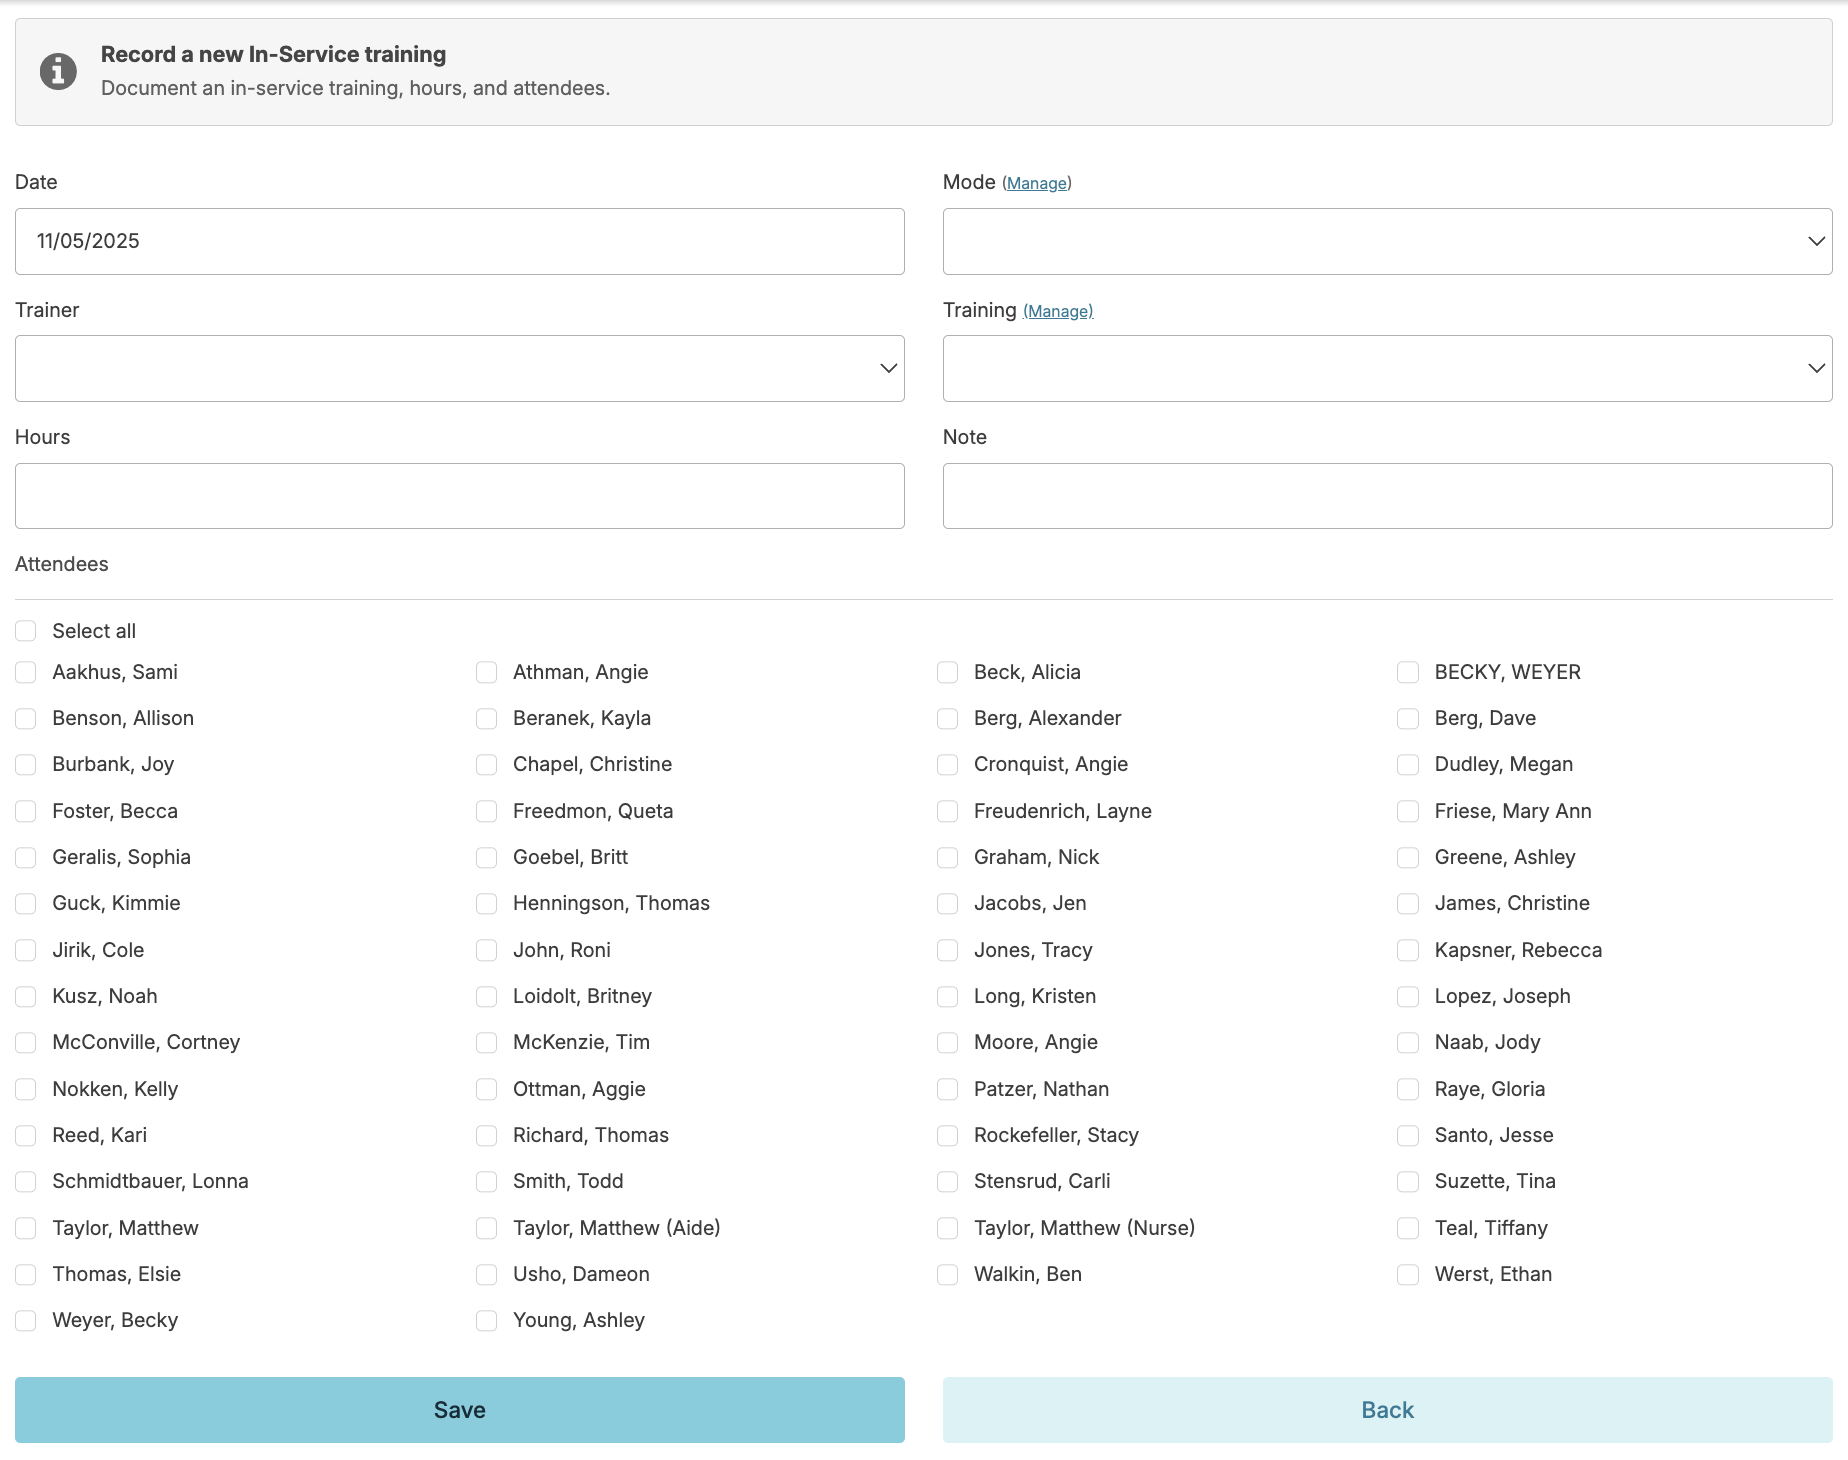
Record the In-Service Training Session
Once the training type has been created and configured, you can record the actual training session.
-
Navigate to Staff > In-Service Training.
-
Click Add Training.
-
Complete the following fields:
-
Date – Enter the date the training took place.
-
Mode – Select the appropriate delivery method (e.g., Classroom).
-
Trainer – Enter the name of the trainer or facilitator.
-
Training Topic – Select the training type you created in Step 1.
-
Hours – Enter the number of hours completed.
-
Notes – Add any relevant notes about the session.
-
Staff Attendees – Be sure to specify all staff members who attended the session.
-
-
Click Save.
Additionally the in-service training can be recorded by navigating to Staff > Staff > staff profile > Training > In-Service Training here you will also see the history of trainings attended by that staff member.
With clinical LMS enabled, you can host group in-service trainings of a clinical LMS course and document this as an in-service training using the Mode 'Clinical LMS', which will display the list of courses in the Training dropdown. If you are using this method of completing a clinical LMS course, you can run the report Clinical LMS - Paper Test to test your staff.
Staff Competency Documentation
Documentation of an unlicensed staff's competency in performing delegated procedures (e.g. vital signs, oxygen management, med administration) can be recorded in Residex. Residex essentially links a Policy document to the staff competency feature in Residex.
Enter Procedures
Competencies are determined by the policy type chosen when entering policies/procedures in Residex. By specifying a policy type that includes the term 'procedure' in the name, it will be recognized by Residex as a skill that might require competency testing.
Document Competency
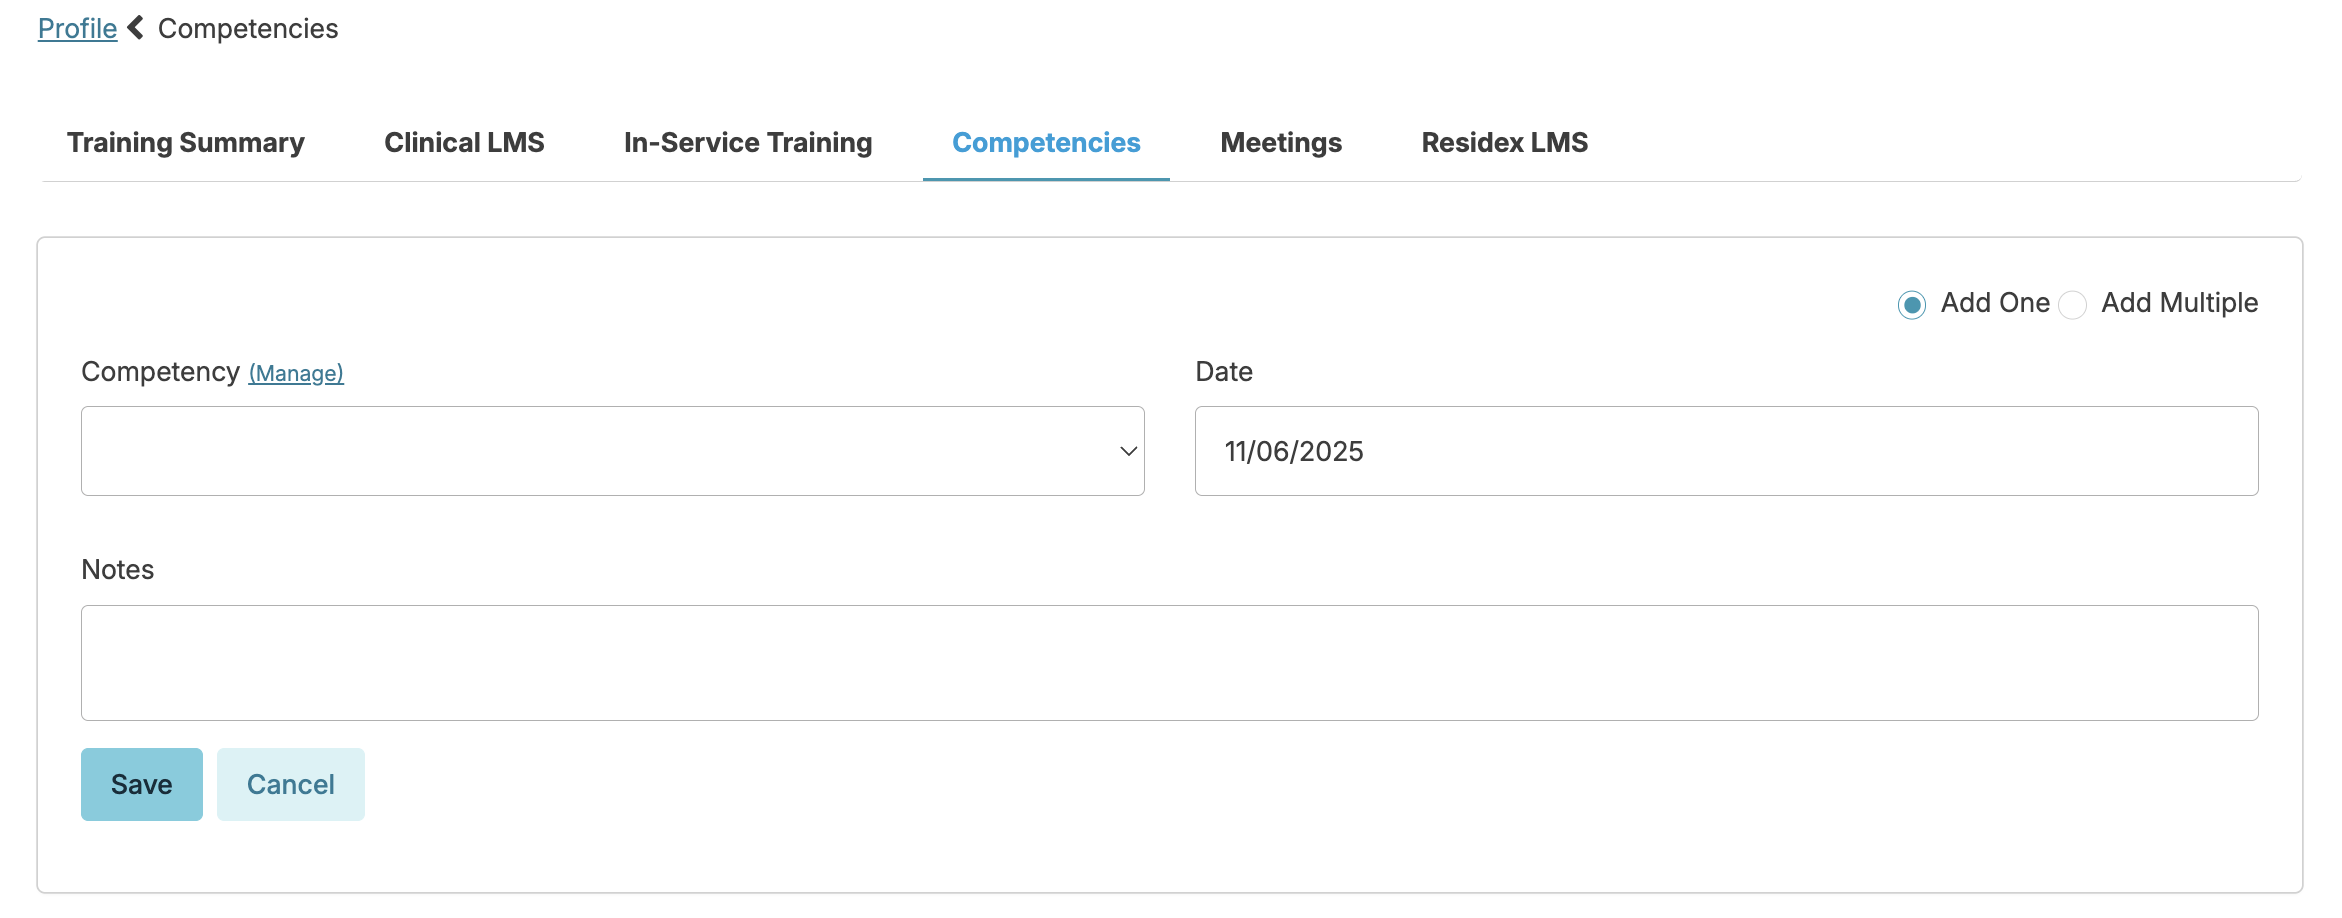
Navigate to Staff > Staff > staff profile > Training > Competencies > Add Competency.
- Select a competency - Selecting a competency will produce the link to that policy document, visible as a blue banner/link
- Select the issue date
- Click competent if they successfully demonstrated competency
- Enter additional details in the notes field
- Select Save
- If deeming staff competent, there will be an acknowledgment for the nurse/supervisor attesting that the staff person is trained and competent in performing the procedure.
- The staff deemed competent will also get an acknowledgment on their Today > Assignments screen for them to confirm and acknowledge their competency
- Reports can be pulled demonstrating a single competency or all competencies for a given staff member, or all staff competency tested for a specific skill. Details of the facility procedure (or links to the document) are included in these reports.
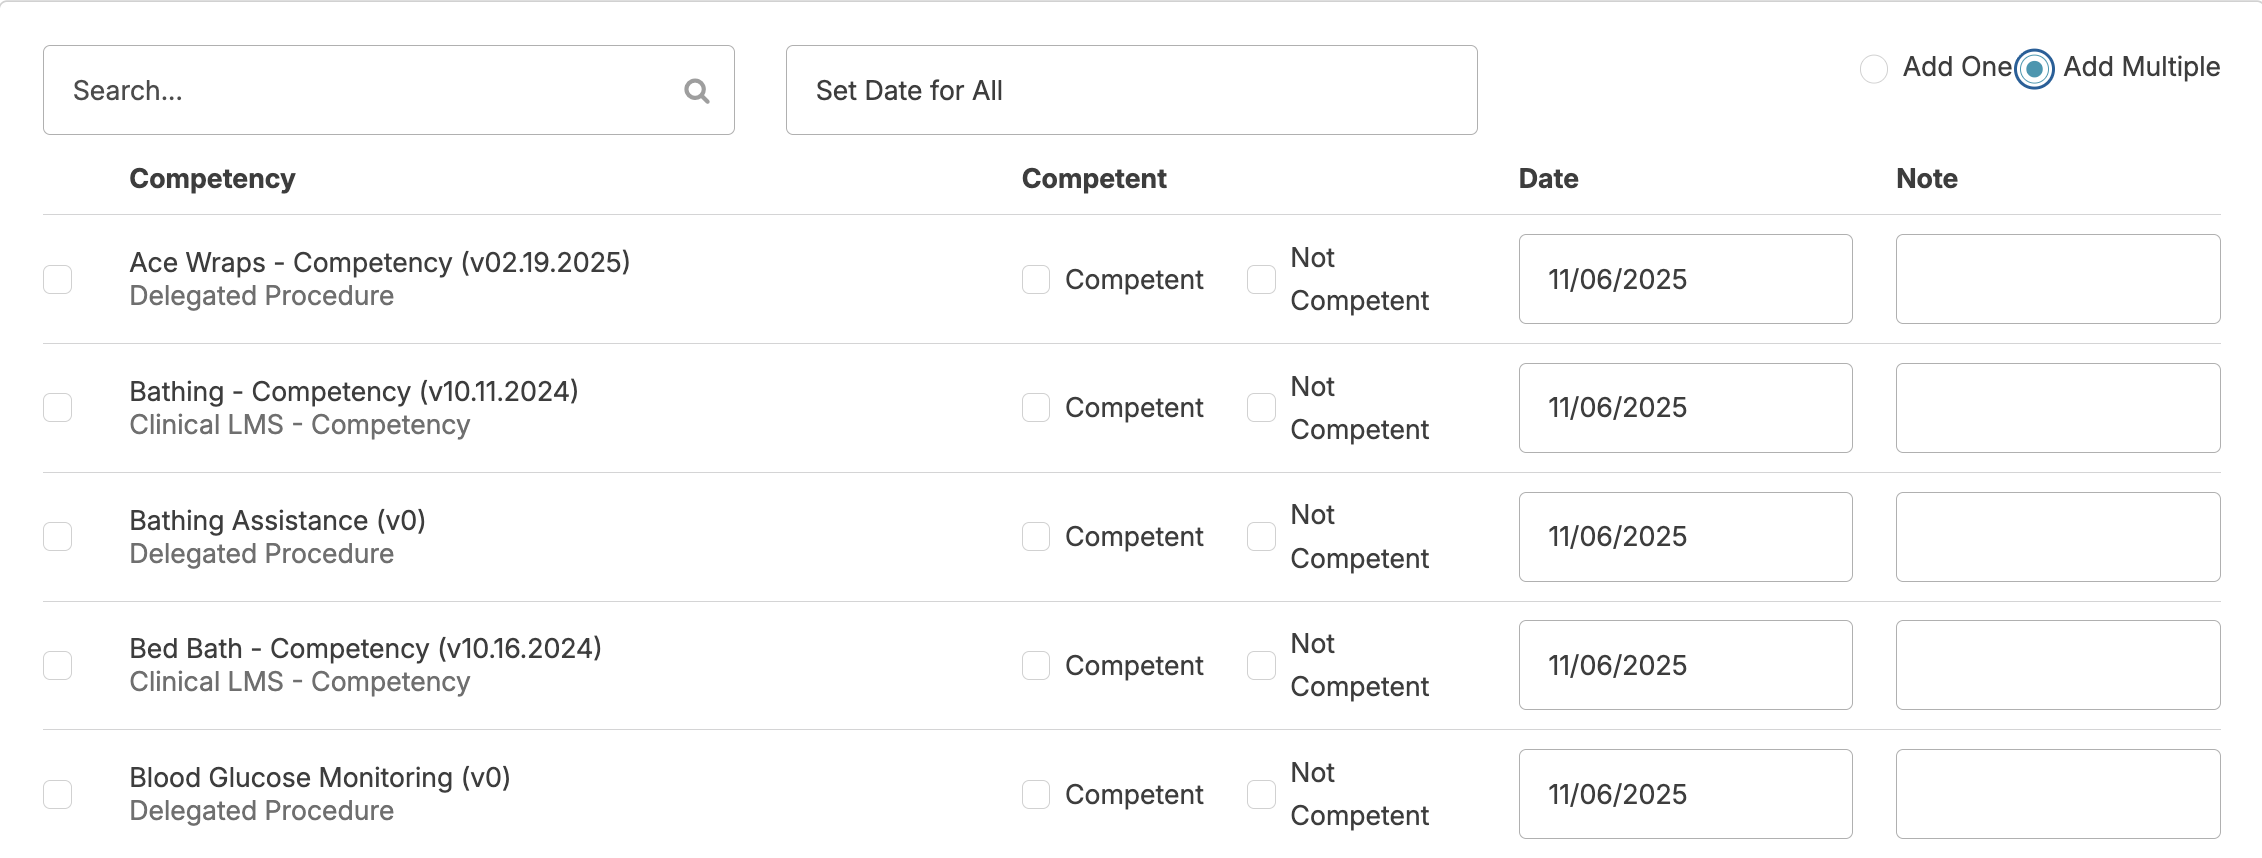
Document Multiple Competencies for One Staff
To add more than one competency at a given time for a single staff person, from the staff profile > Training > Competencies > Add Competency > toggle the Add Multiple competencies option.
- Check the competencies you wish to document
- Check whether they are Competent or Not Competent
- Enter notes, if applicable
- Press Save
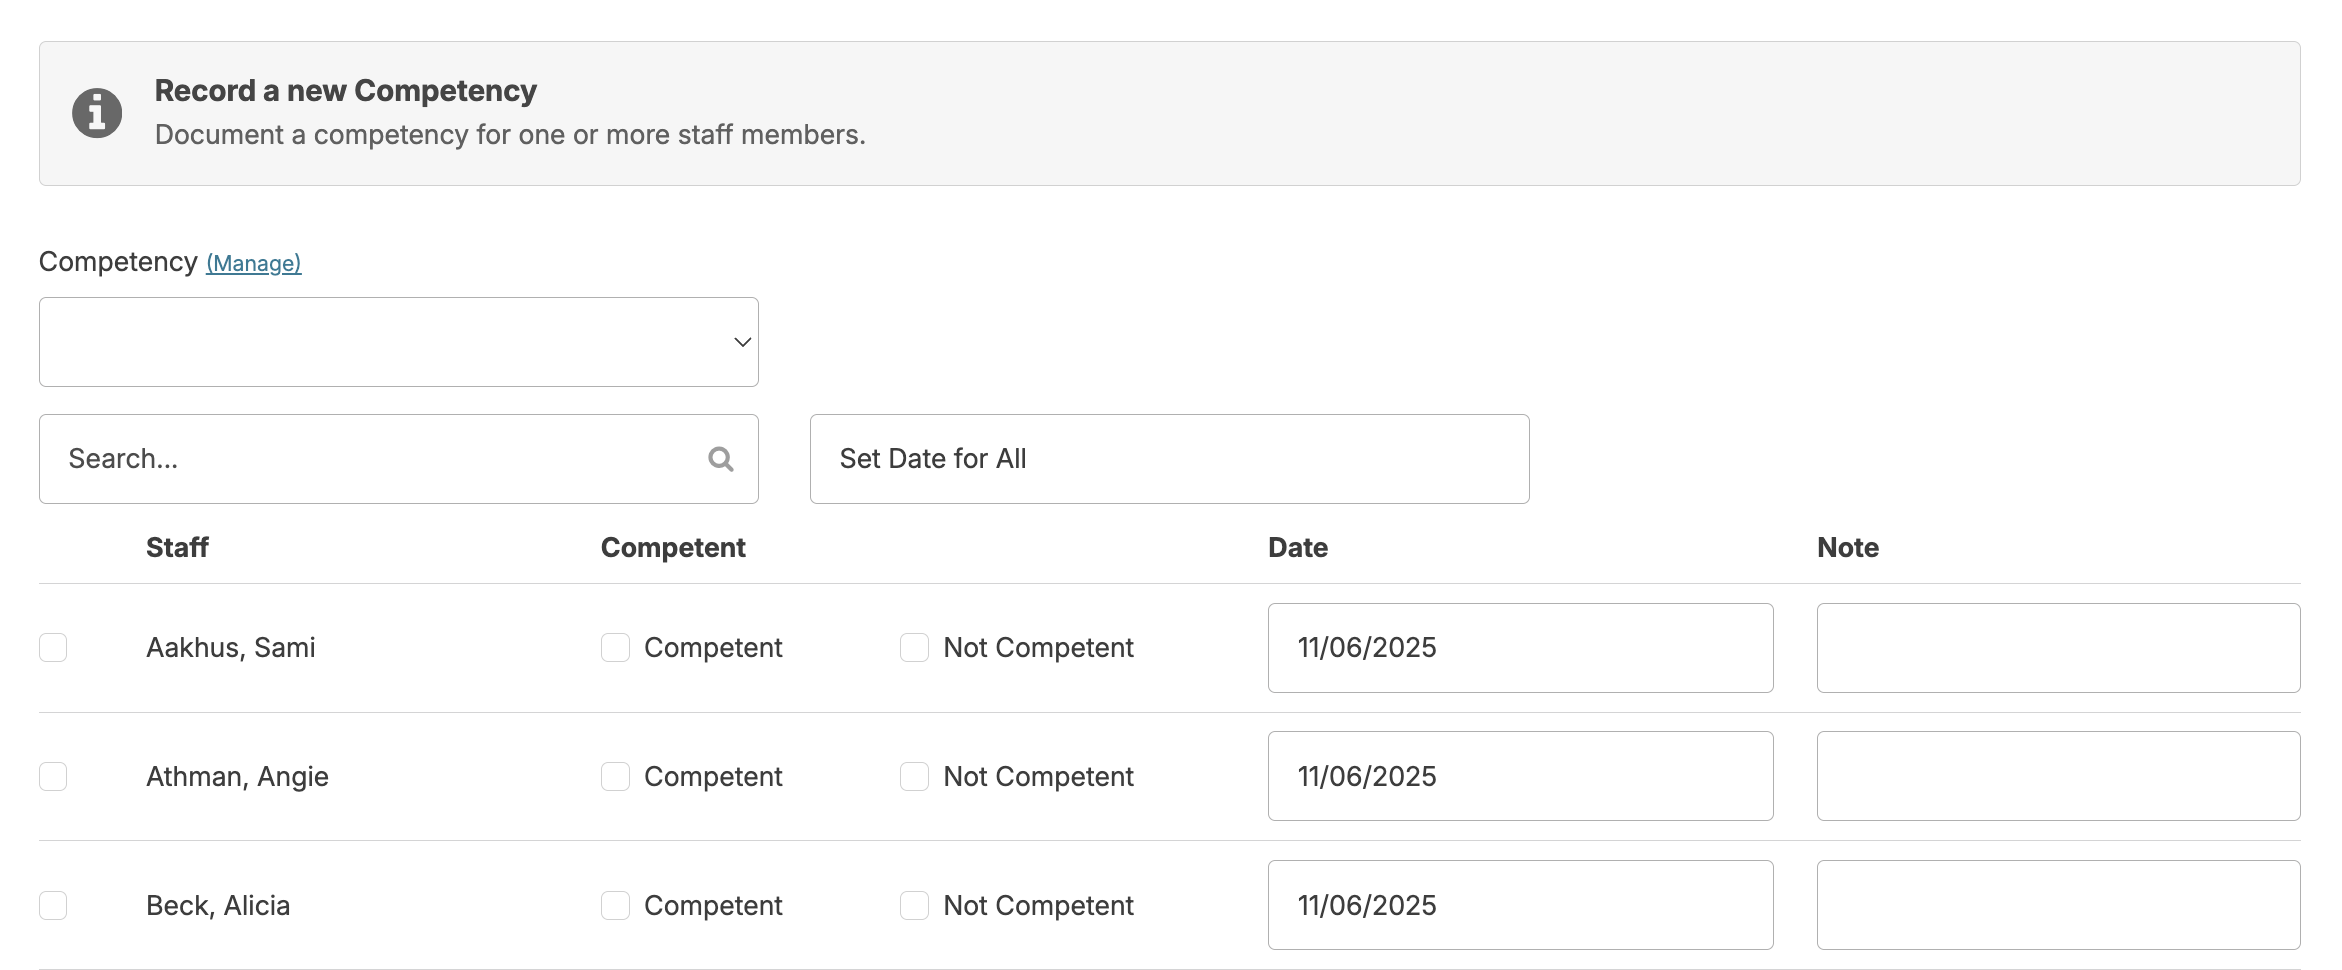
Document Single Competency for Multiple Staff
From the Staff > Staff Competencies screen, you can document a single competency for multiple staff at one time.
- Select competency
- Select the staff
- Select whether they were Competent or Not Competent
- Select date
- Enter note, if applicable
- Select Save
Note: You can only delete a competency within two weeks of documenting the competency. Navigate to the staff profile > Training > Competencies > select the competency you wish to delete > Delete.
Remote or Limited Access
You may choose to give the limited access partner access in Residex. This offers a couple of advantages:
- Remote access allows limited access partners such as medical providers, mental health professionals, or pharmacists to gather resident information and support continuity of care without requiring an on-site visit, saving time for both your facility and the partner while still ensuring they have what they need.
- You are in control of what access they have.
- Less time (and paper) is spent printing reports for viewing.
The process for setting up Limited Access:
- Enter the limited access partner as a Staff Person, Provider type 'Ancillary Staff'. Do NOT set up a generic login. Enter each limited access partner as an individual using their own name, giving their own unique access. In Security > 'Login and Access':
- Provide access for that person to login
- Do not check IP Address restrictions (to allow for a remote survey)
- Limit campus access to only the campus needed
- Under 'Resident Data Access', select ONLY the residents needed for the survey.
- Do NOT give any resident, staff, or other roles.
Assist the limited-access partner in logging in for the first time. Their view will be limited. They will:
- Not see a Login Report/Dashboard
- Not see services on the Today > Assignments screen (the provider type 'Surveyor' is at or near the bottom of the hierarchy)
- ONLY see the residents for whom they have been given access
- ONLY see the reports for which the provider type 'Ancillary Staff' has been given access
This article can be provided to them to give a quick overview of Residex. Any additional report that may be needed can be managed by your Administrator with (Role 411).