Table of Contents:
- Enter a Resident
-
Unit Transfer - Transferring a Resident Within a Campus
-
Convert a Prospect to Resident
- Campus Move | Import Resident
- Add Diagnosis
- Bulletins
- Resident Photo
- Resident Tags
- Resident Flags
- Emergency File
- Contacts
- Resources
- Global Resource Mangagement
- Managing Resident Status
- Resident Notes
- Resident/Prospect Documents
Resident Data Entry
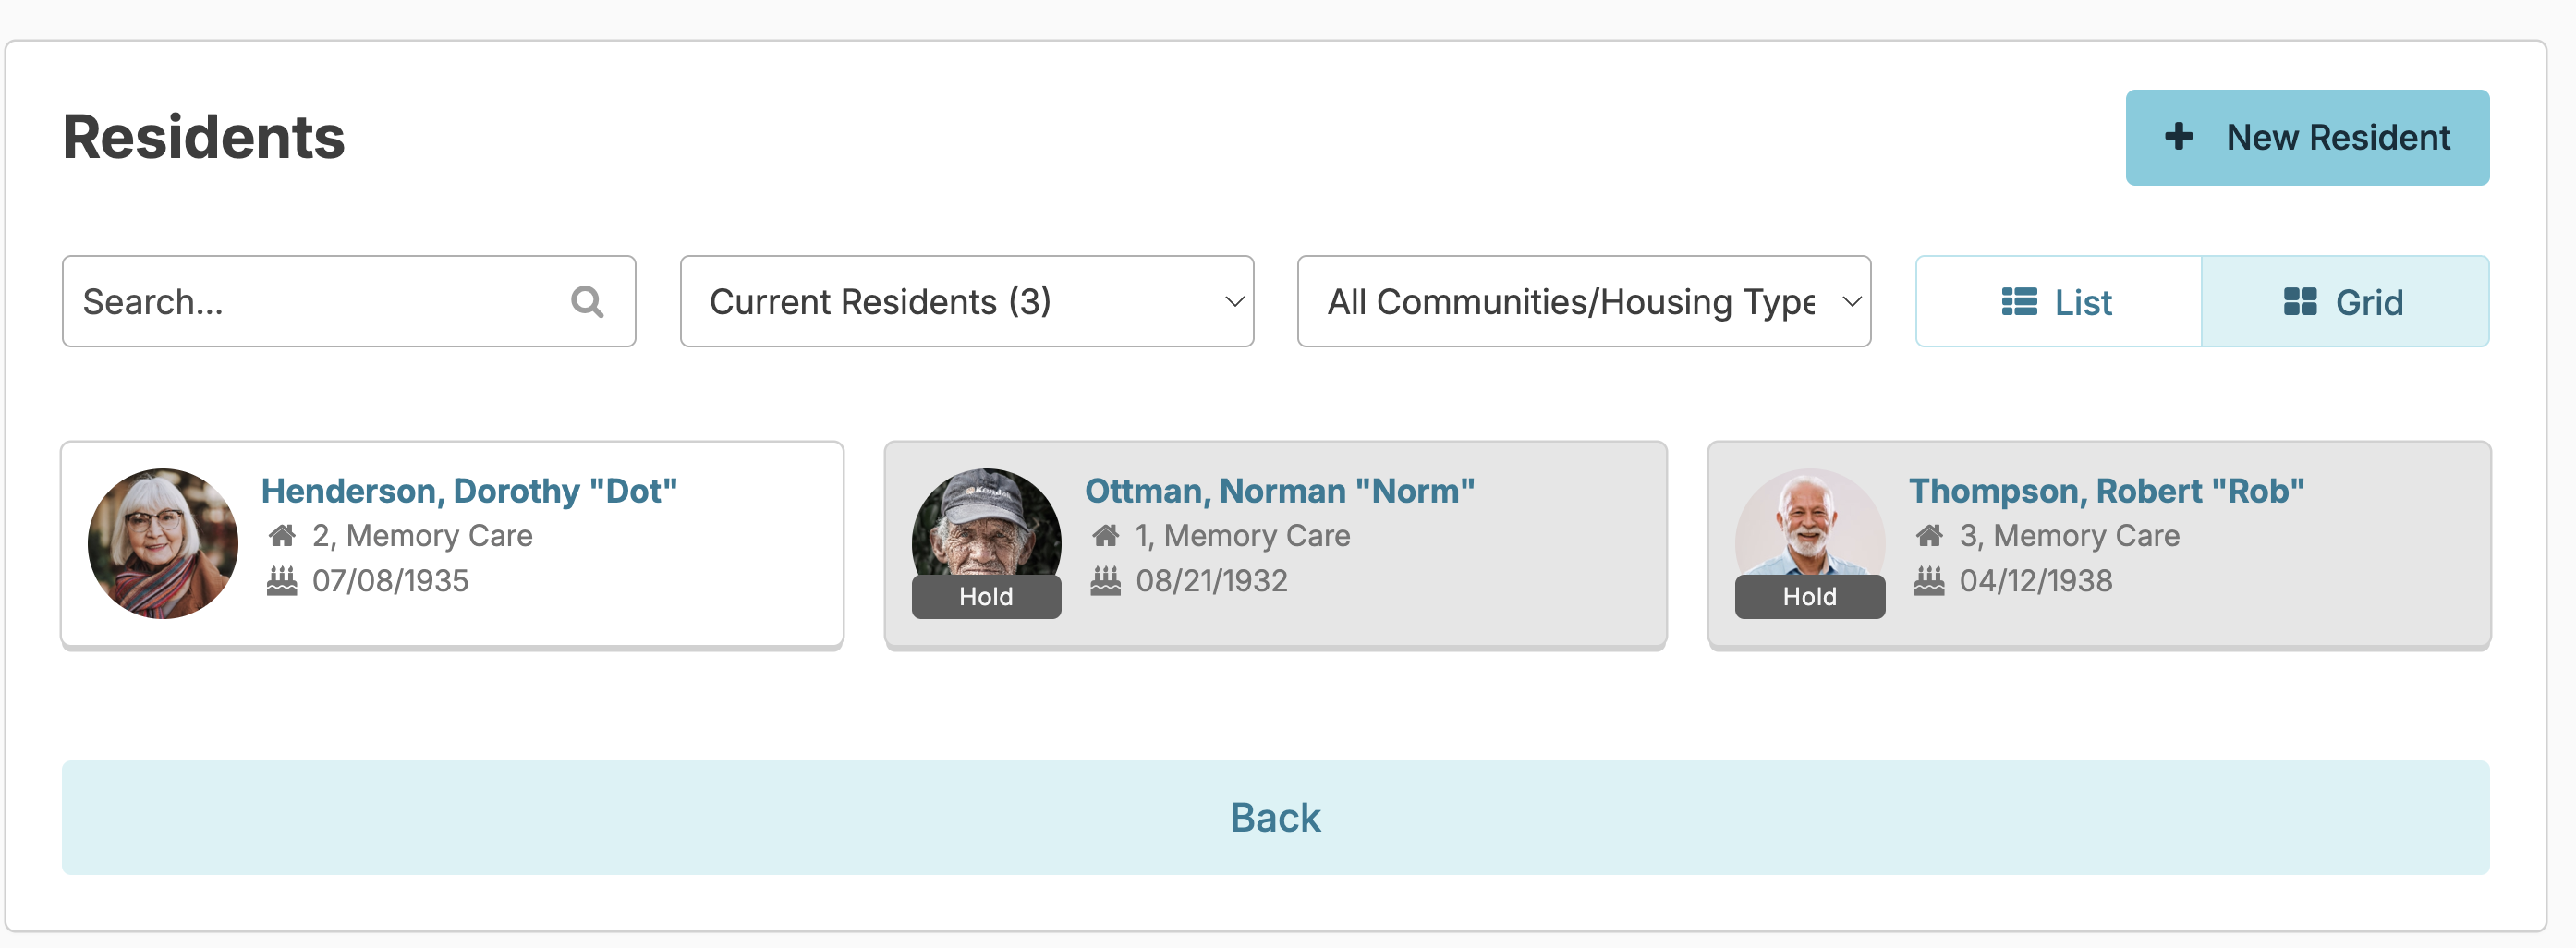
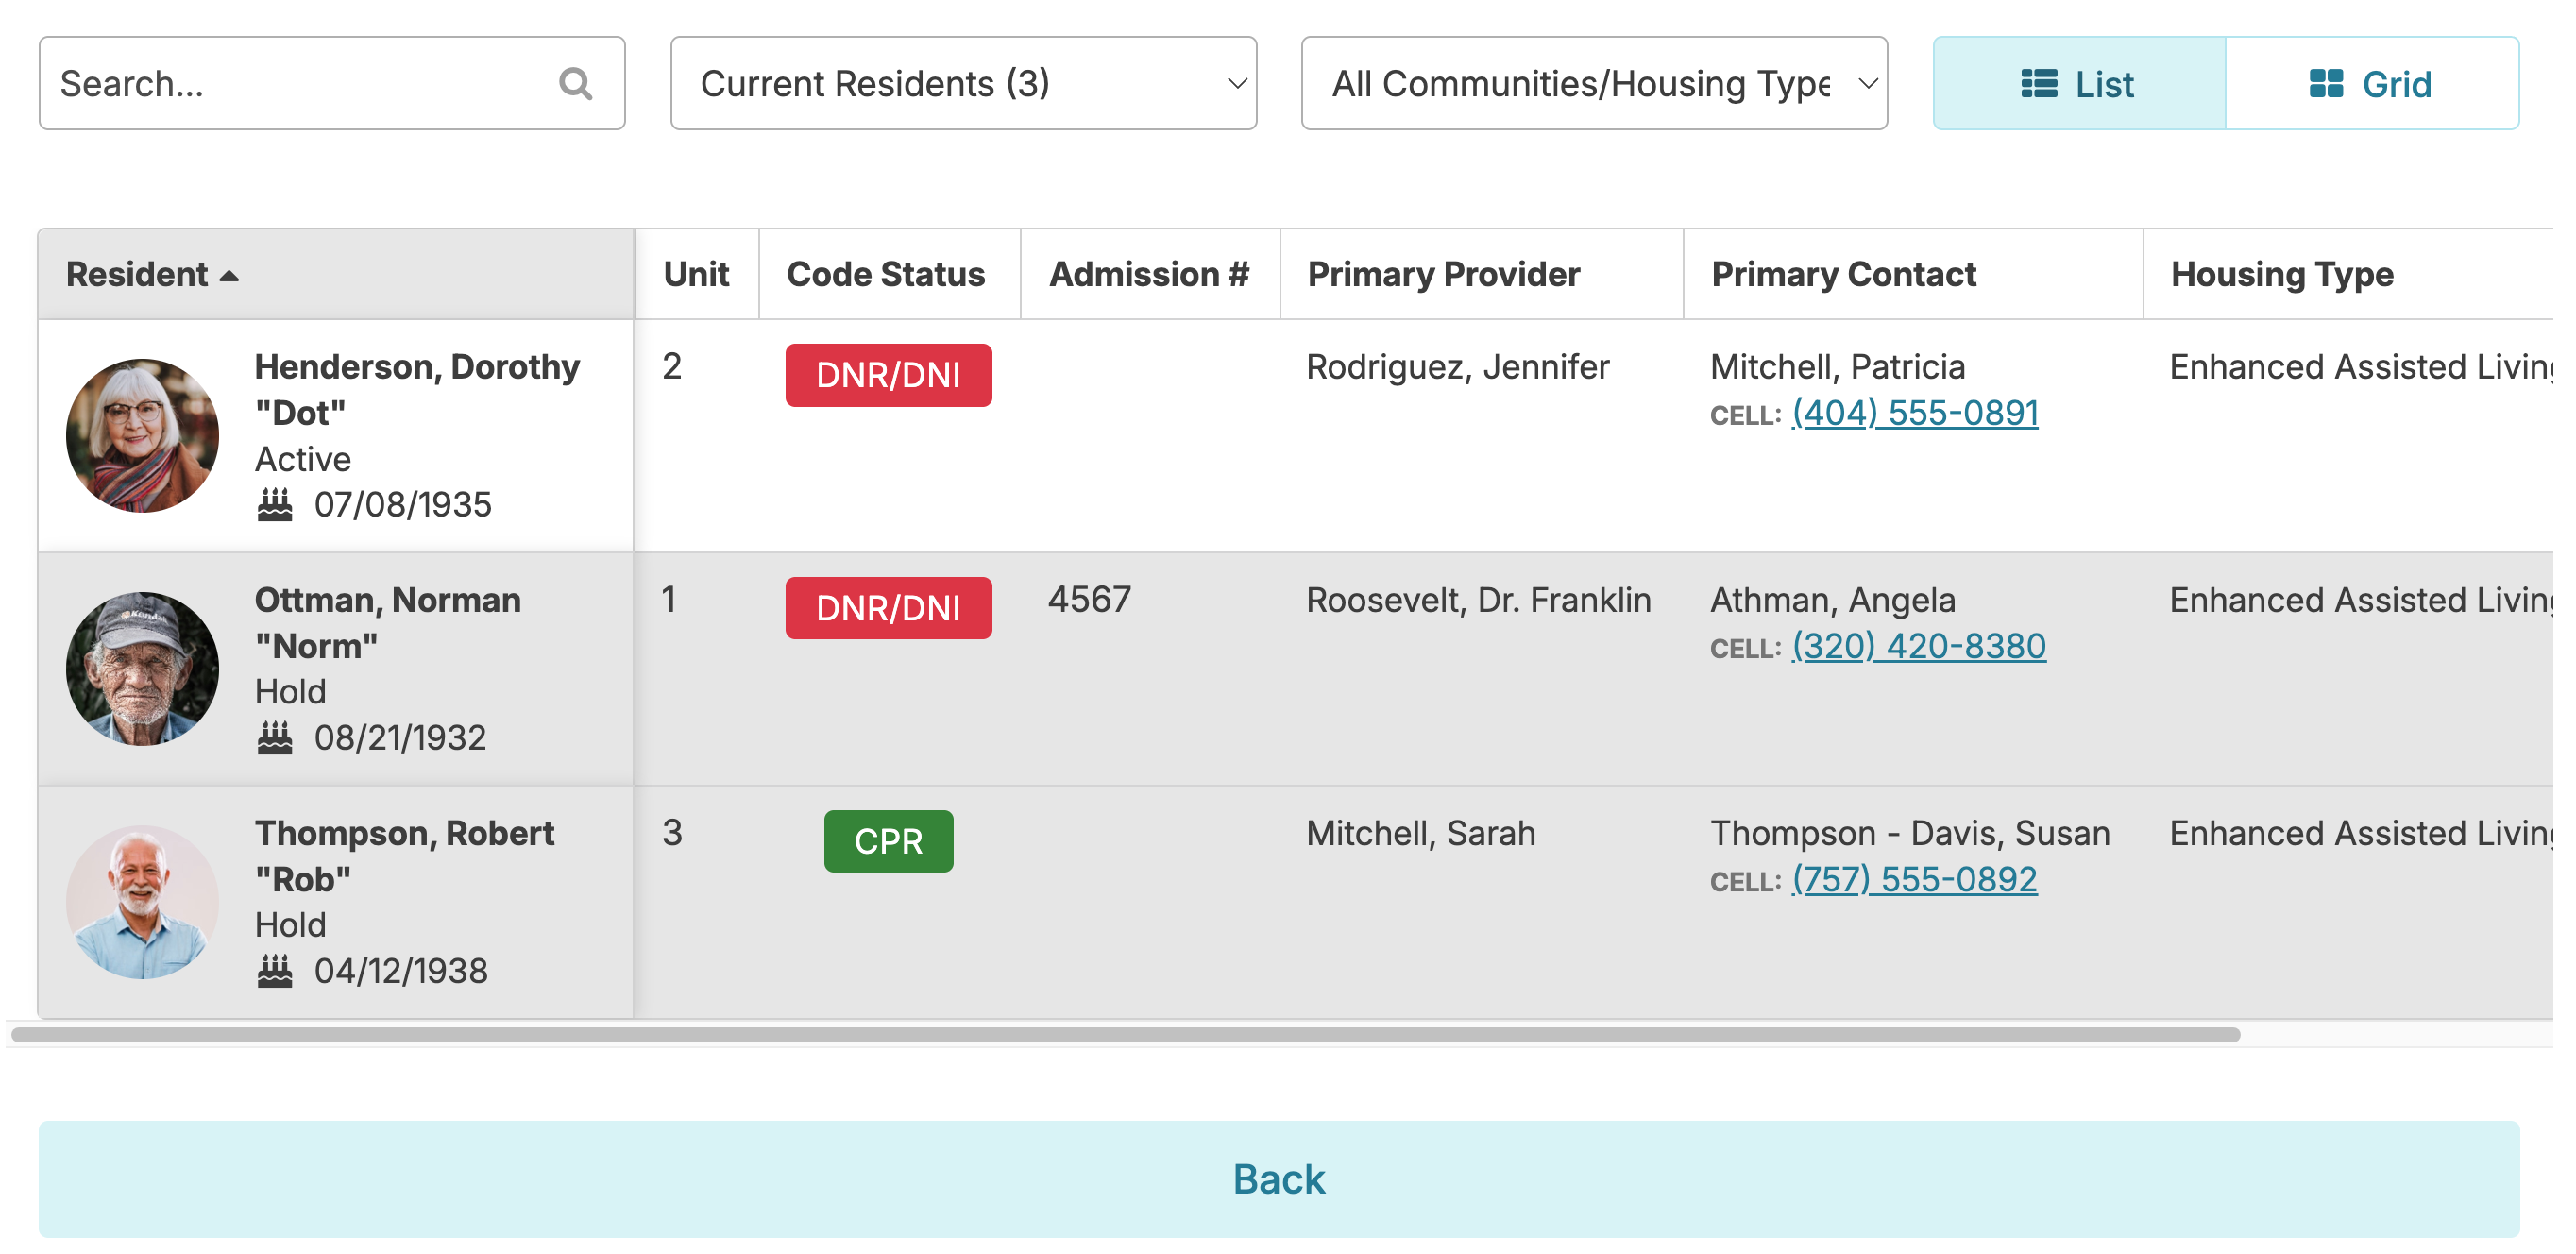
Similar to viewing charts on a shelf, you can view the list of resident profiles from the Residents > Residents screen. You can view your residents in card view or list view by clicking the icons in the upper right.
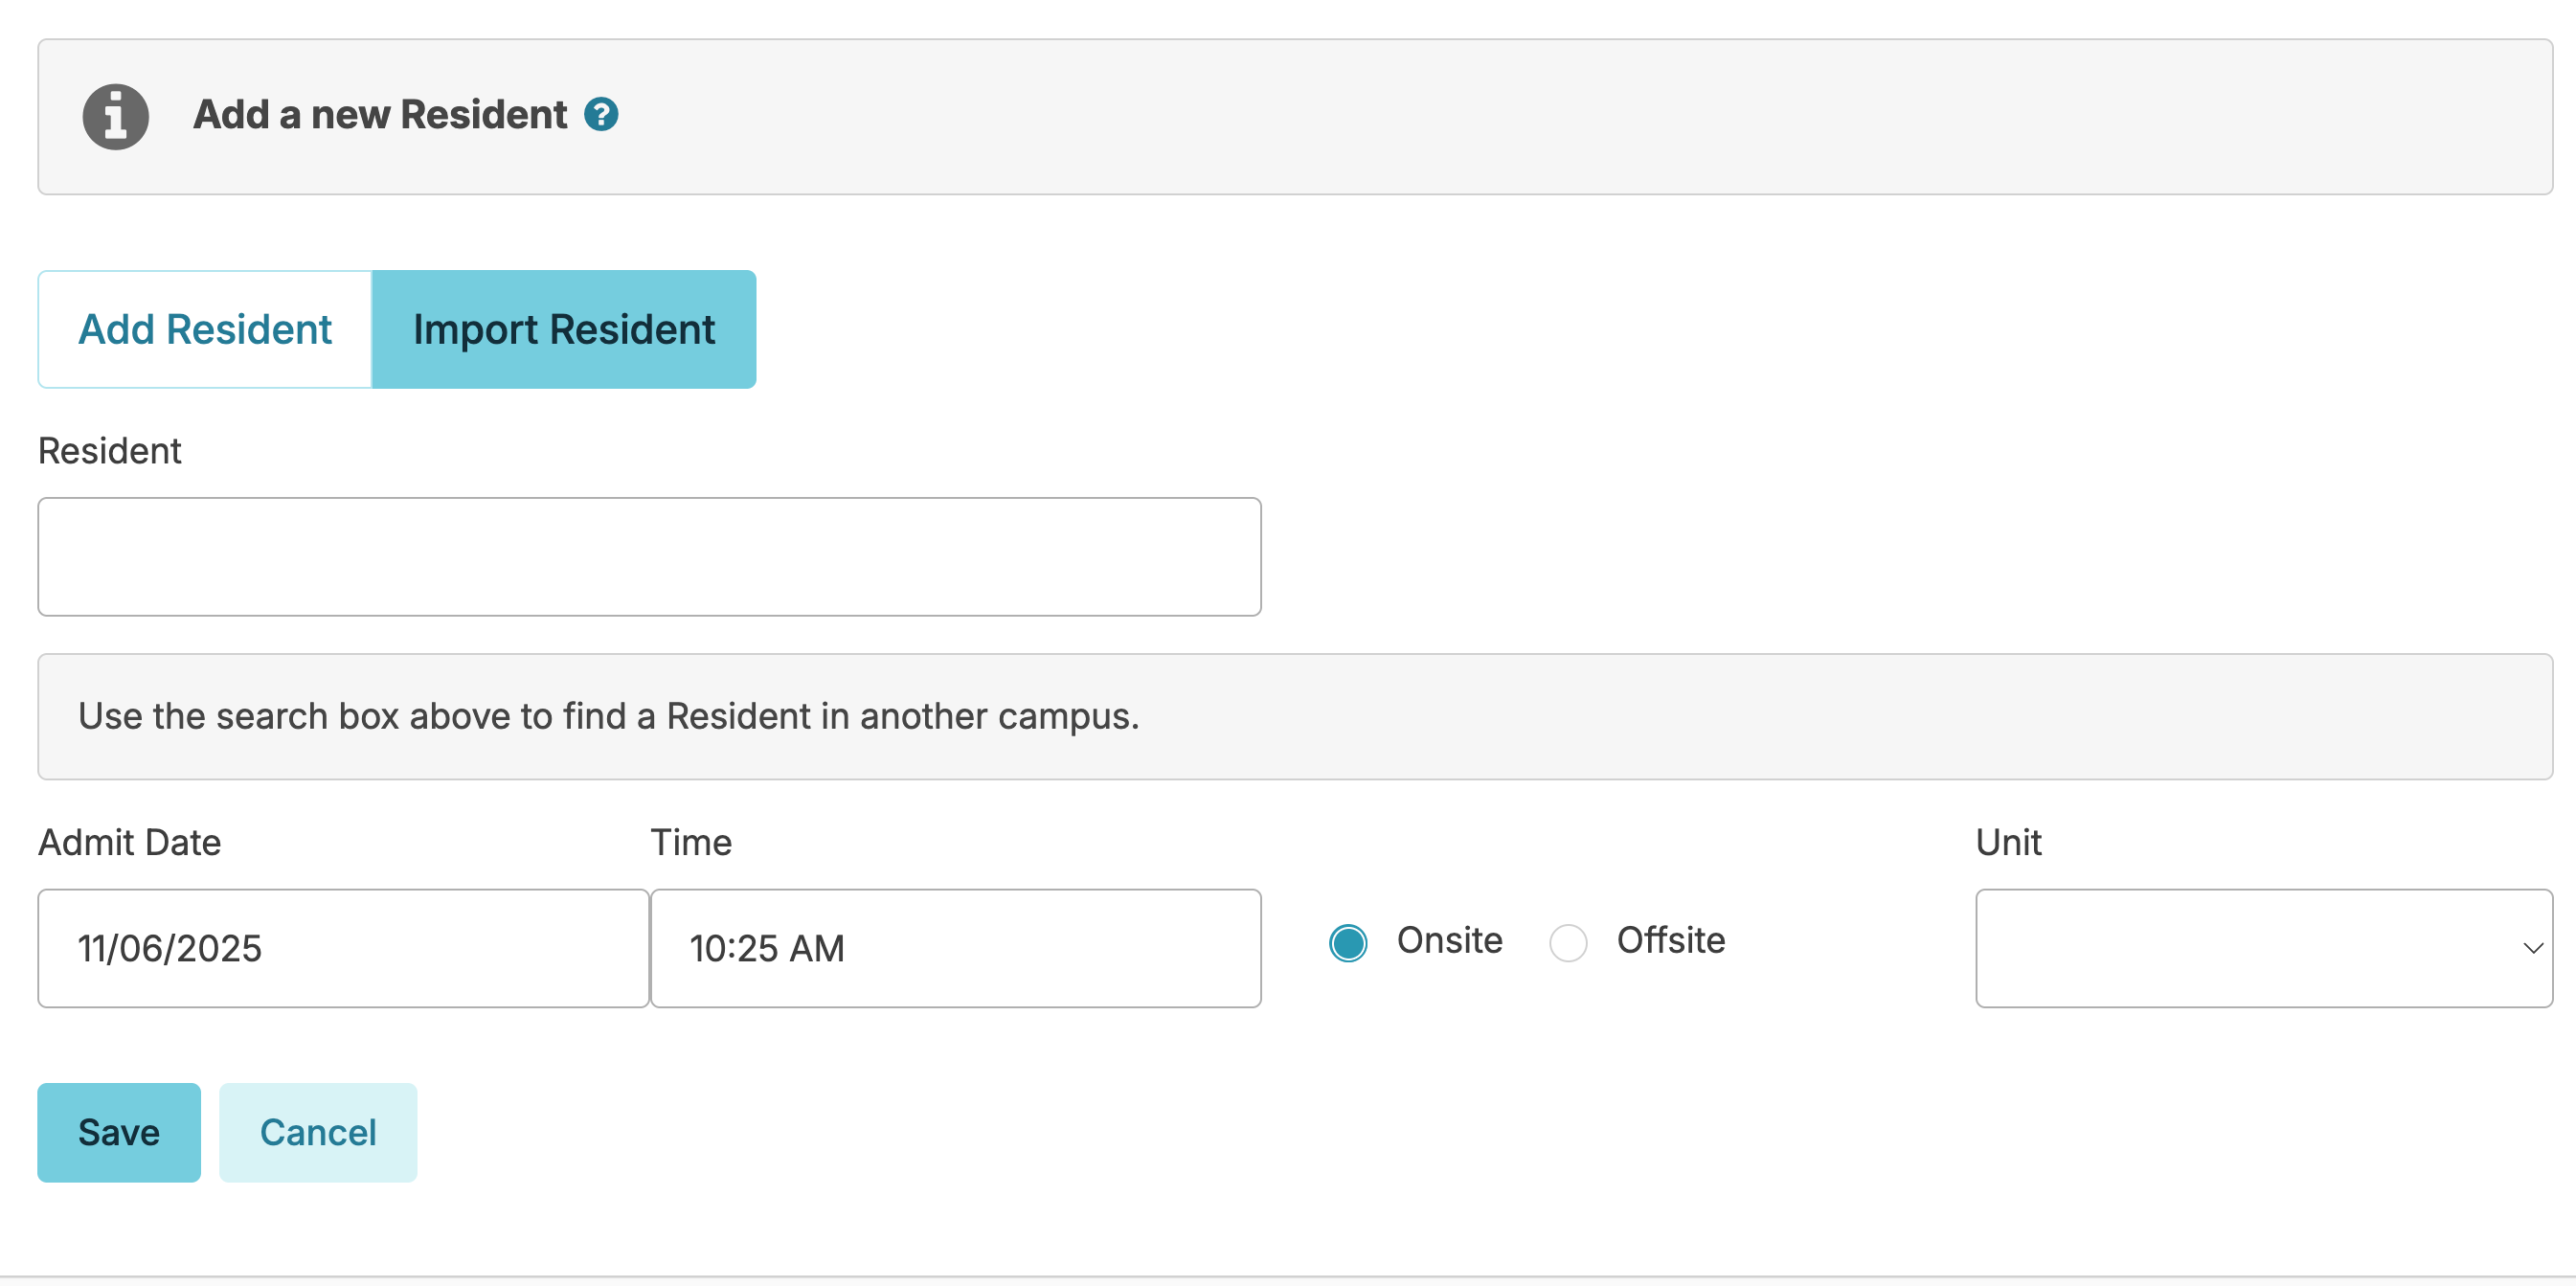
To add a new resident to your campus, navigate to Residents > Residents and select + New Resident and. Fields appear for data entry. If a Manage button is visible above a field, you can add an option to the dropdown list available for that field.
Entering a future Move-In date places that resident into a 'Reserved' status and will prevent services from populating to the Today screen for that resident. On the day of move-in, simply change their status from 'Reserved' to 'Active', adjust the move-in time, and medications and services will populate based upon the time selected.
Residex offers both on-site unit numbers and off-site street addresses, meeting the needs of those who serve people in the greater community.
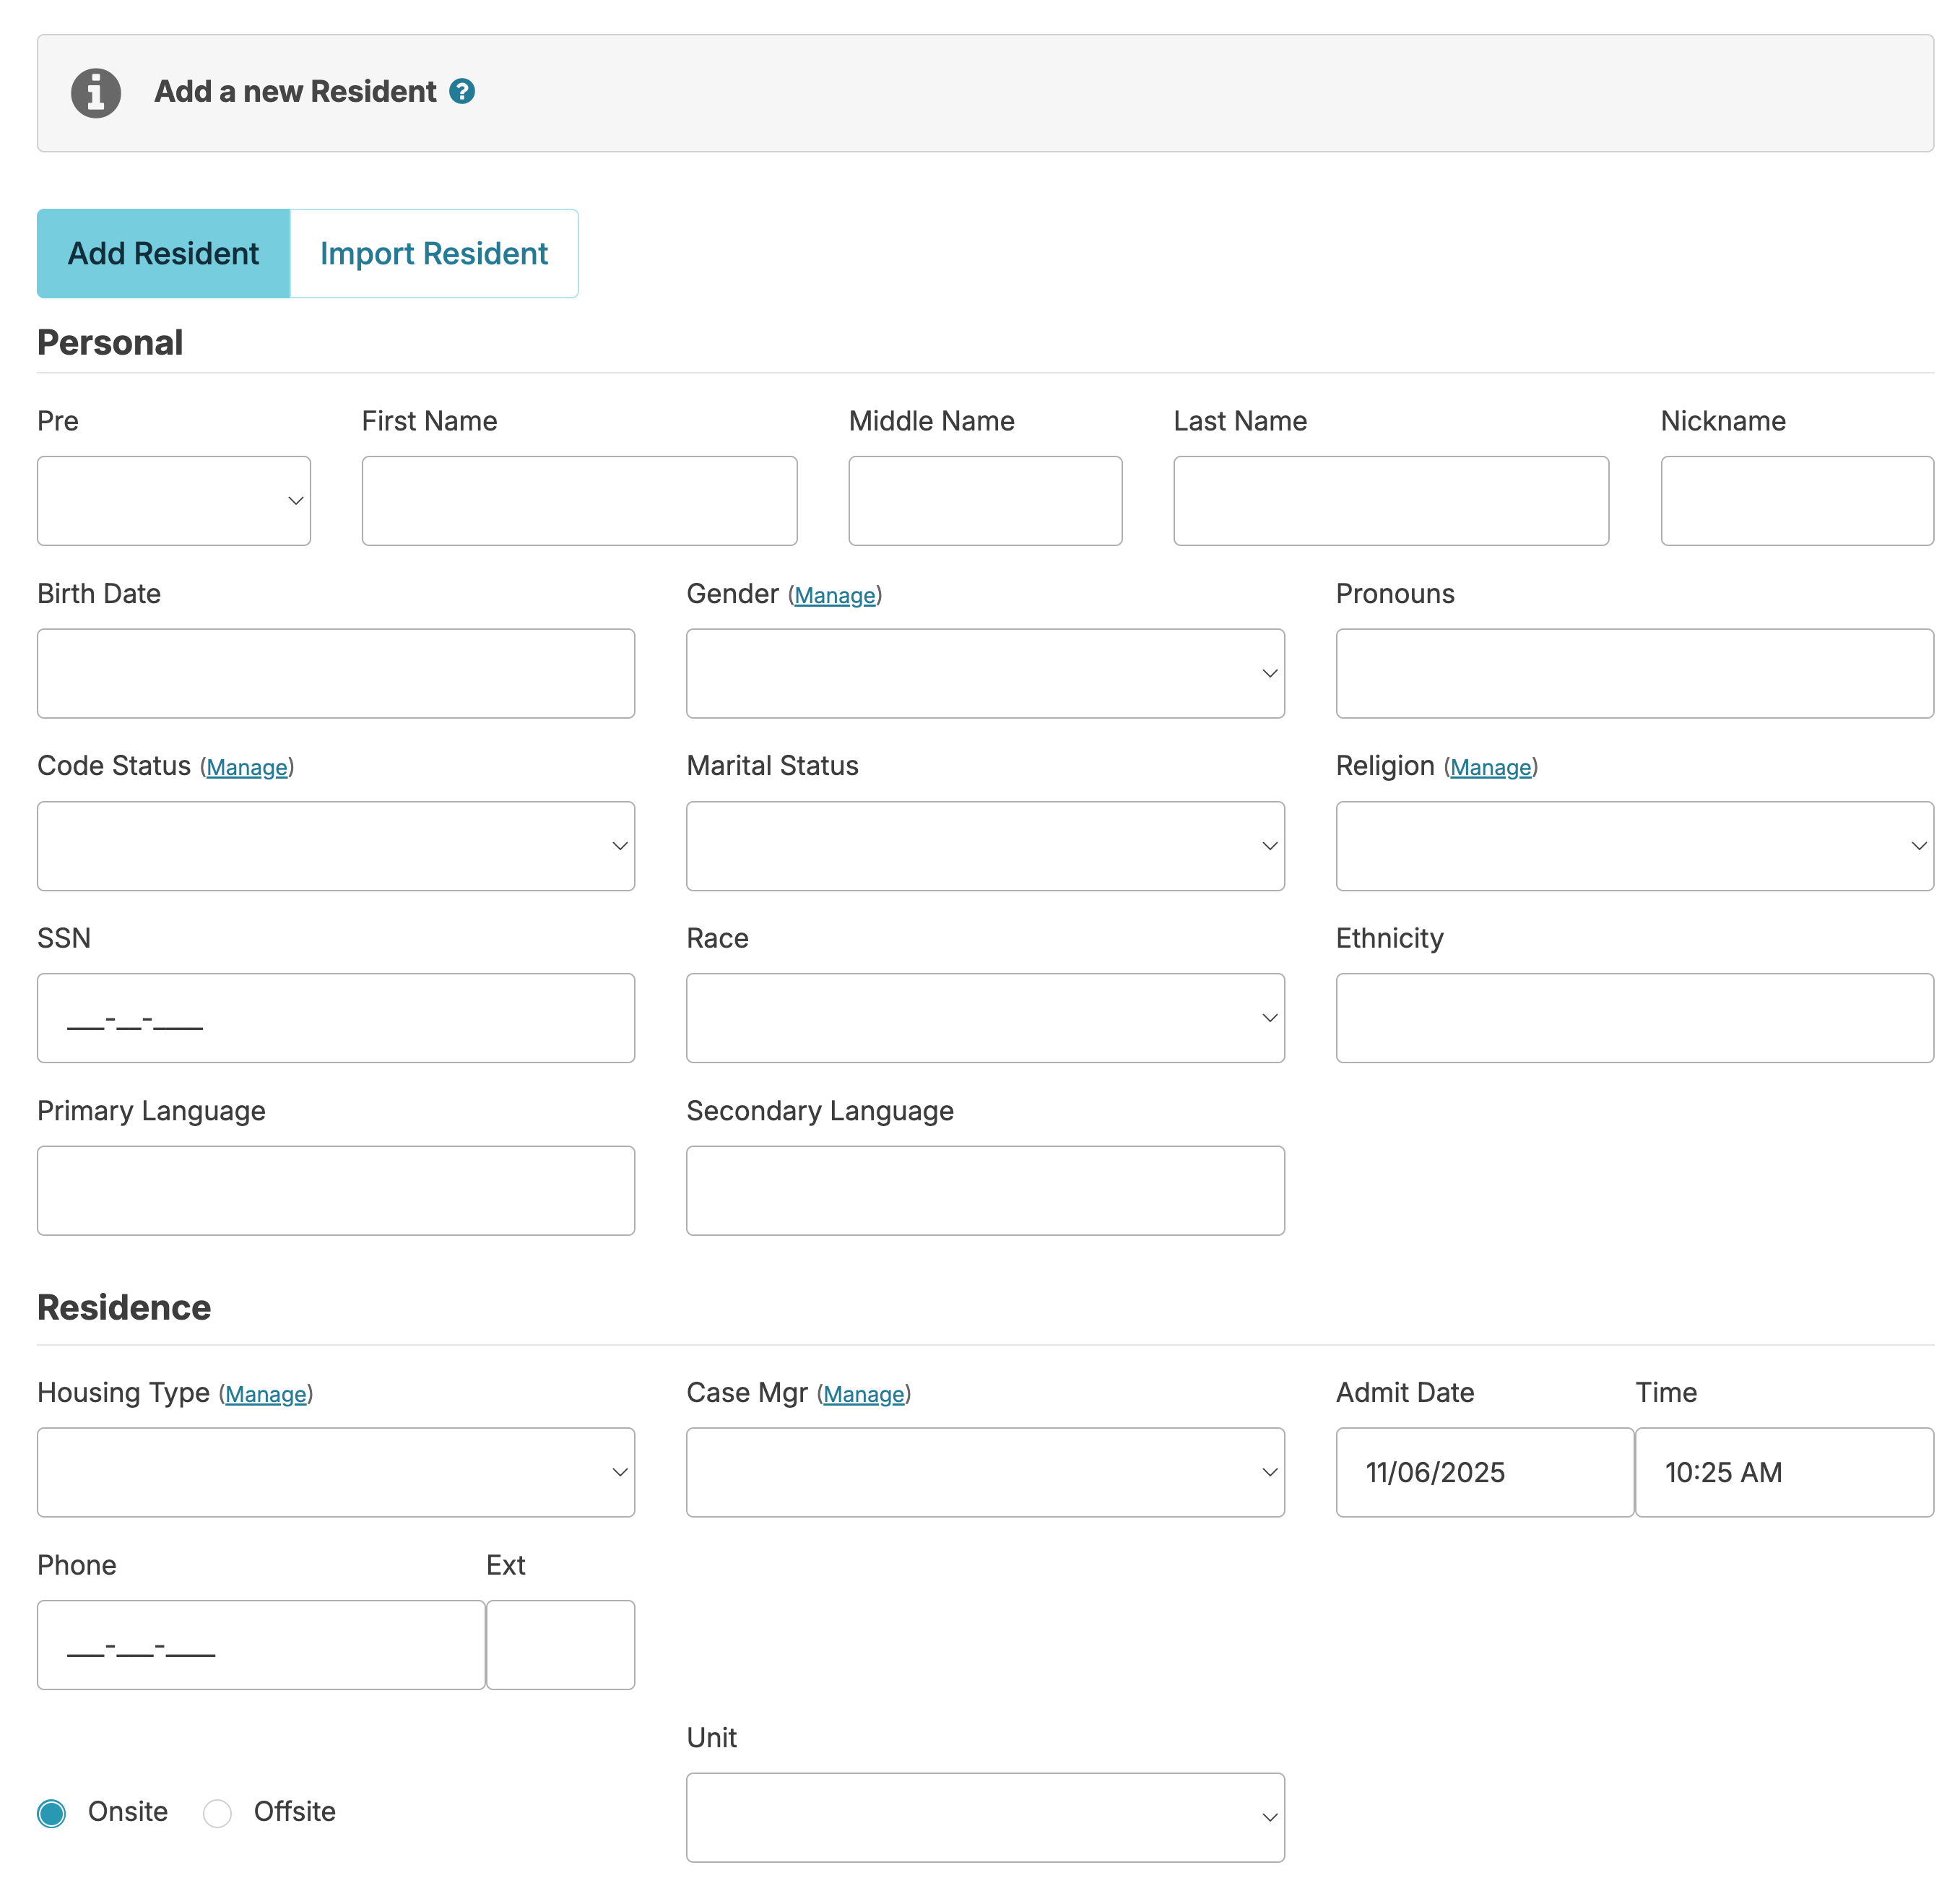
The Ongoing Orders field will pull data entered into any service for that resident. This can remind staff of ongoing requirements (e.g. method of resident transfer, Elopement Precautions, etc...).
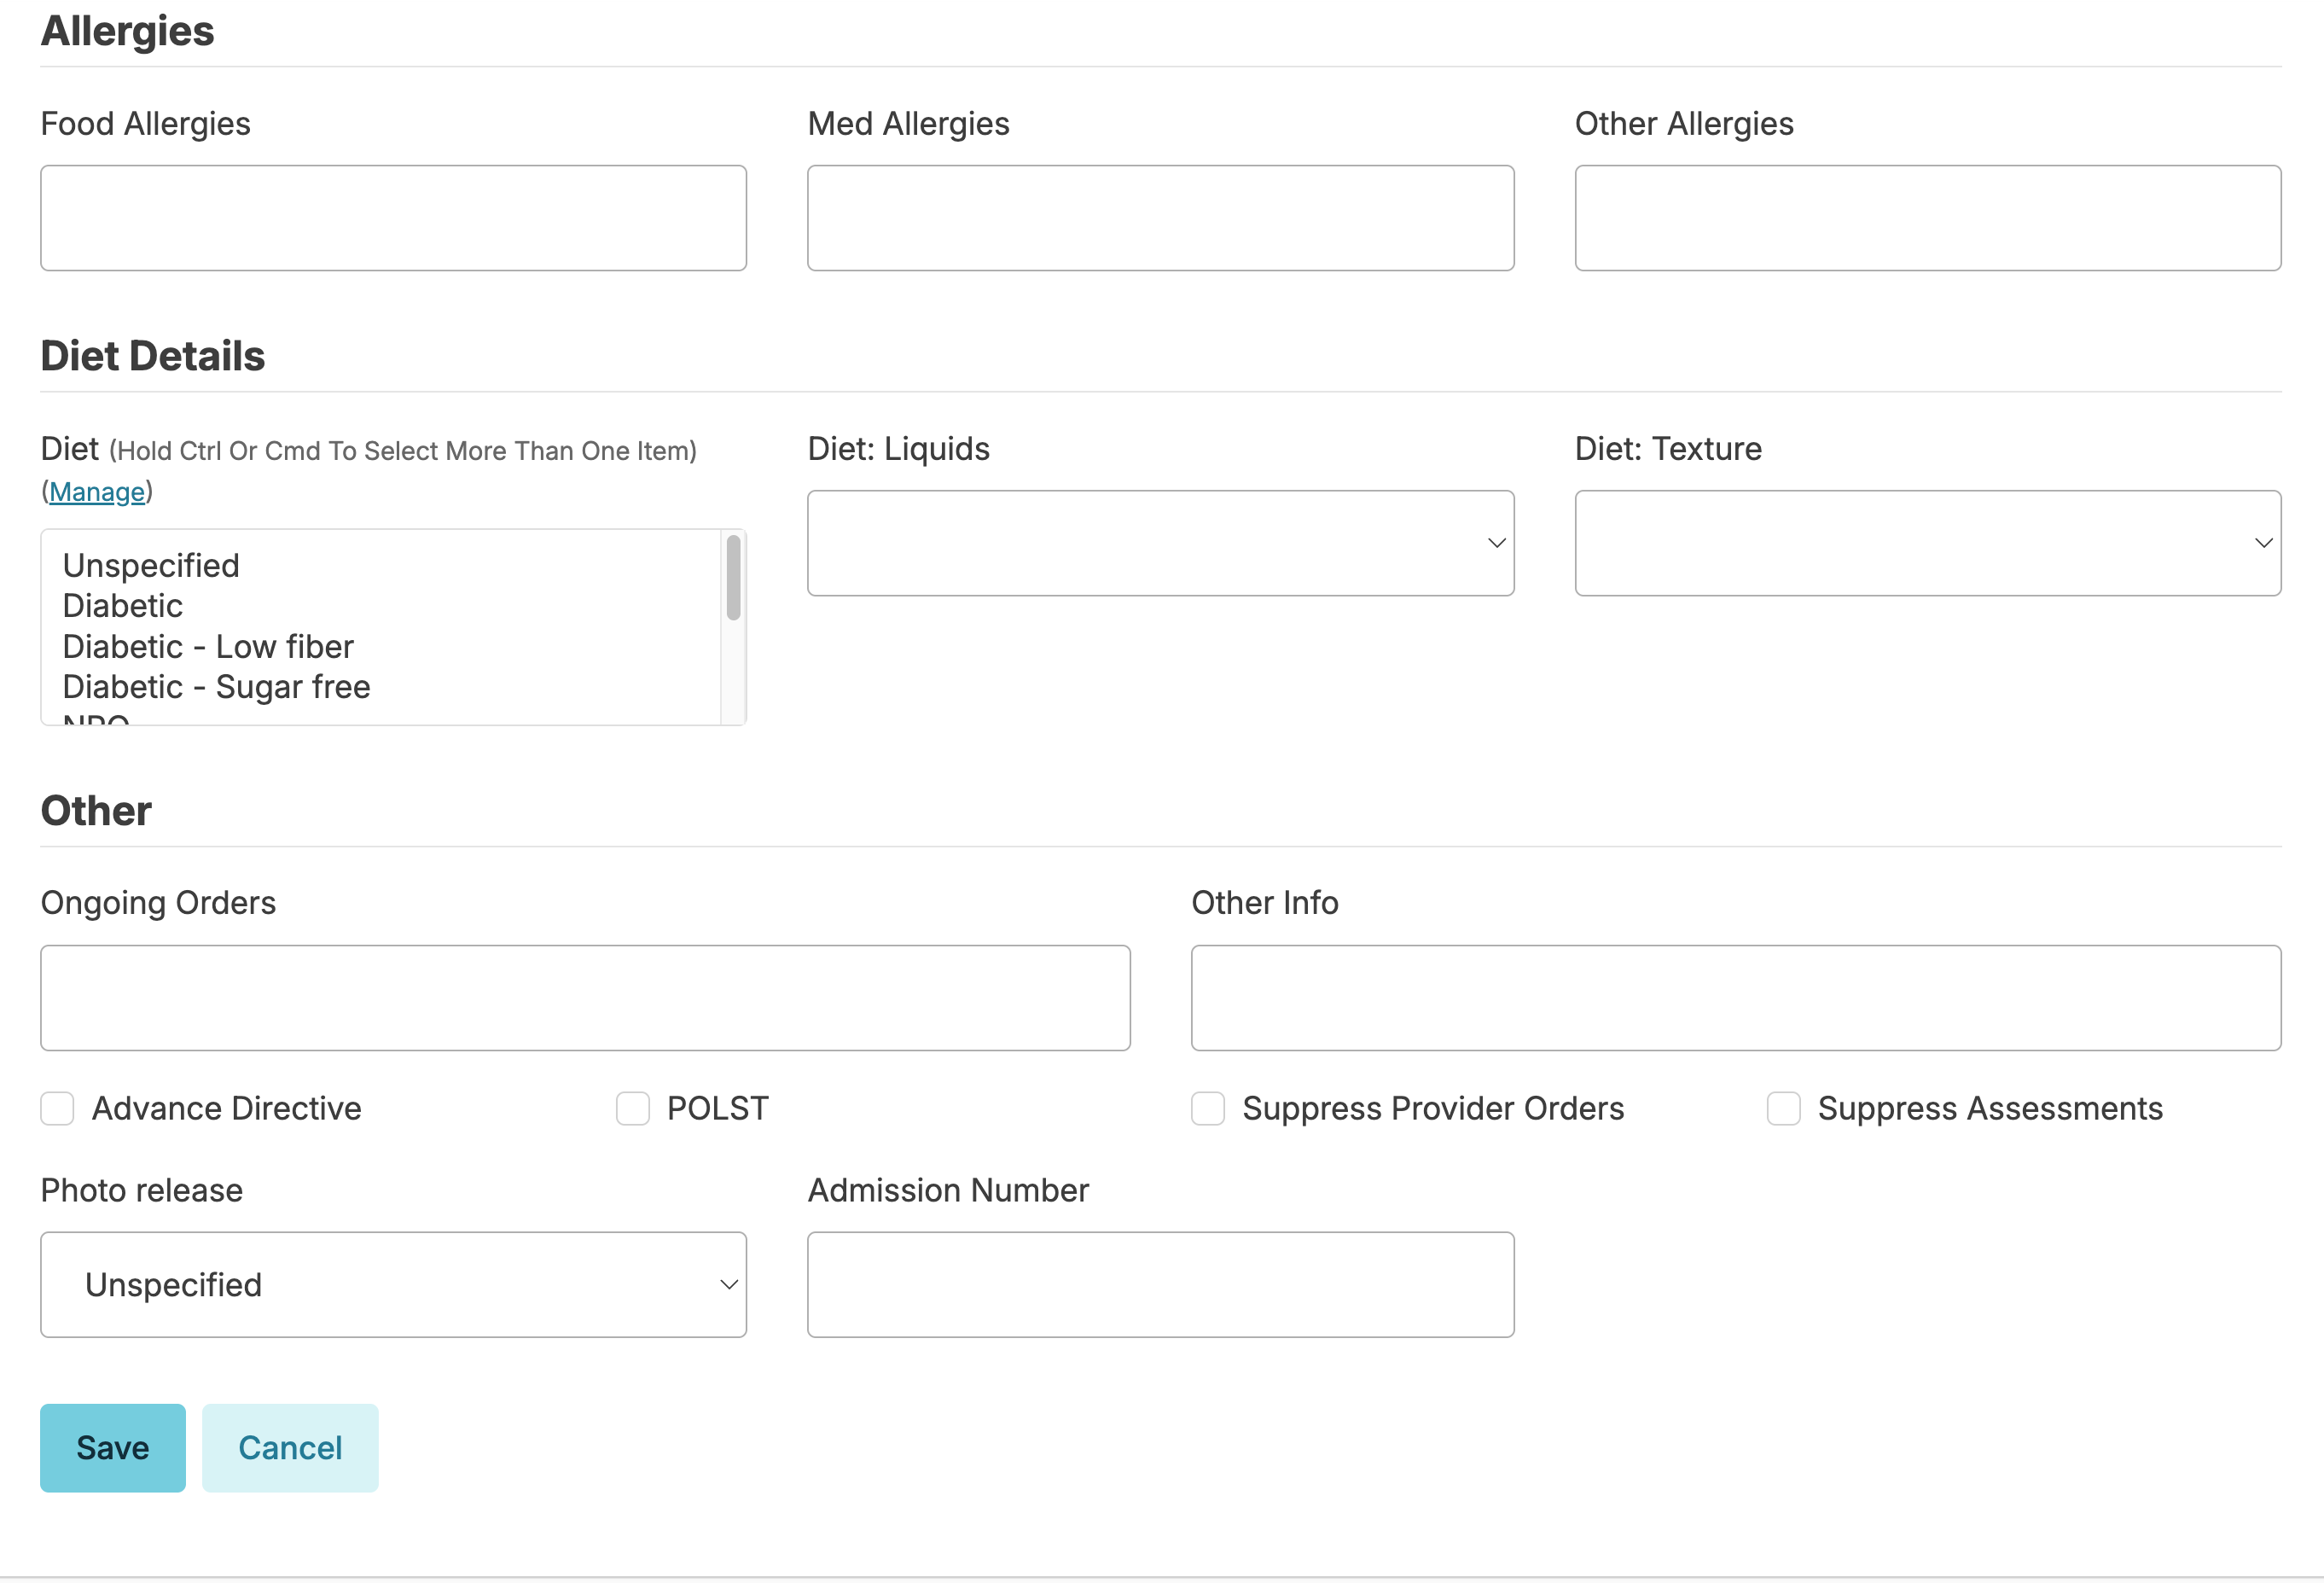
If a resident has a POLST you will need to answer the related evaluation option within the assessment. If the individual does not require assessments out of Residex, and the 'Suppress Provider Orders' option is selected, you will be able to select the POLST option from within the resident profile. This ensures seamless updating to both locations when changes in the resident's POLST status occurs.
Once you click Save, the Resident Profile has been created.
Move a Resident From One Campus to Another (Import)
Importing a Resident allows you to move a resident from one campus in the database to another campus or offsite address. The receiving campus is able to initiate the import without impacting the resident's record in the old campus. You cannot transfer a resident from one database to another.
From the campus the resident will be moving to, navigate to Residents > Residents > + New Resident > Import a Resident.
Begin typing the resident name. Residex will search for the name within the database. Select the correct resident and enter the move-in date and unit for the new campus, or community and address for an offsite location. If a future date is entered, the resident will be placed under a reserved status.
❗️Note: The resident record in the old campus will remain active until you DISCHARGE them from that campus, therefore remember to discharge the old campus record once the resident officially moves.
Importing a resident will pull:
- Resident profile with a picture
- Contacts
- Diagnoses
- Assessments
- Resident notes
- Medications and medication times
- Services and service times
- Resources (providers and organizations)
- Documents
- Care Coordination (appointments/provider contacts)
The following records do not import:
- Resident payers
- Insurance
- Care status history (past admission and dates the resident was placed on hold)
- Unit activity history (history of previous apartment/unit numbers)
Once imported into your campus, you'll want to go in and reassign medications and services to your own assignments.
Transferring a Resident Within a Campus - Unit Transfer
Once a resident has been assigned a unit or room number, they can be reassigned or transferred to another unit at any time through their resident profile.
- Navigate to the resident's profile.
- Click Change Status > Transfer.
- Indicate whether the resident is on site or off site.
- Select the new unit number.
- Enter a reason for the transfer.
- Click Confirm to complete the transfer.
The resident will be reassigned to the selected unit. A full history of unit activity can be reviewed at any time under Unit Activity History in the resident's profile.
Convert a Prospect to Resident
If using our marketing tools, your prospects can be converted to residents via the Residents > Prospects Profile screen. All data entered on the prospect screen carries through and populates to the resident profile.
Add Diagnoses
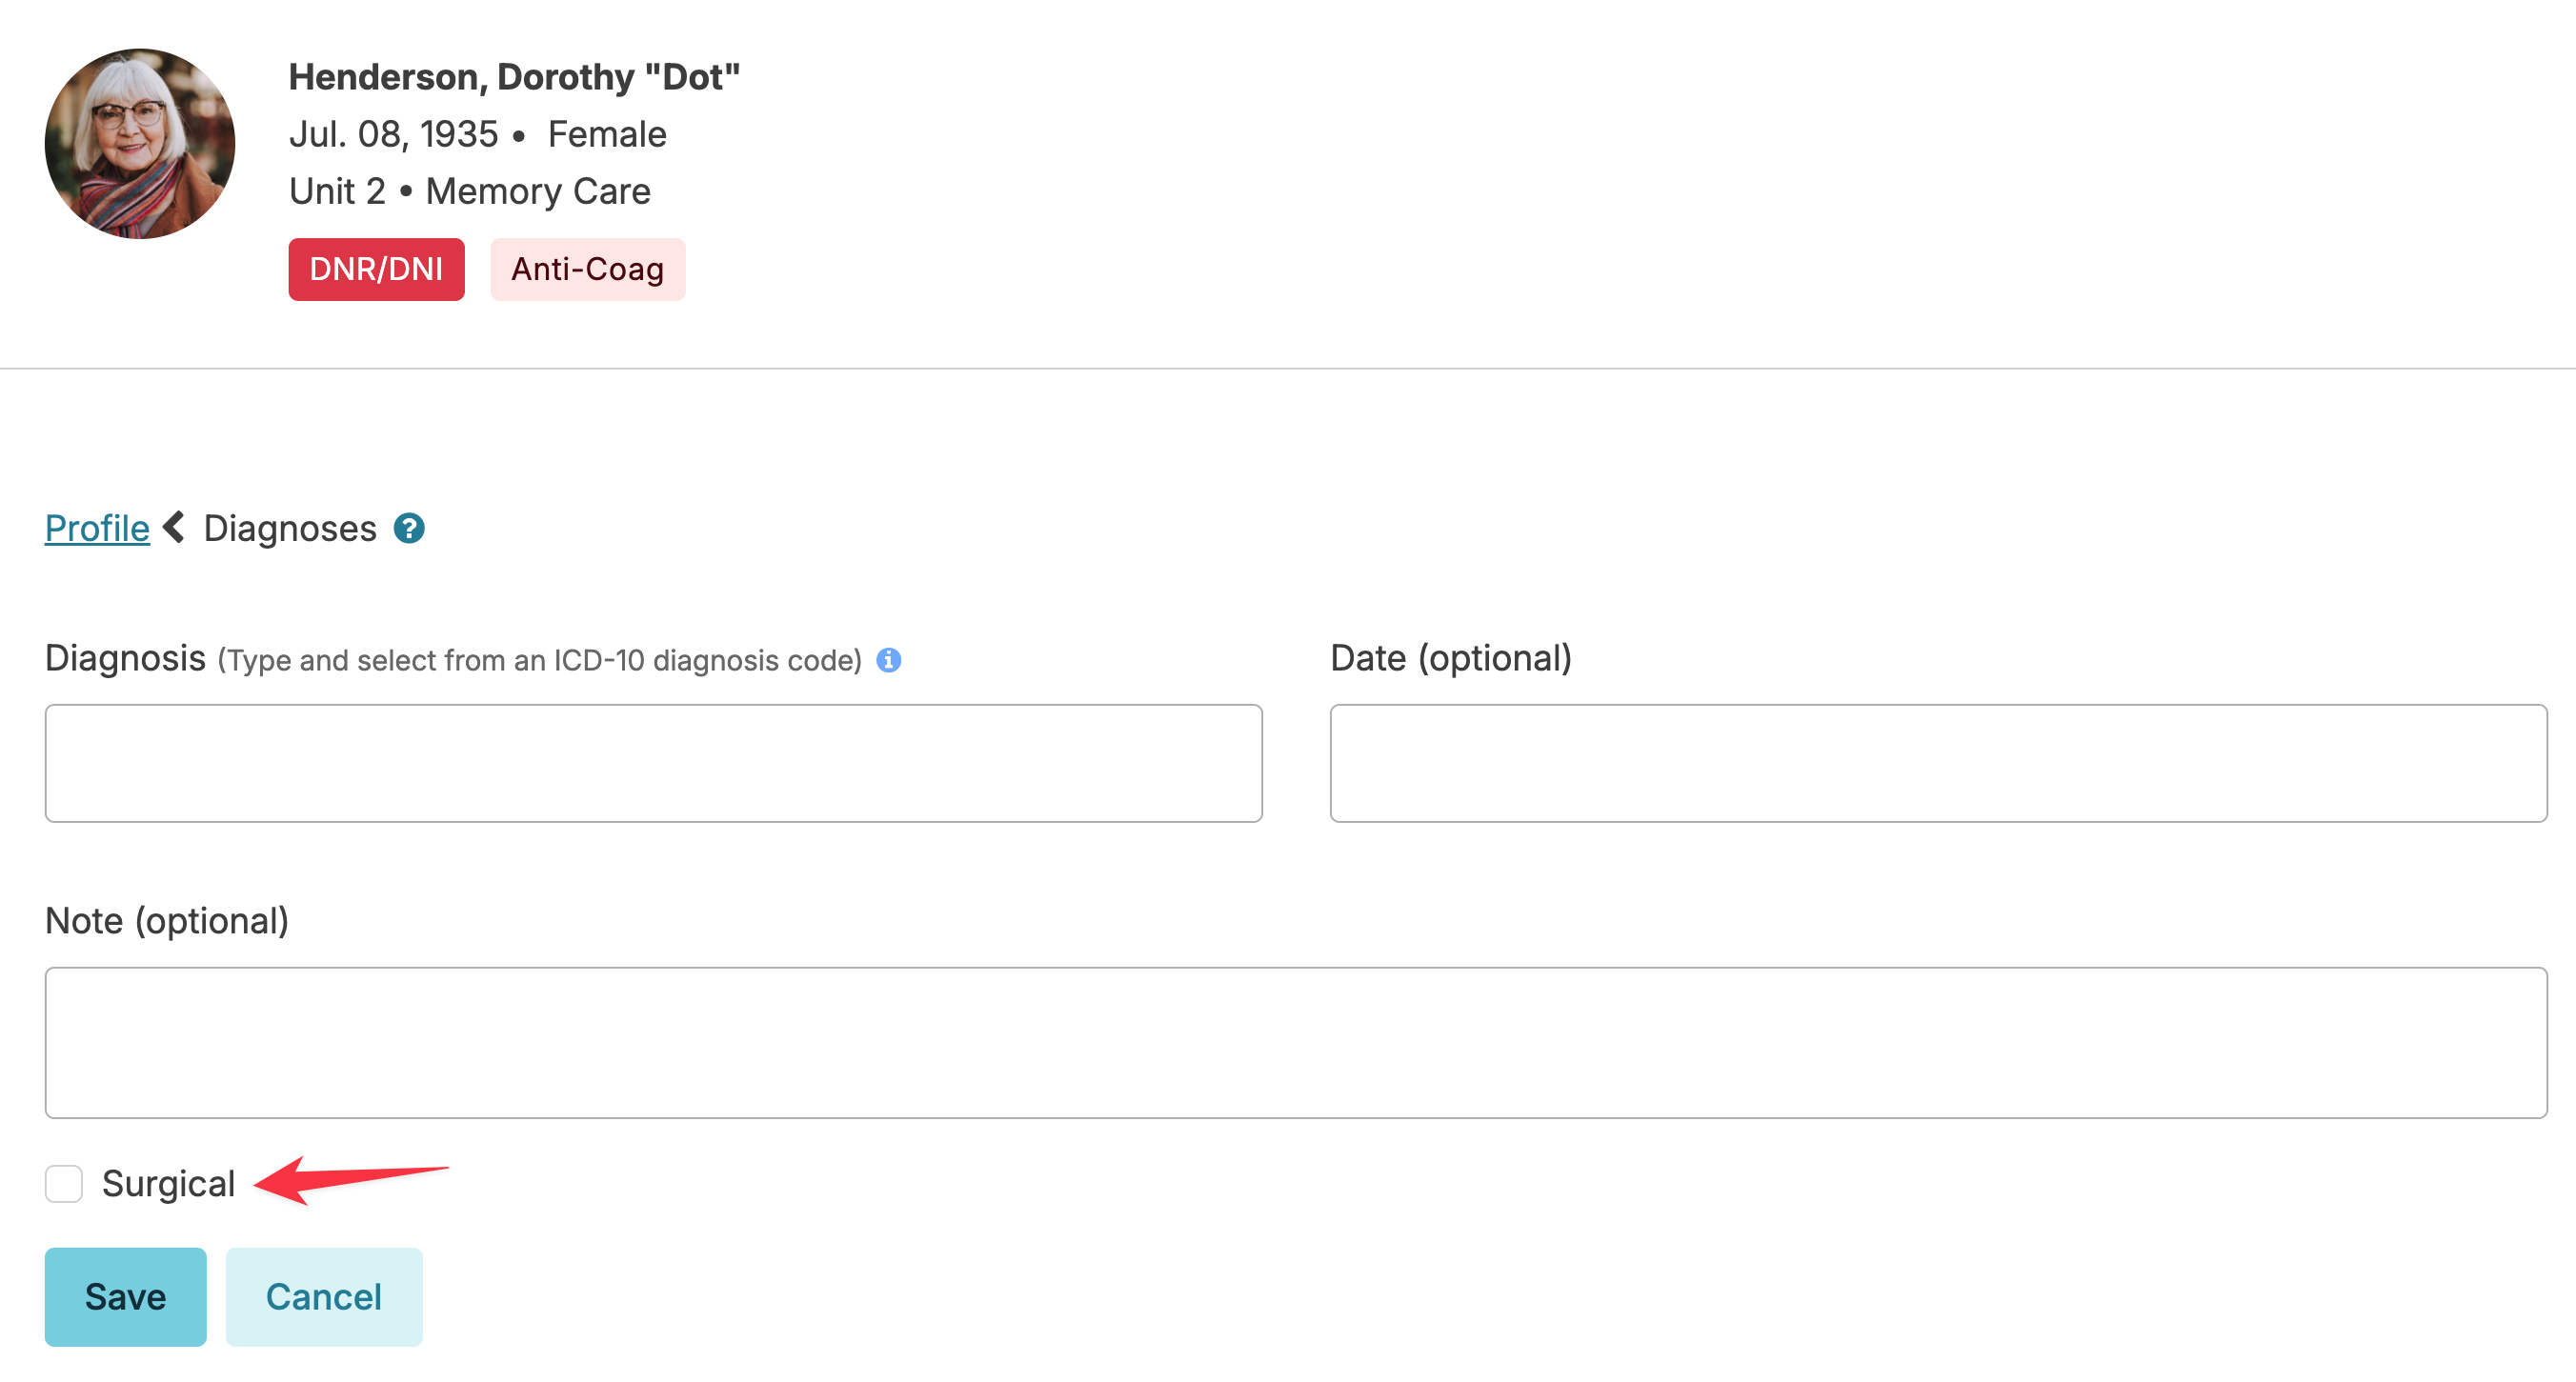
There are two methods to enter diagnoses. The first is using ICD-10 codes. Navigate to Residents > Residents > Select the resident profille > Diagnoses > Add a diagnosis
- Start entering a diagnosis. Residex will offer you options from a list using ICD-10 codes / Keyword (s) sourced from the NLM (National Library of Medicine) website.
- Select the diagnosis that applies. Optionally, you can click the blue "i" to be taken to the National Center for Health Statistics – ICD-10-CM list if you need to review what code you may need.
If ICD-10 codes are disabled in your database, users with Clinical (Role 19), Administrator Assistant (Role 410) or Administrator (Role 411) can add a new diagnosis to the global list by navigating to:
- Beginning to type a diagnosis
- Select the correct diagnosis from the auto-sorted selections
- If nothing displays, continue to type the desired diagnosis name and click save. This will add the diagnosis to the global list.
NOTE: To ensure that the diagnosis is not already entered, click the blue ‘manage’ button to see the complete global diagnosis list. The diagnoses list should be reviewed regularly, and careful consideration should be given to correct spelling and eliminating duplicate entries.
Date and Note fields are optional. An optional configuration allows you to specify whether the diagnosis is a surgical diagnosis. Contact Residex support if this is needed.
The top diagnosis is flagged as primary. You may change the primary by selecting the appropriate diagnosis from the resident list and clicking the blue Make Primary button.
Bulletins
Bulletins are a great way to communicate resident specific information. They can be created either from the resident profile or from any service for that resident.
Click on the Add Bulletin button that is in the blue banner atop the Profile. Enter expiration date & time and the message.
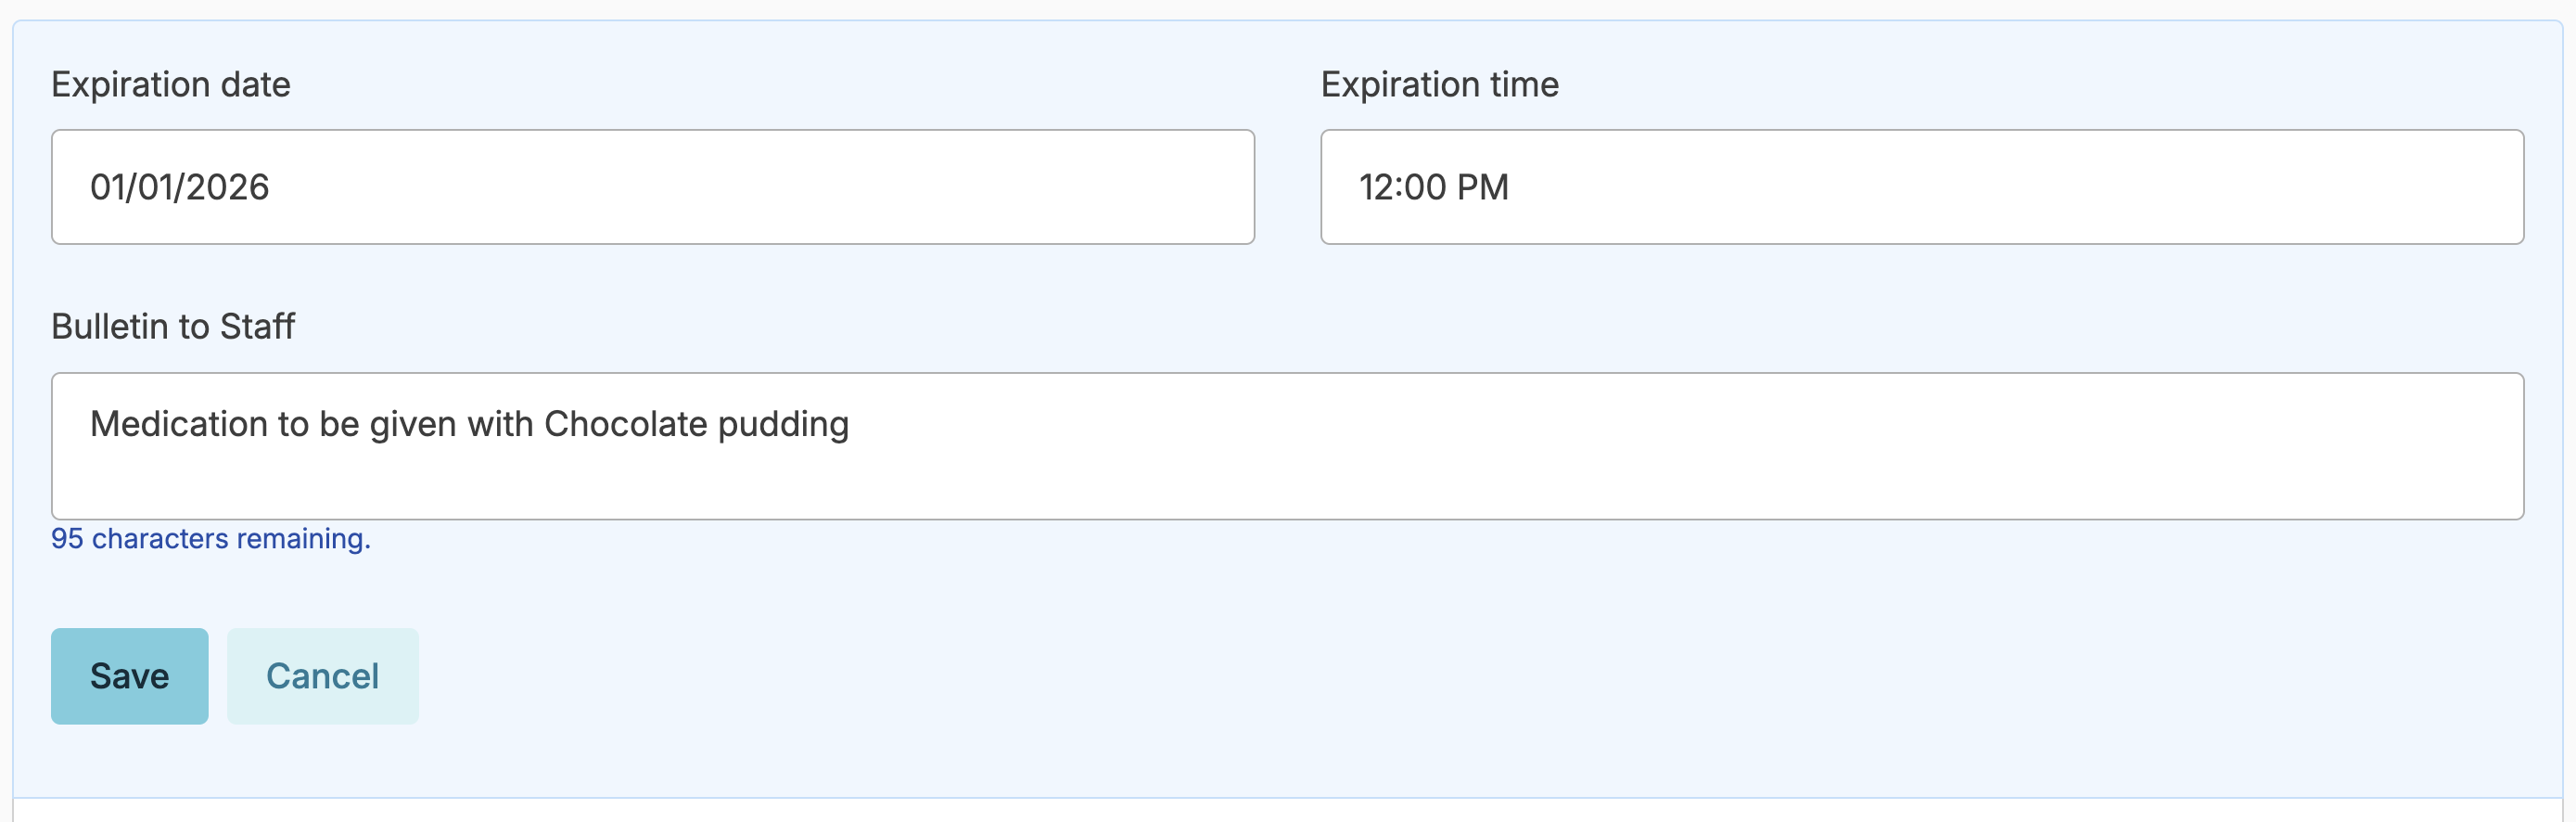
The saved bulletin will appear as a banner across the top of the profile, across any service for that resident, and can appear as a report in the 'Login Report'.
Photo
We recommend a resident photo be added as a best practice. This is done from the resident profile > change photo screen by dragging and dropping or by clicking Upload to browse for an image.
Resident tags offer a quick way to apply a label or 'tag' to a resident that allows quick, easy reference, but also allows you to create helpful reports based upon those tags. For instance, a tag such as 'daily newspaper' for residents who receive that would allow you to create a list used to guide delivery.
To add an existing tag to a resident, navigate to the resident profile > Other Details > Click blue pencil under Tags.
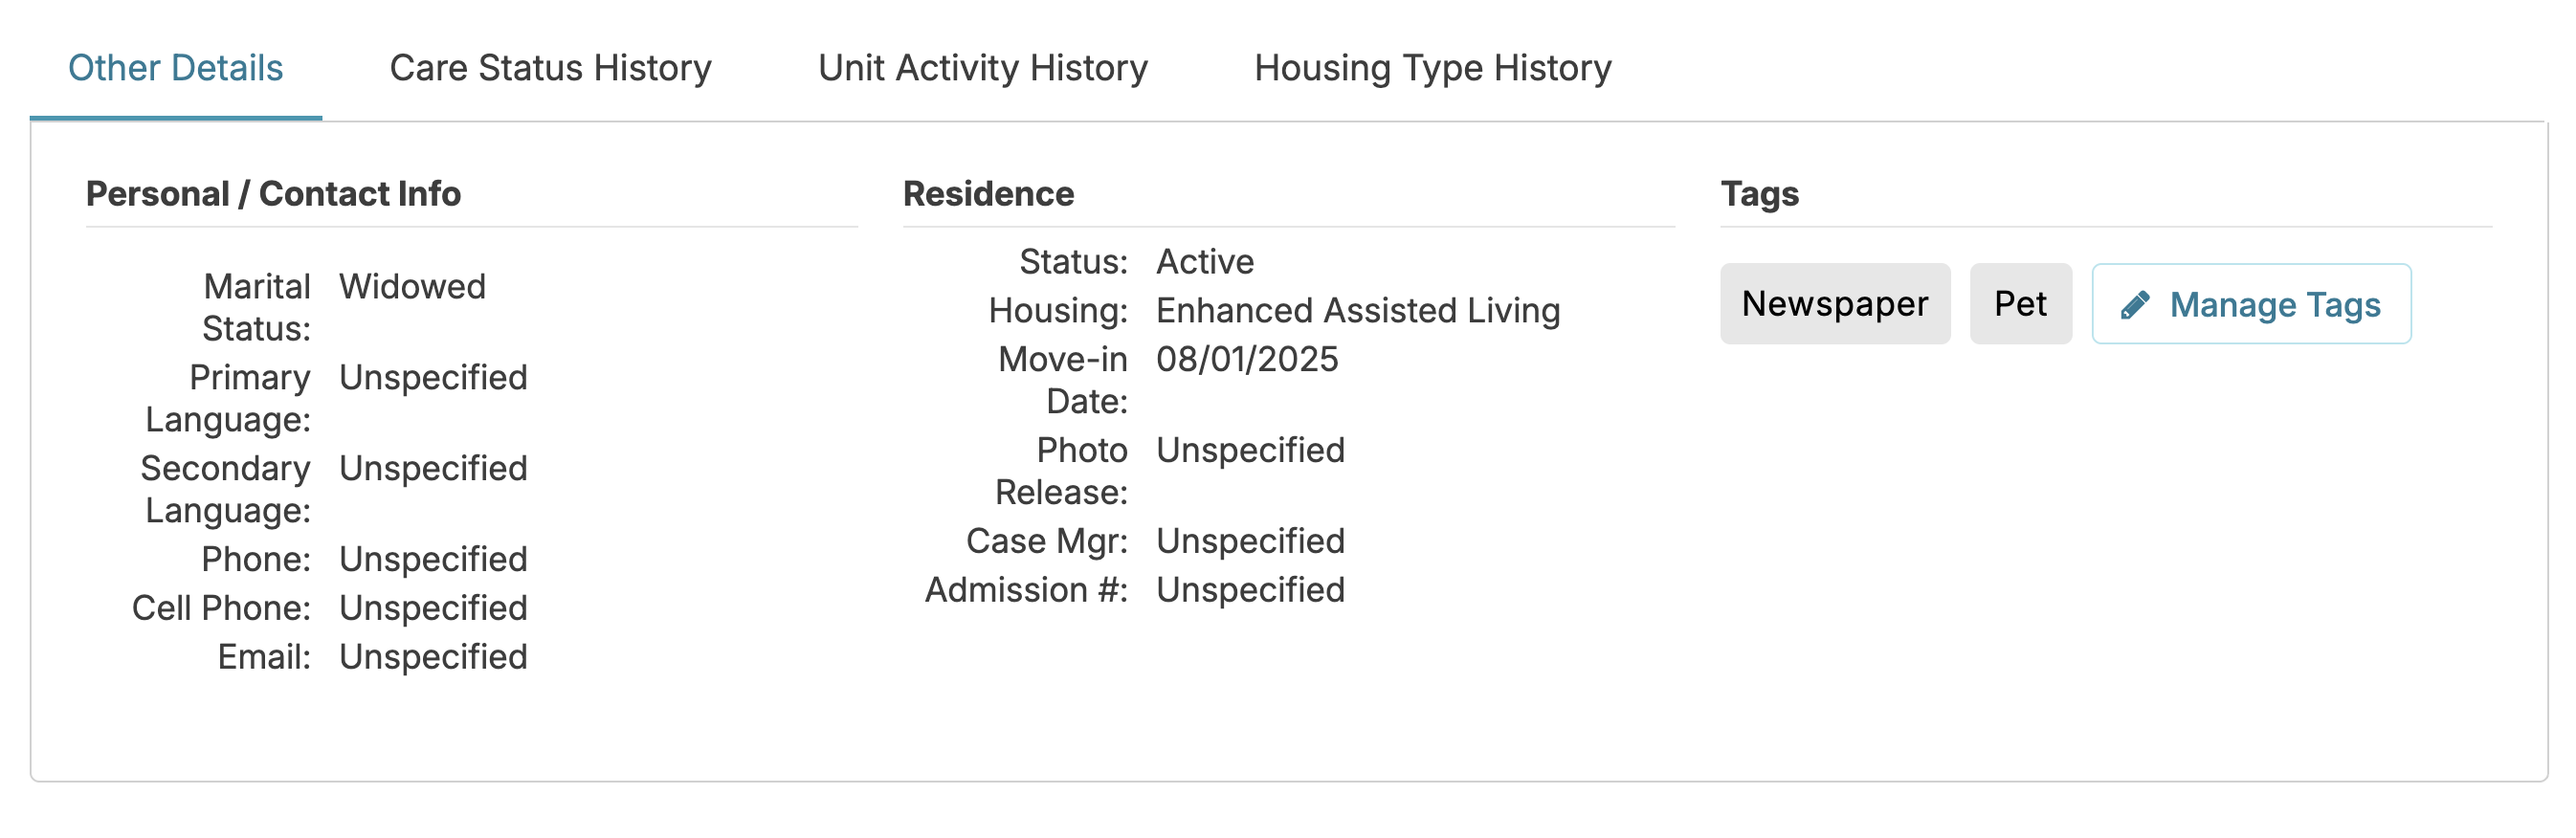
Select from the available tags, or users with 410 or 411 roles can click Add New Tag to create a new one. Associated reports in the Residents category include 'Residents by Tag', or 'Residents With Tag'.
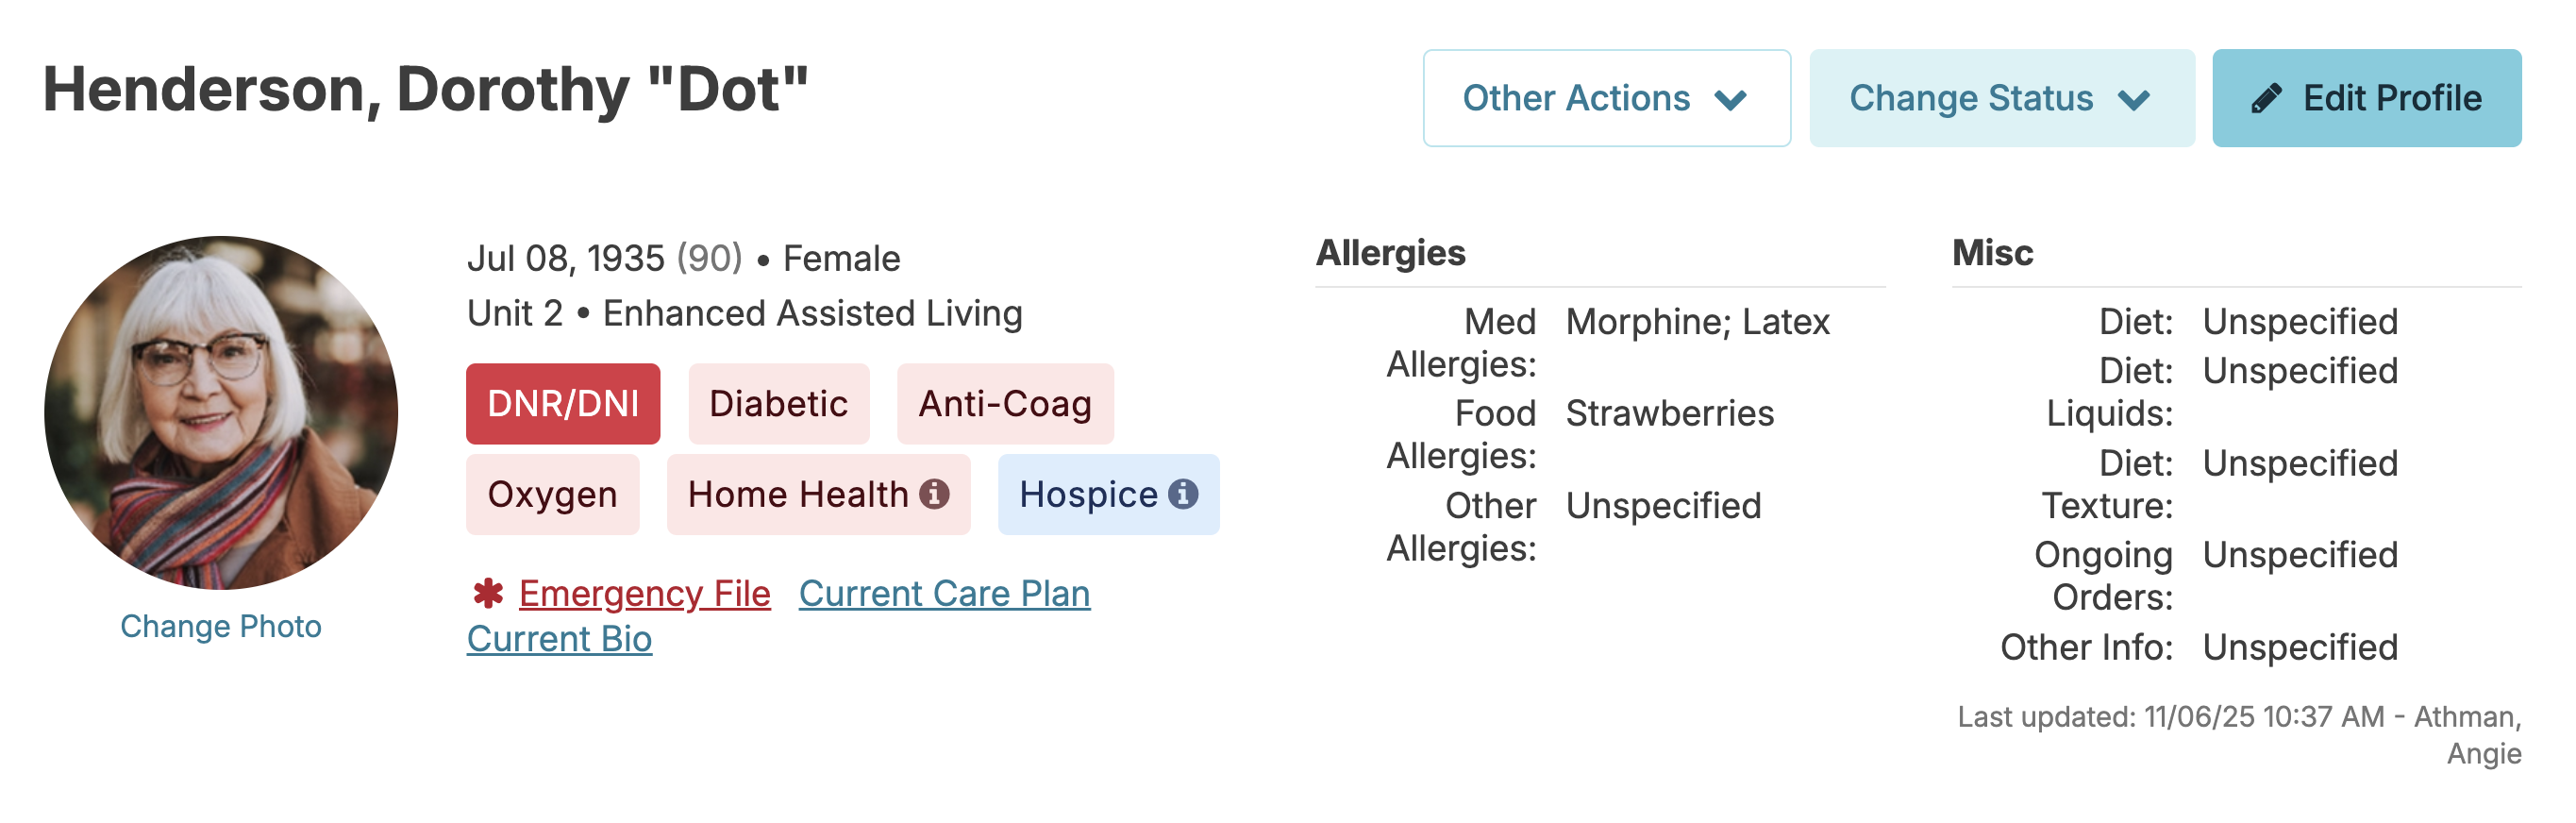
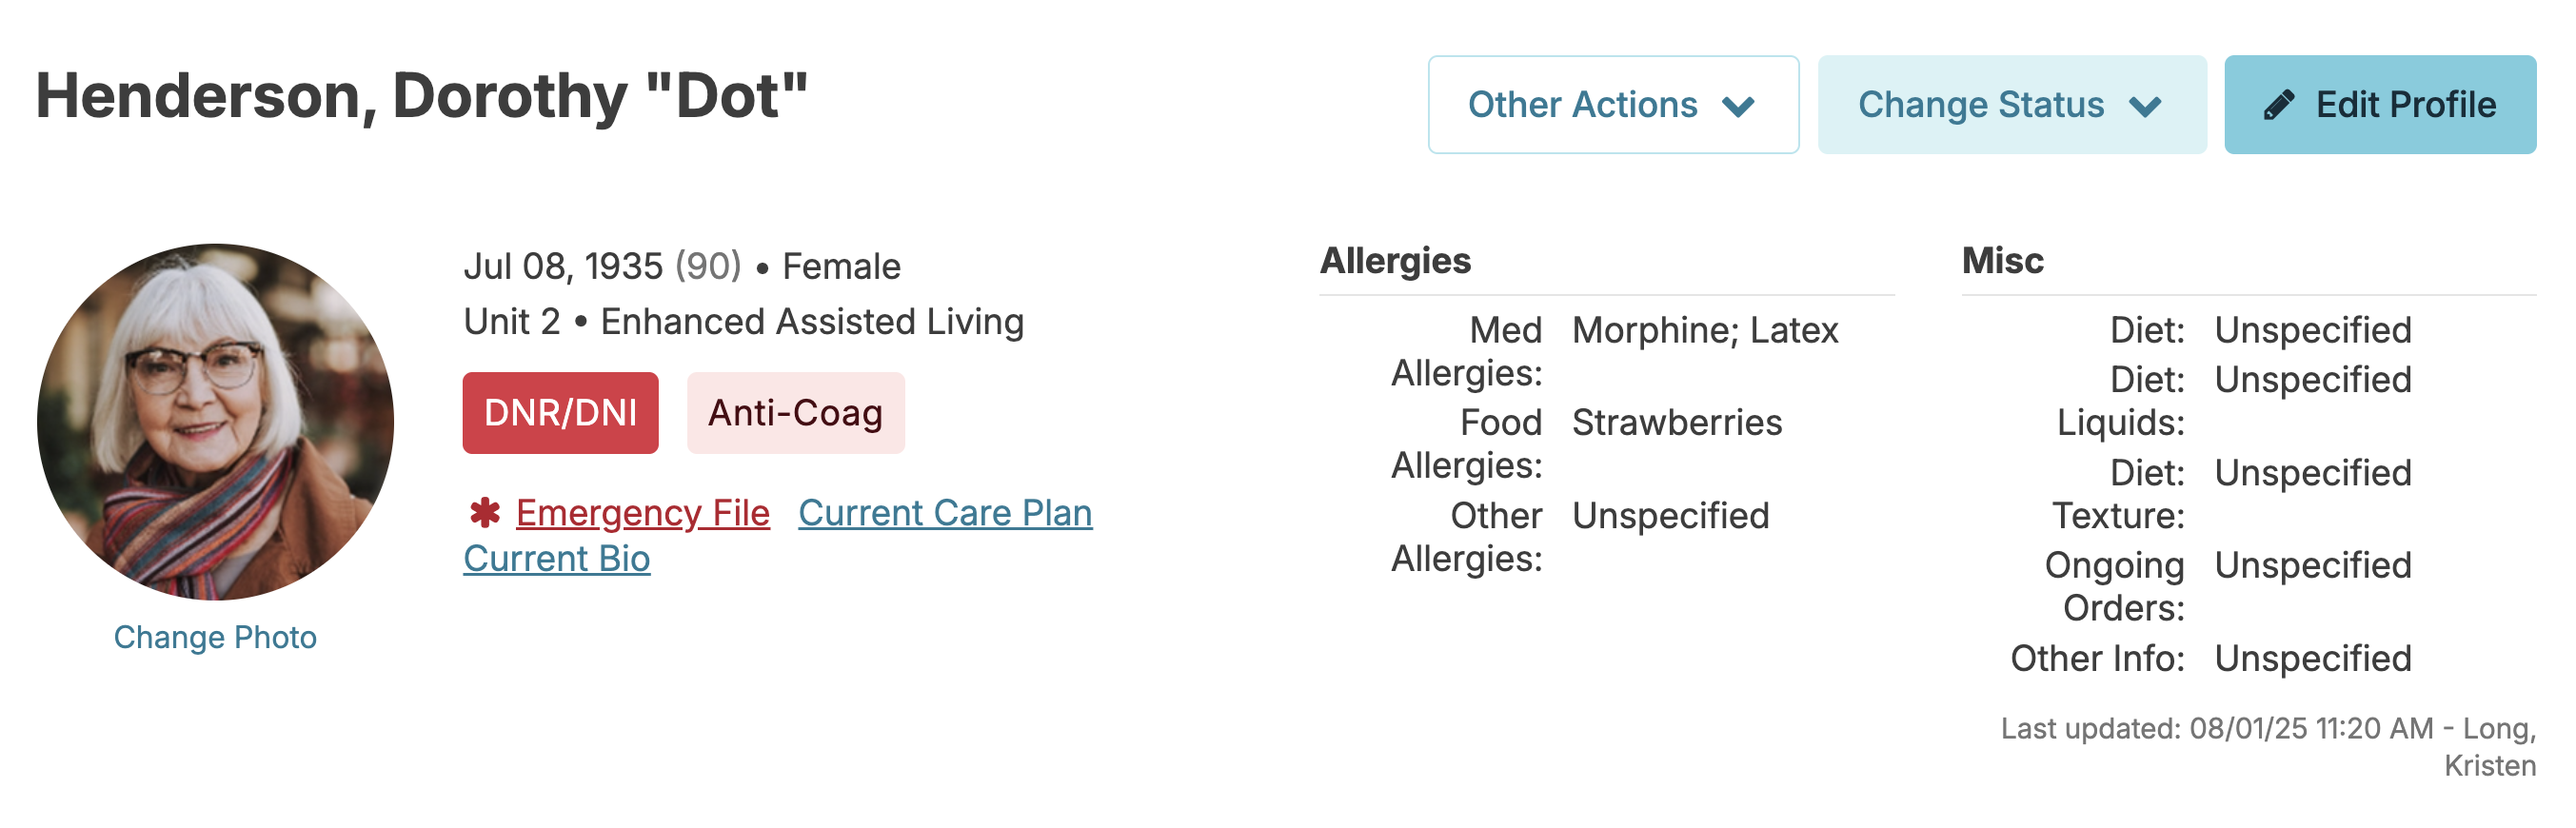
- DNR/CPR - are generated from the Code status designation identified in the resident profile
- Oxygen - appears if the resident has a current service in the category of 'Oxygen' in the Global Service List
- Hospice - if the resident has an active organization listed in their profile of the organization type 'Hospice'
- Home Health - if the resident has an active organization listed in their profile of the organization type 'Home Health'
- Anti-coag - if the resident is currently taking a medication classifed as an anticoagulant in the Global Medications list. If the anticoagulant is discontinued, the flag will automatically be removed the next calendar day.
- Seizure - if the resident has a diagnosis of Epilepsy or Seizure Disorder in their current list of diagnoses
- Diabetic - if the resident has a current diagnosis starting with the term 'Diabetes' (this filters and excludes the diagnosis of 'Diabetes Insipidus')
- COVID - if the resident has a documented positive COVID test. This flag will fall off if a negative COVID test is entered or automatically after 20 days (unless configured differently for your database). The COVID status needs to be documented as a PRN service using the service COVID Diagnostic Test.
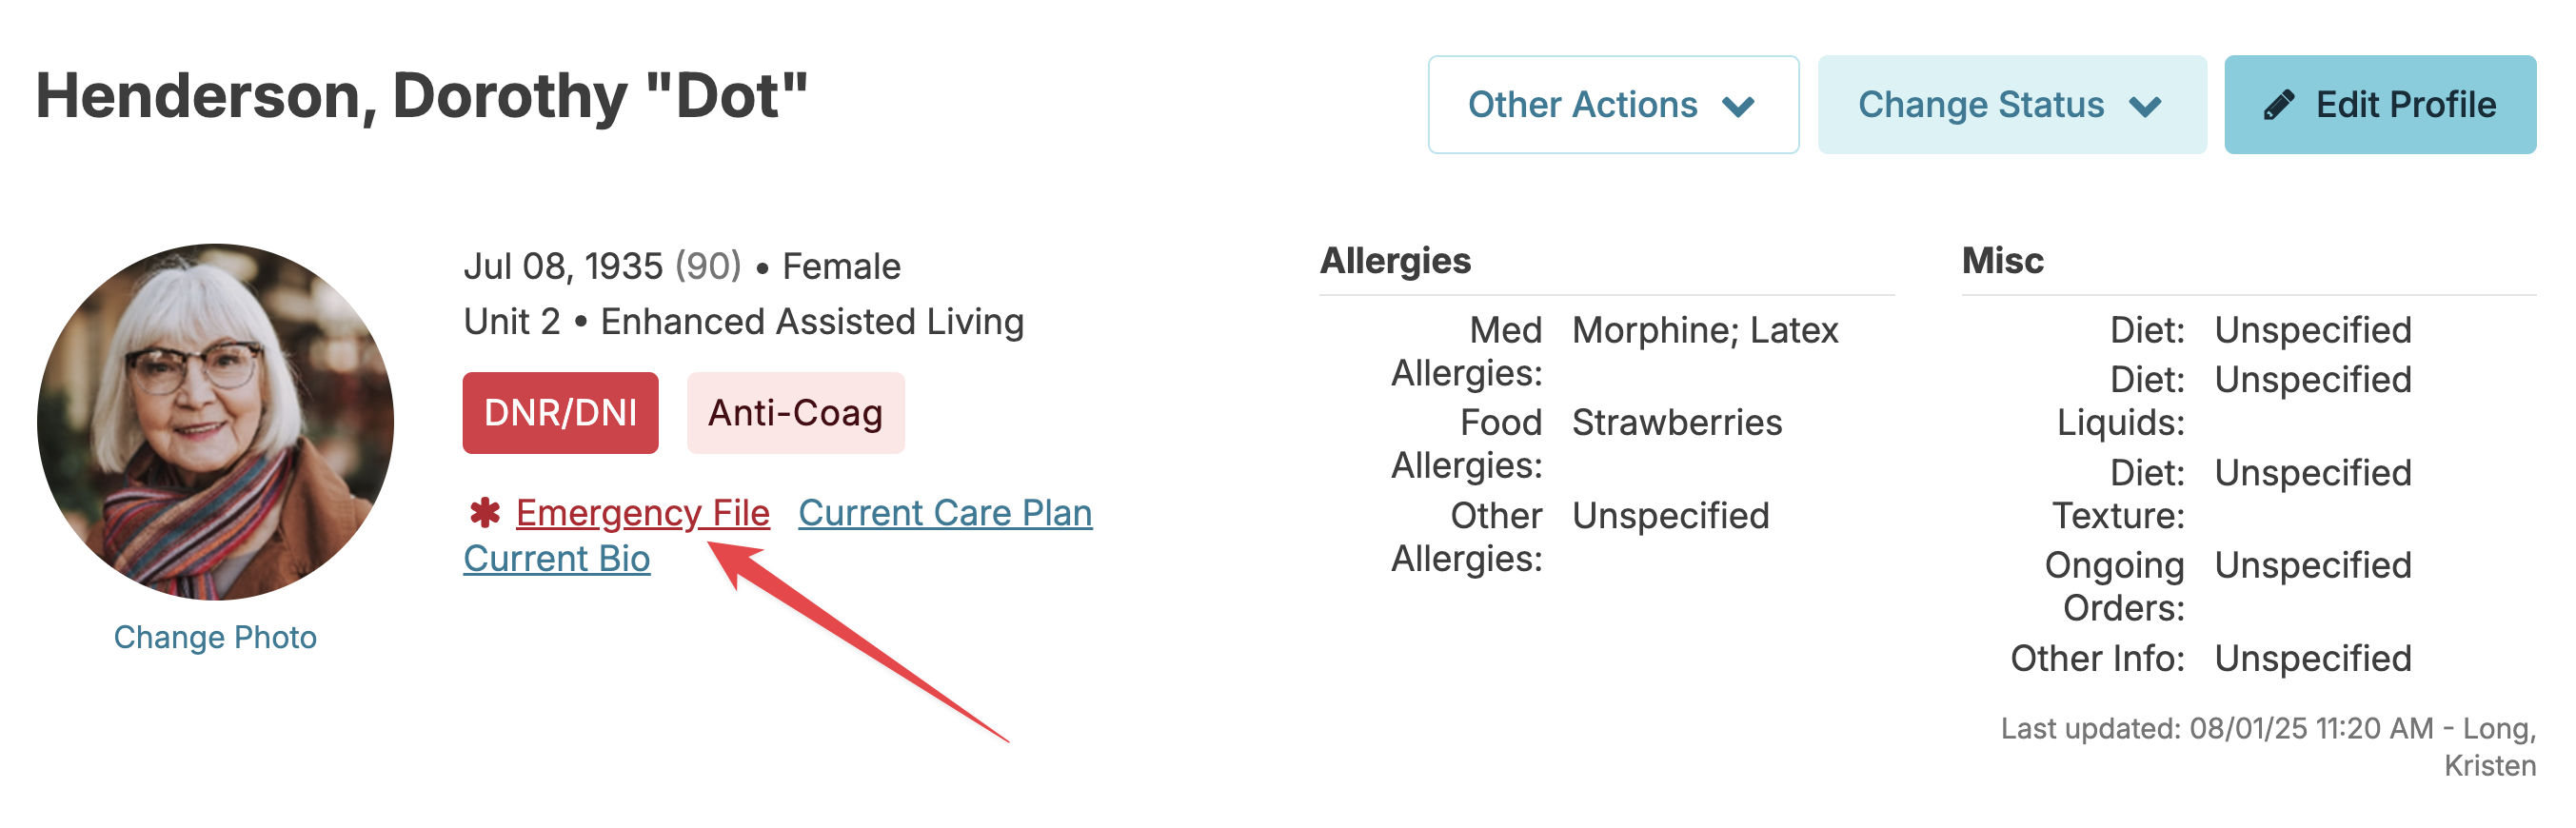
Emergency File
In the event of an emergency, clicking the red 'Emergency File' button will pull the most recent POLST/MOLST uploaded to the document type of 'Emergency File' in addition to the 'Resident Profile' report. This feature is for a POLST (Depending on state may be MOST, iPOST, etc) only to provide immediate guidance to emergency personnel so they can act swiftly during an emergency. This is not intended for advanced directives, or additional paperwork, all of which can be provided at a later time. These additional documents can be housed in their own category, so that there is still ease of access to these documents.
Note: the POLST/MOLST MUST be uploaded as a .pdf file format to the document type of 'Emergency File' for it to pull when the 'Emergency File' button is clicked.
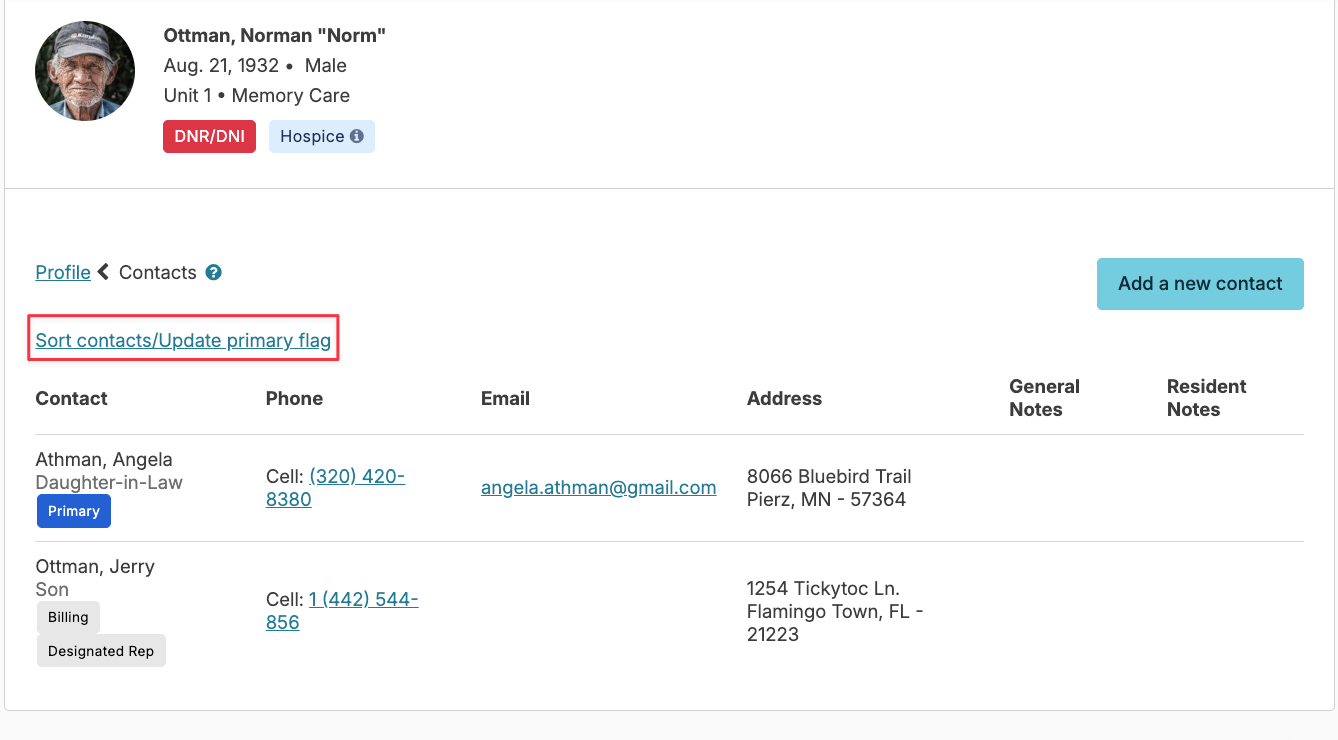
Contacts
Contacts are those people playing an important role in the lives of residents and prospects such as family, significant others, friends, decision makers, and so on.
From a resident or prospect's profile, you can view their Contacts list.
Add Contacts
From a resident or prospect's Contacts screen, press the Add a new contact button.
Enter details including address, phone number(s), notes, personal relationship to the resident, and legal relationships. Whichever contact is sorted at the top of the list is deemed the 'primary' contact.
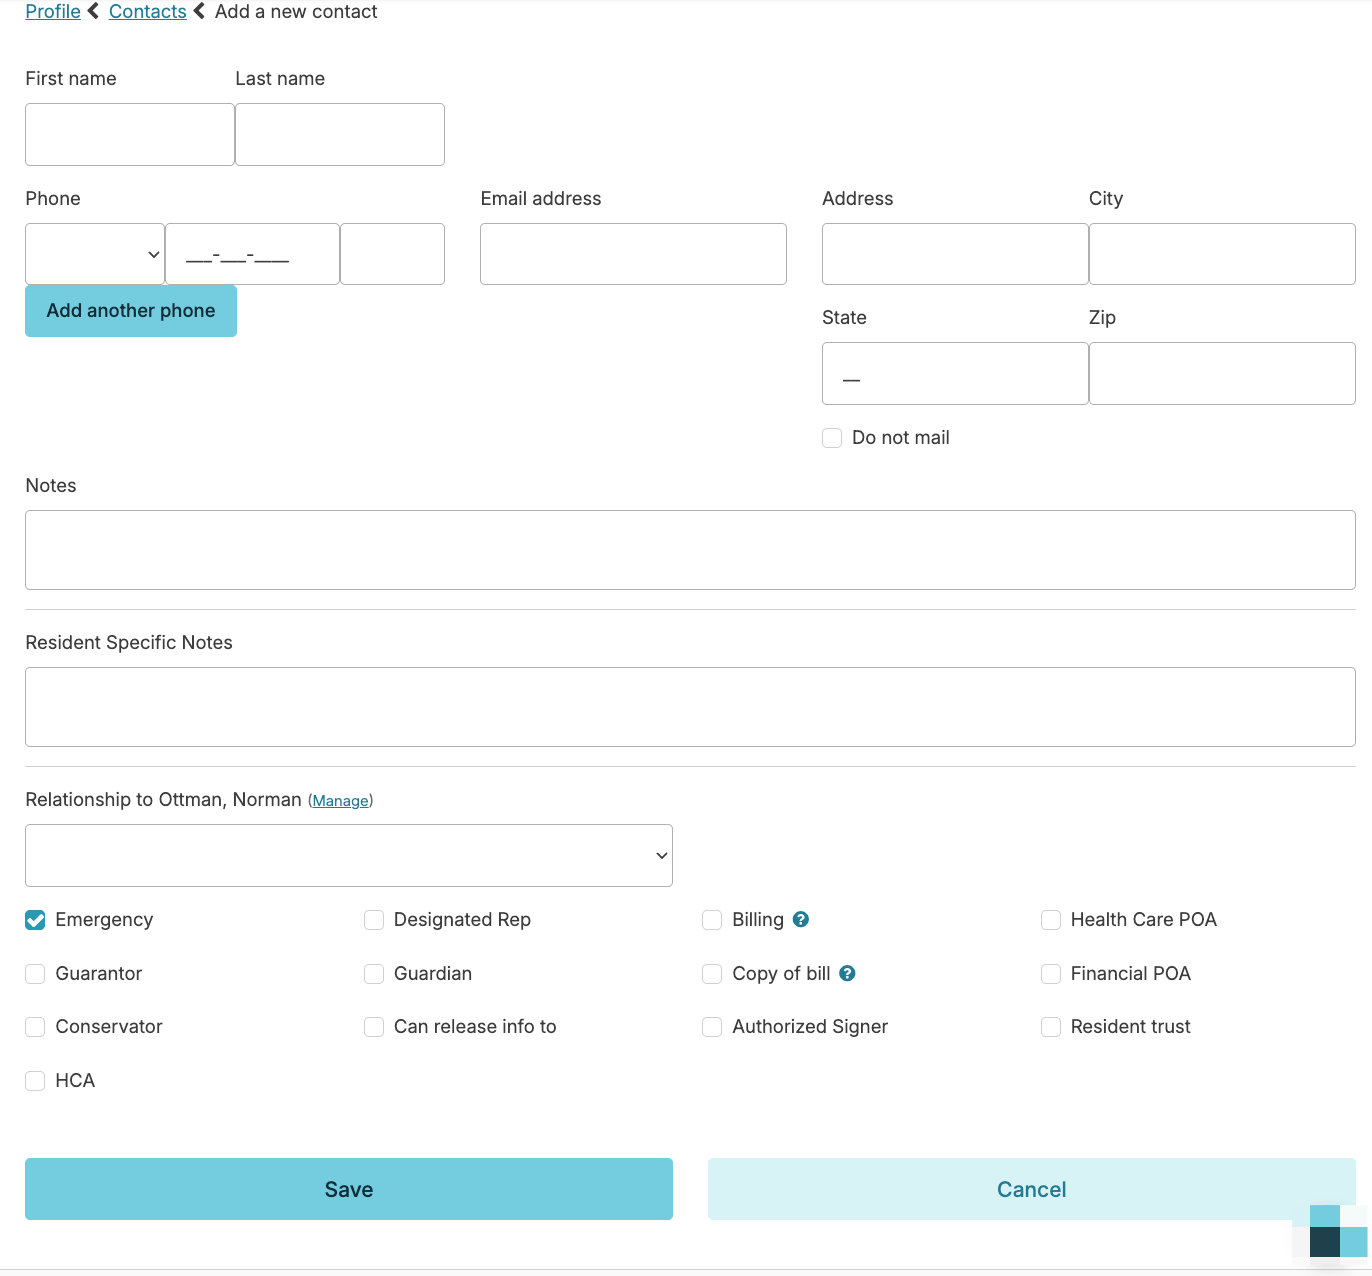
Billing: A contact with this option selected will become the default contact for billing matters for the resident. If checked, the resident themself will not receive invoices/statements. The 'Billing' contact's name and address will appear on the invoice/statement documents you generate. Only one of a resident's contacts should be their 'Billing' contact.
Copy of Bill: Contacts with this option checked will not be the primary billing contact for their related resident, but will receive copies of invoices / statements. Multiple contacts can have the 'Copy of Bill' role for a related resident.
Relationship types can be managed using the Manage button for that field.
Manage Primary Contact
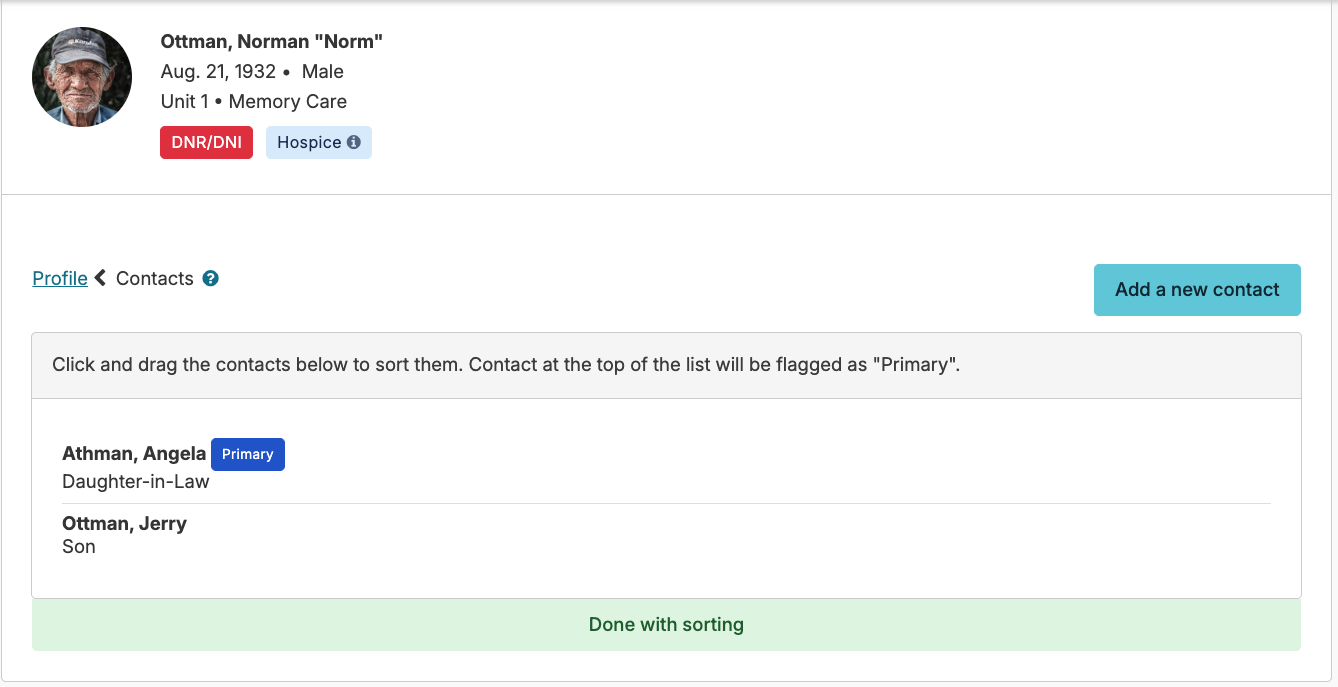
To manage or change a primary contact for a resident, you simply click on the blue Sort contacts/Update primary flag link in the resident's contacts.
Click and drag the contacts to sort them. Contact at the top of the list will be flagged as "Primary". When sorting is complete, click 'Done with sorting' and the order will be saved.
Residents > Contacts
Users with Contacts (Role 9) have visibility to the Residents > Contacts screen, a master list of all resident contacts, prospect contacts, and referral sources for your campus.
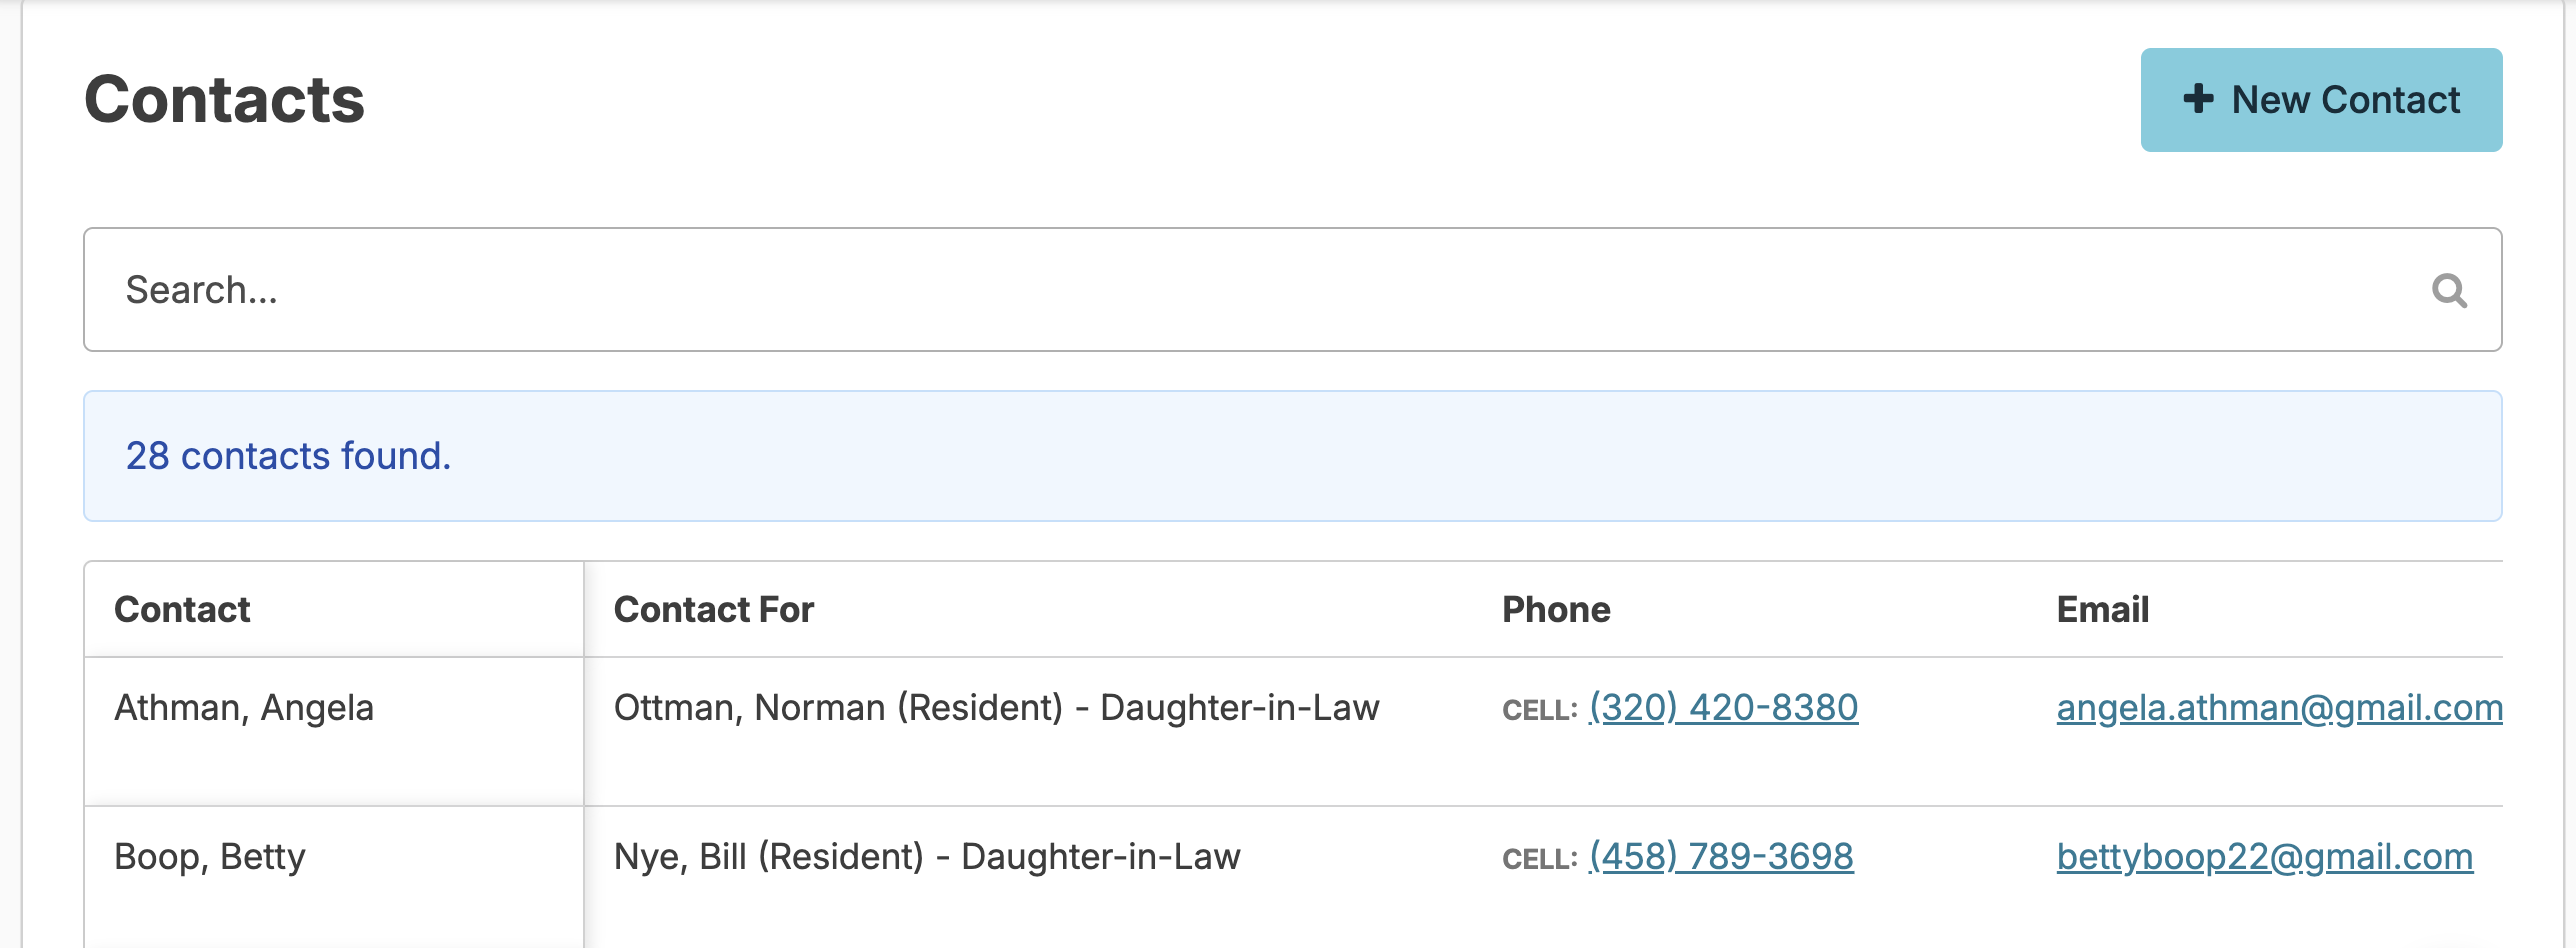
Update/Delete/Merge a contact
Click on any contact record to view the contact's profile
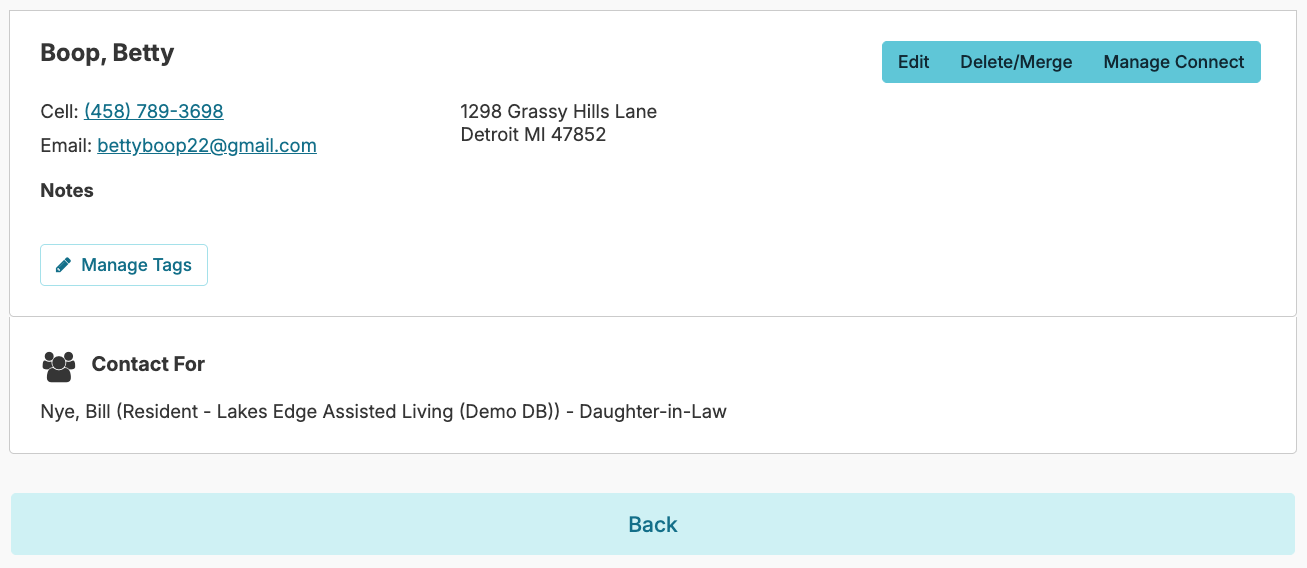
- Click on the blue edit button to update details
- Click on the blue 'Delete/Merge' button to remove a contact or merge duplicate contact entries
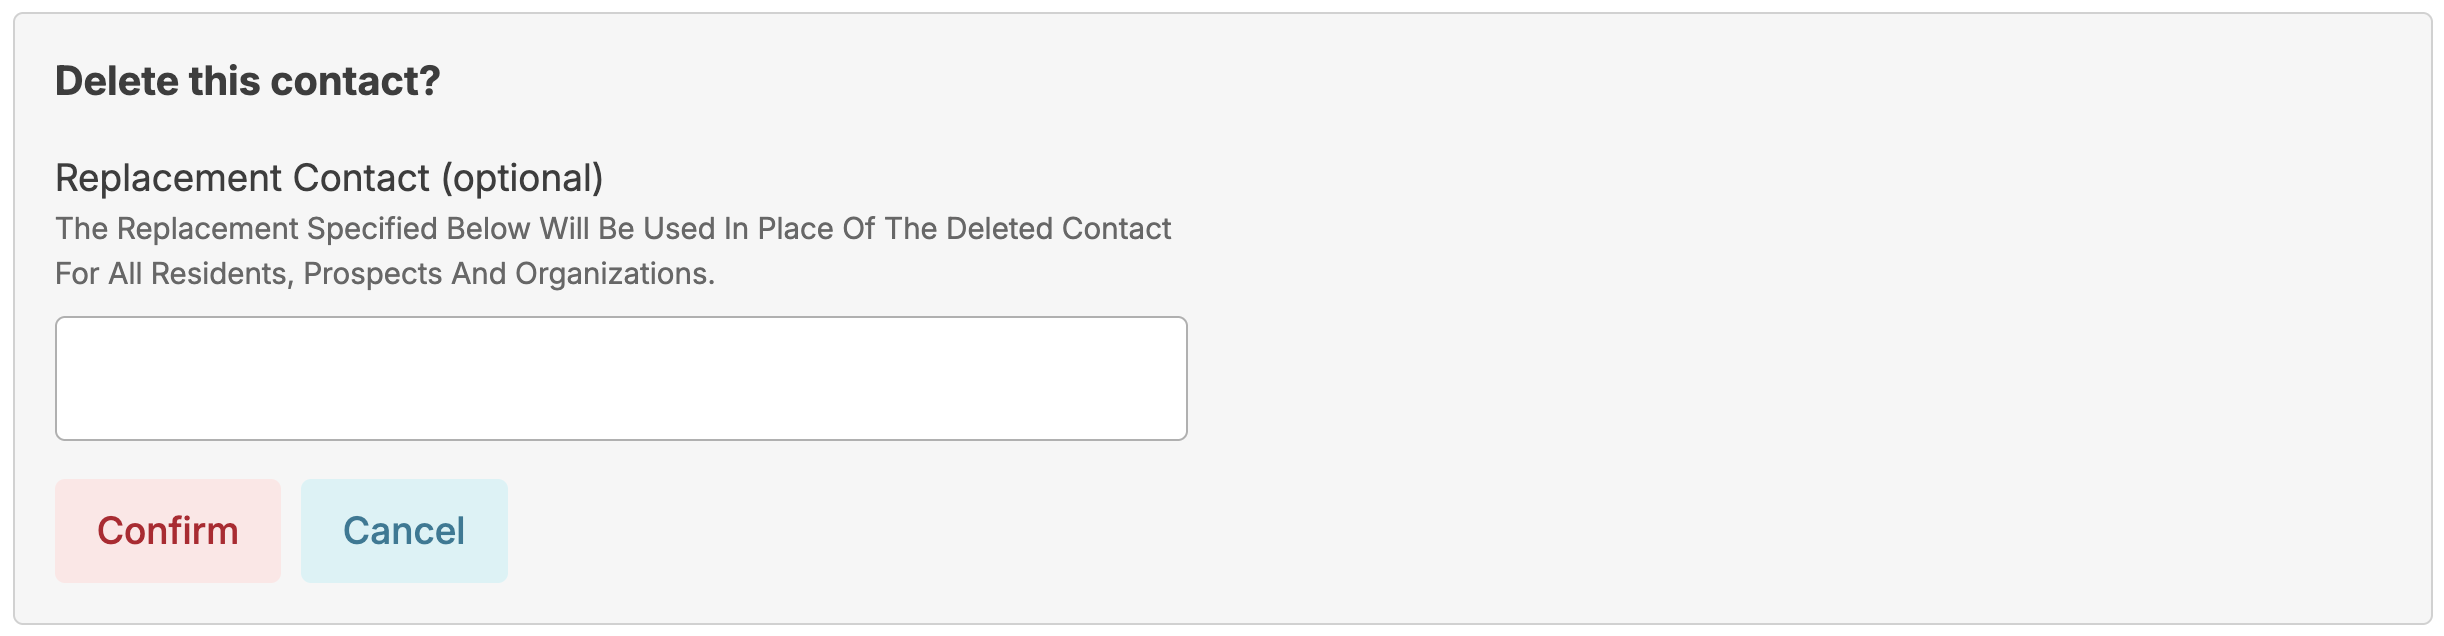
- You can completely delete a contact from your records from the Residents > Contacts screen if the contact is not associated to a resident.
- If the contact is already affiliated with a resident/prospect, you can also optionally replace it with another contact, updating every affiliated resident & prospect and associating them with a new contact of your choosing.
Resources
Resources include organizations and professionals that provide services and support to an individual resident as well as insurance information. Resource details entered for residents will appear as options on a variety of screens as well as reports.
- A resident's resources can be viewed/managed from the resident profile > Resources screen.
- A master list of all resources for any resident of your campus can be viewed/managed from Residents > Resources.
Managing Resident Specific Information
Resource Professionals
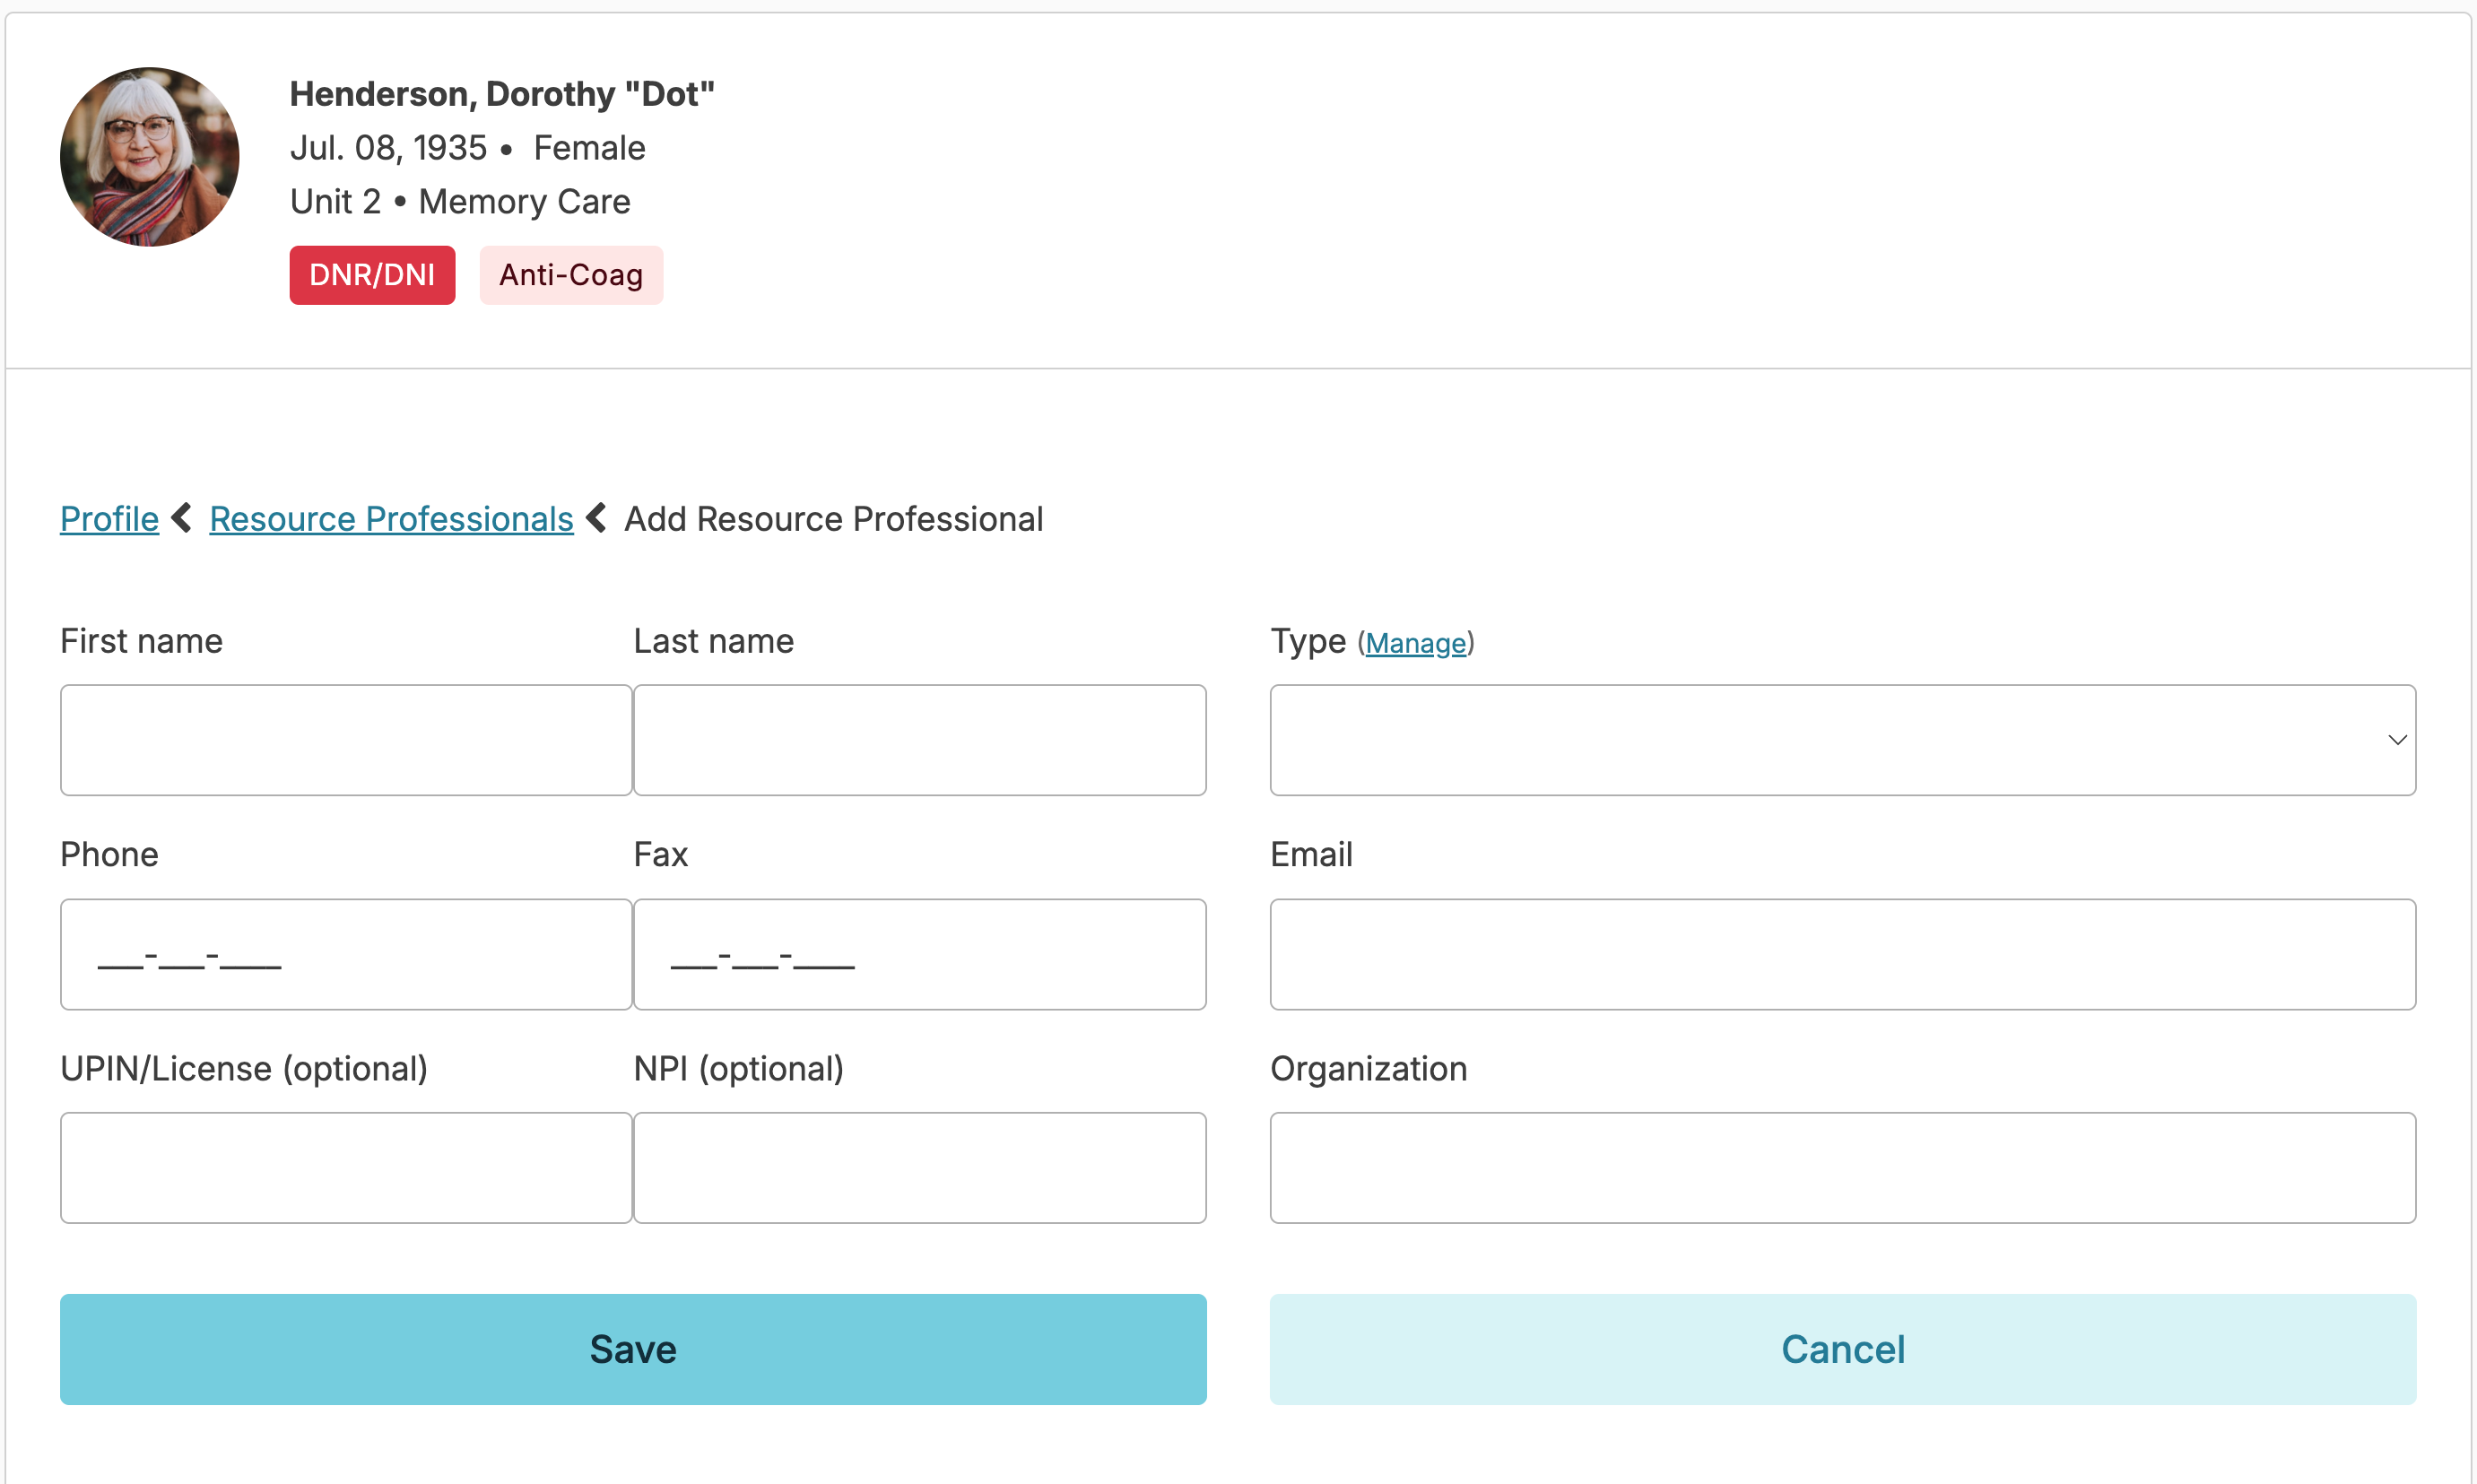
Resource professionals include the primary care providers, dentists, specialists, etc. To add a Resource Professional to an individual resident, navigate to the resident profile > Resources > Resource Professionals > Add Resource Professional. Start typing the name of the resource professional. If this person has already been added in Residex, their name and contact information will appear in a drop down and can be selected. If entering a brand new professional, you can keep typing the name and details of the professional and click Save.
The Manage link alongside the Type field will allow you to add a new type of provider. If the organization to which they belong does not populate when entering, you can keep typing to add the organization to the system.
The UPIN and NPI number fields are optional.
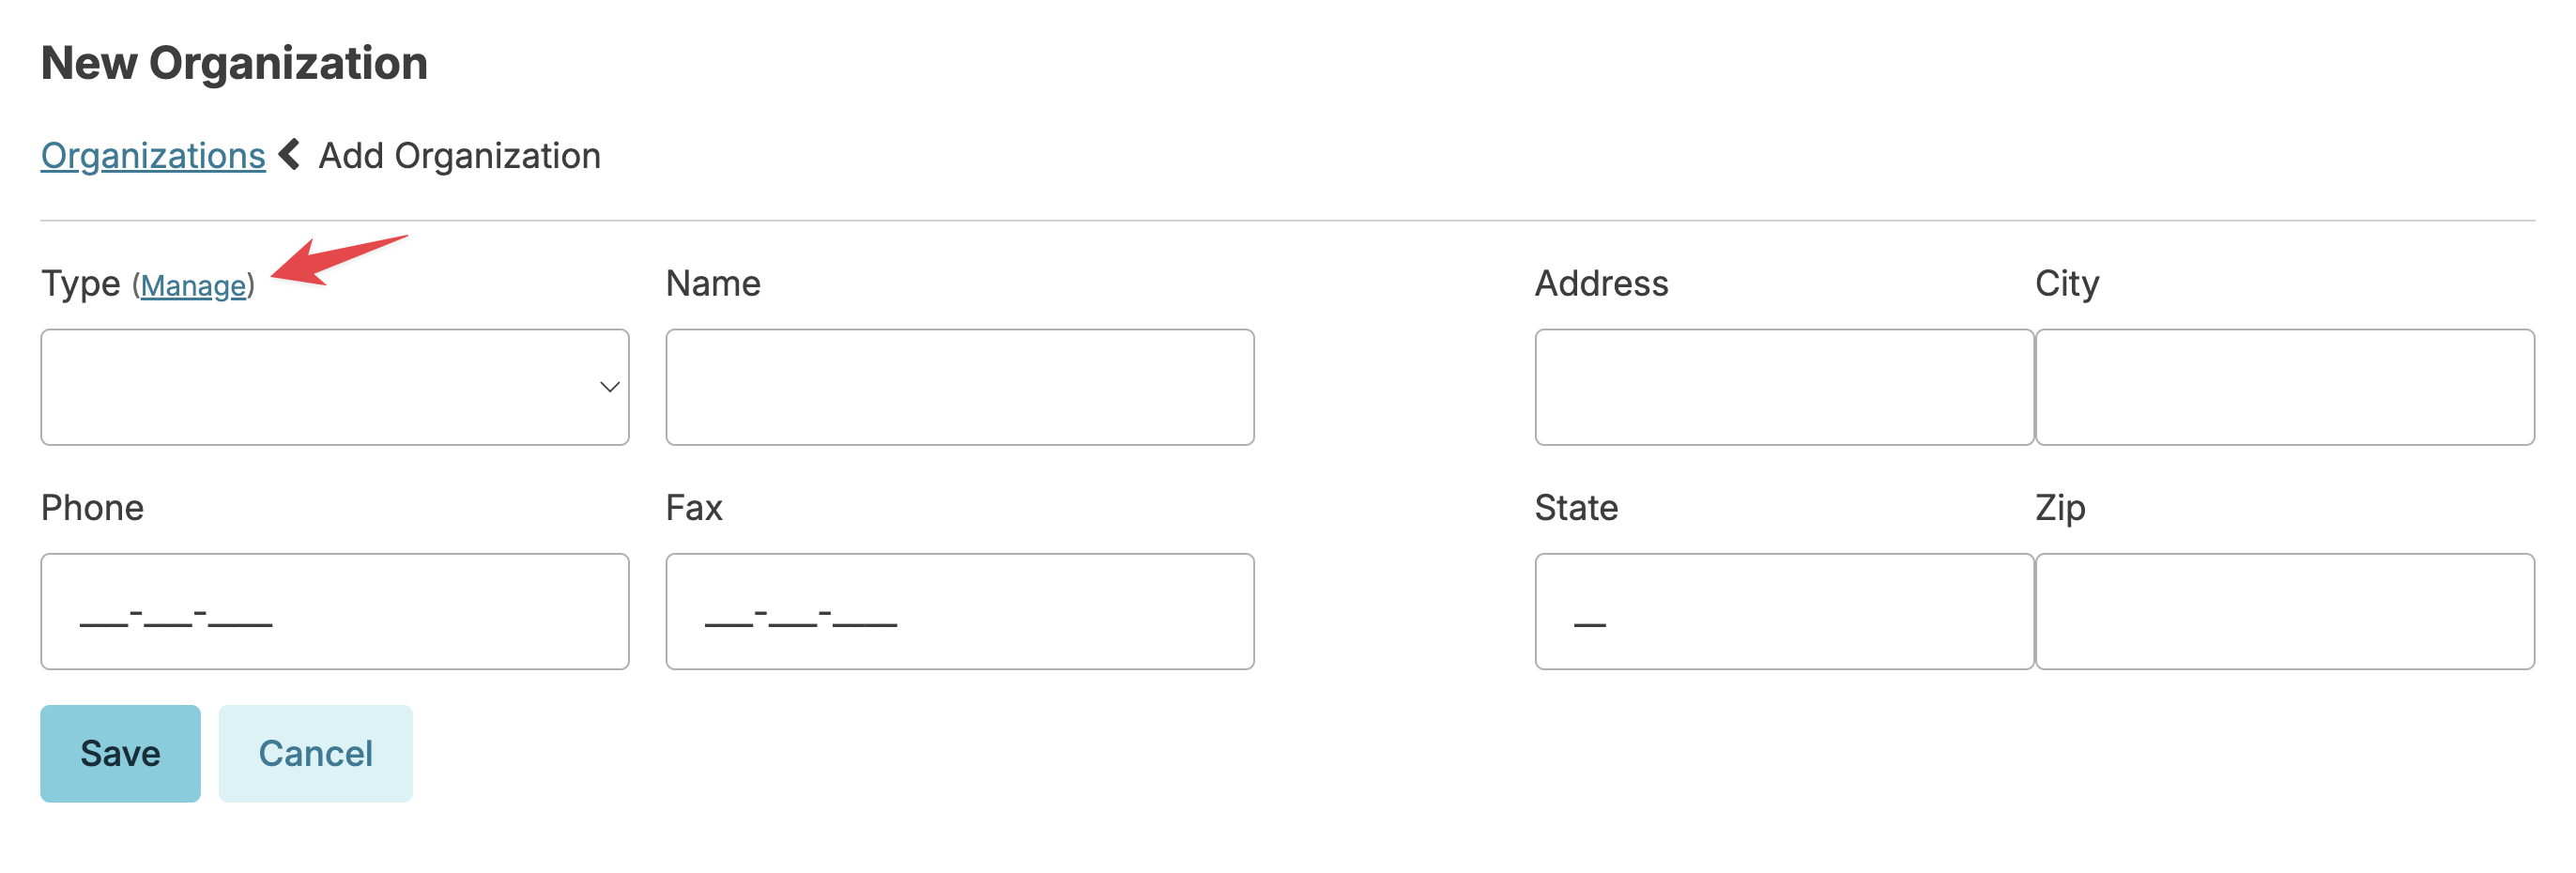
Organizations
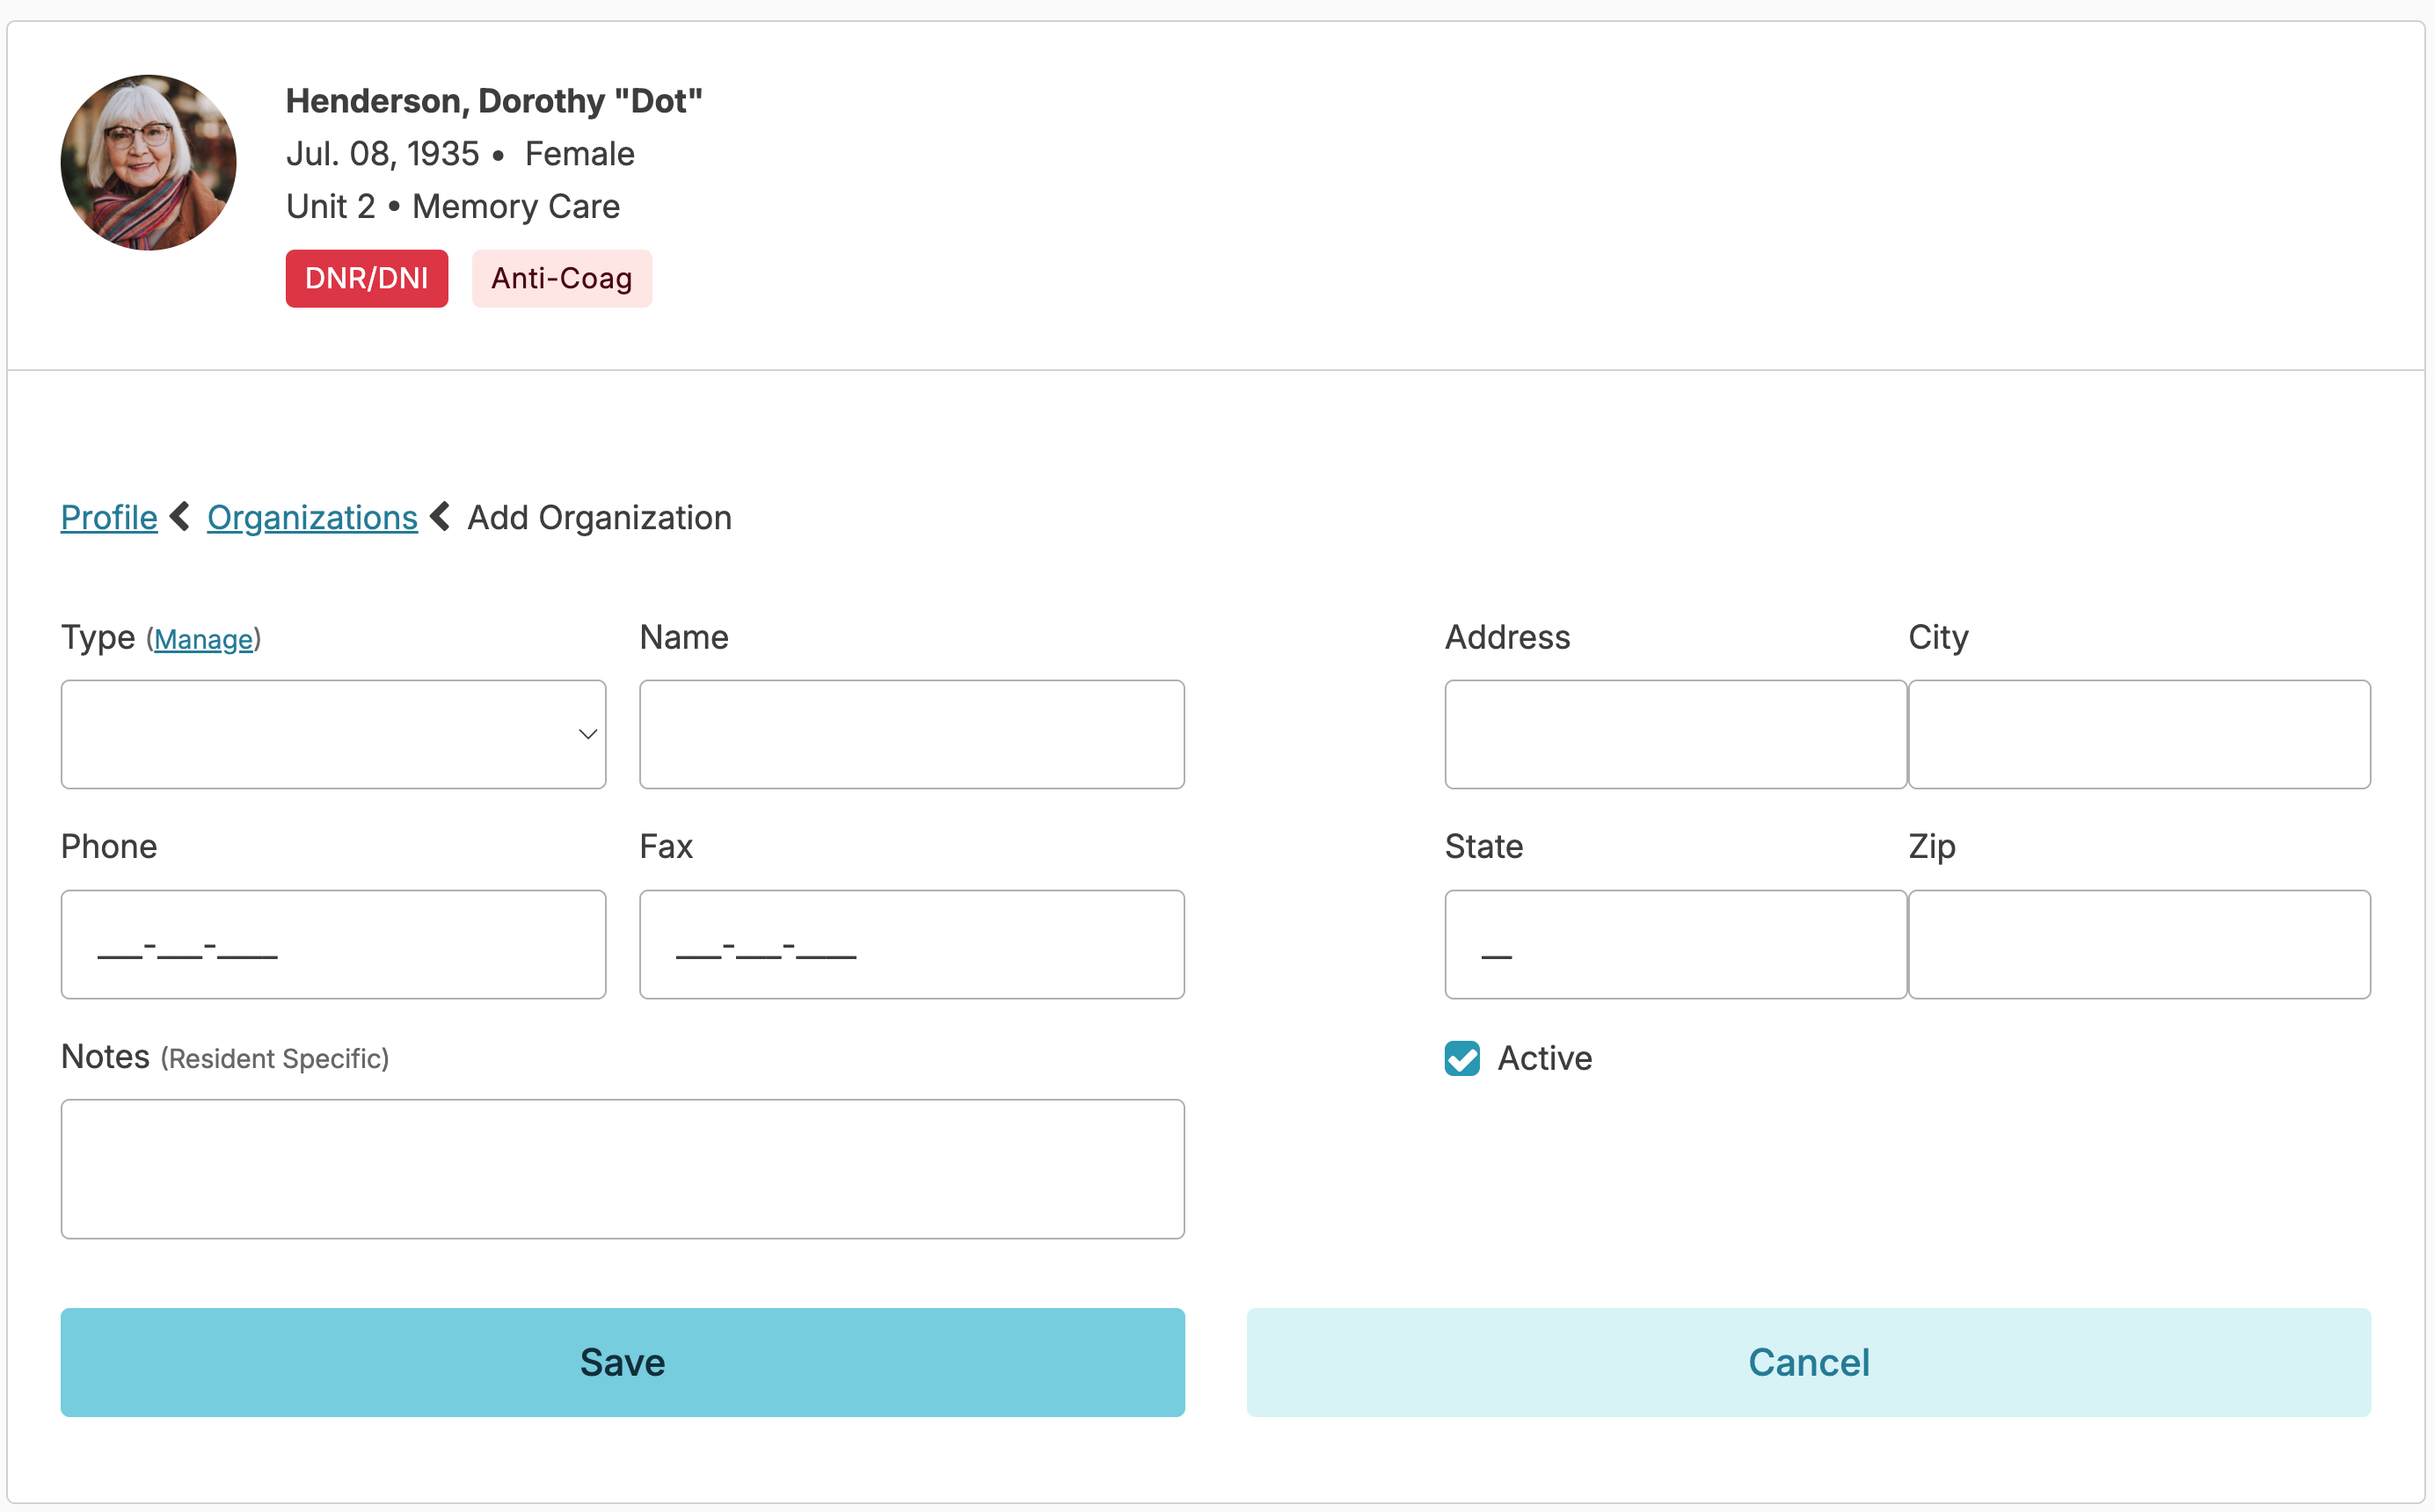
Hospitals, pharmacies, clinics, durable medical equipment providers, hospices, and Medicare-certified home care agencies, are all types of organizations that can be added.
To add an organization, navigate to the resident profile > Resources > Organizations > Add Organization > select the organization Type > enter the organization Name. If this organization has already been added in Residex, selecting the name and fields will populate the remaining information. If entering a brand new organization, keep typing the organization name and details and click Save to add the new entry. Entering a new organization (or editing an organization) requires the user to have role 1. Users with the 411 Role can add new Types of organizations.
An organization can be made Inactive for a particular resident if the resident no longer uses the organization or if they are a preferred organization but not currently providing services. Click on any organization in a resident's resource list > click edit > uncheck Active checkbox. These organizations are flagged as inactive in the resident organization list.
Managing Global Information
Administrative users may navigate to Residents > Resources to view/manage a master list of all organizations and resource professionals associated with any resident.
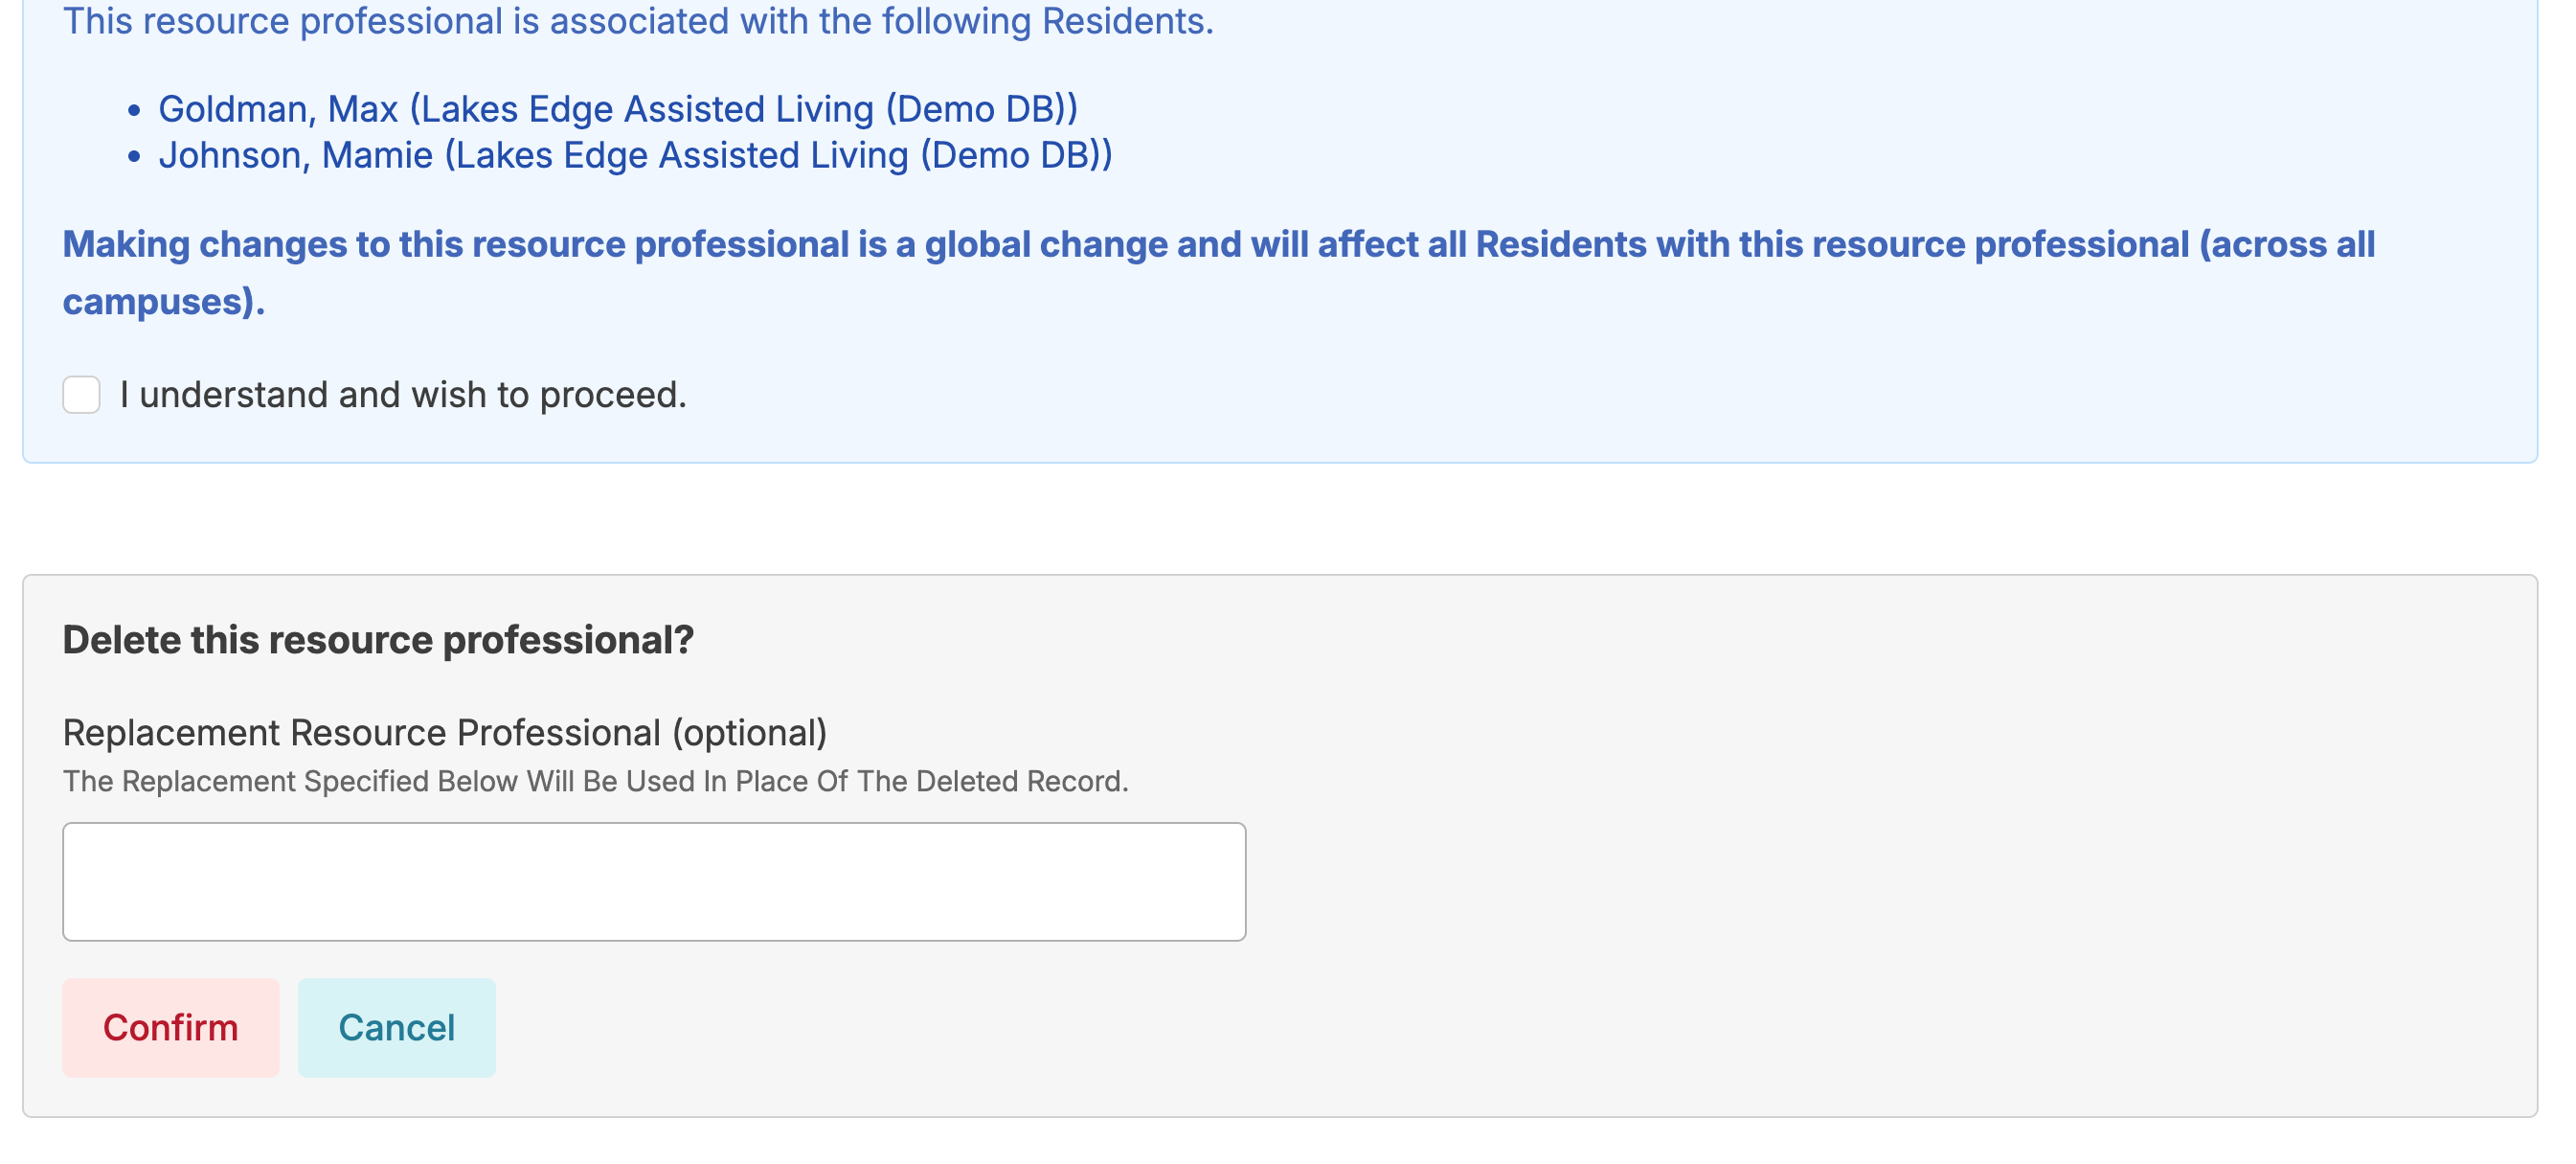
View Organization or Resource Professionals by selecting the tabs at the top. From there, you can view details for any of these resources, search for a specific resource, or click on one to update it. When a resource is updated, an alert will remind you that updating the resource will affect all residents associated with this resource.
Organizations
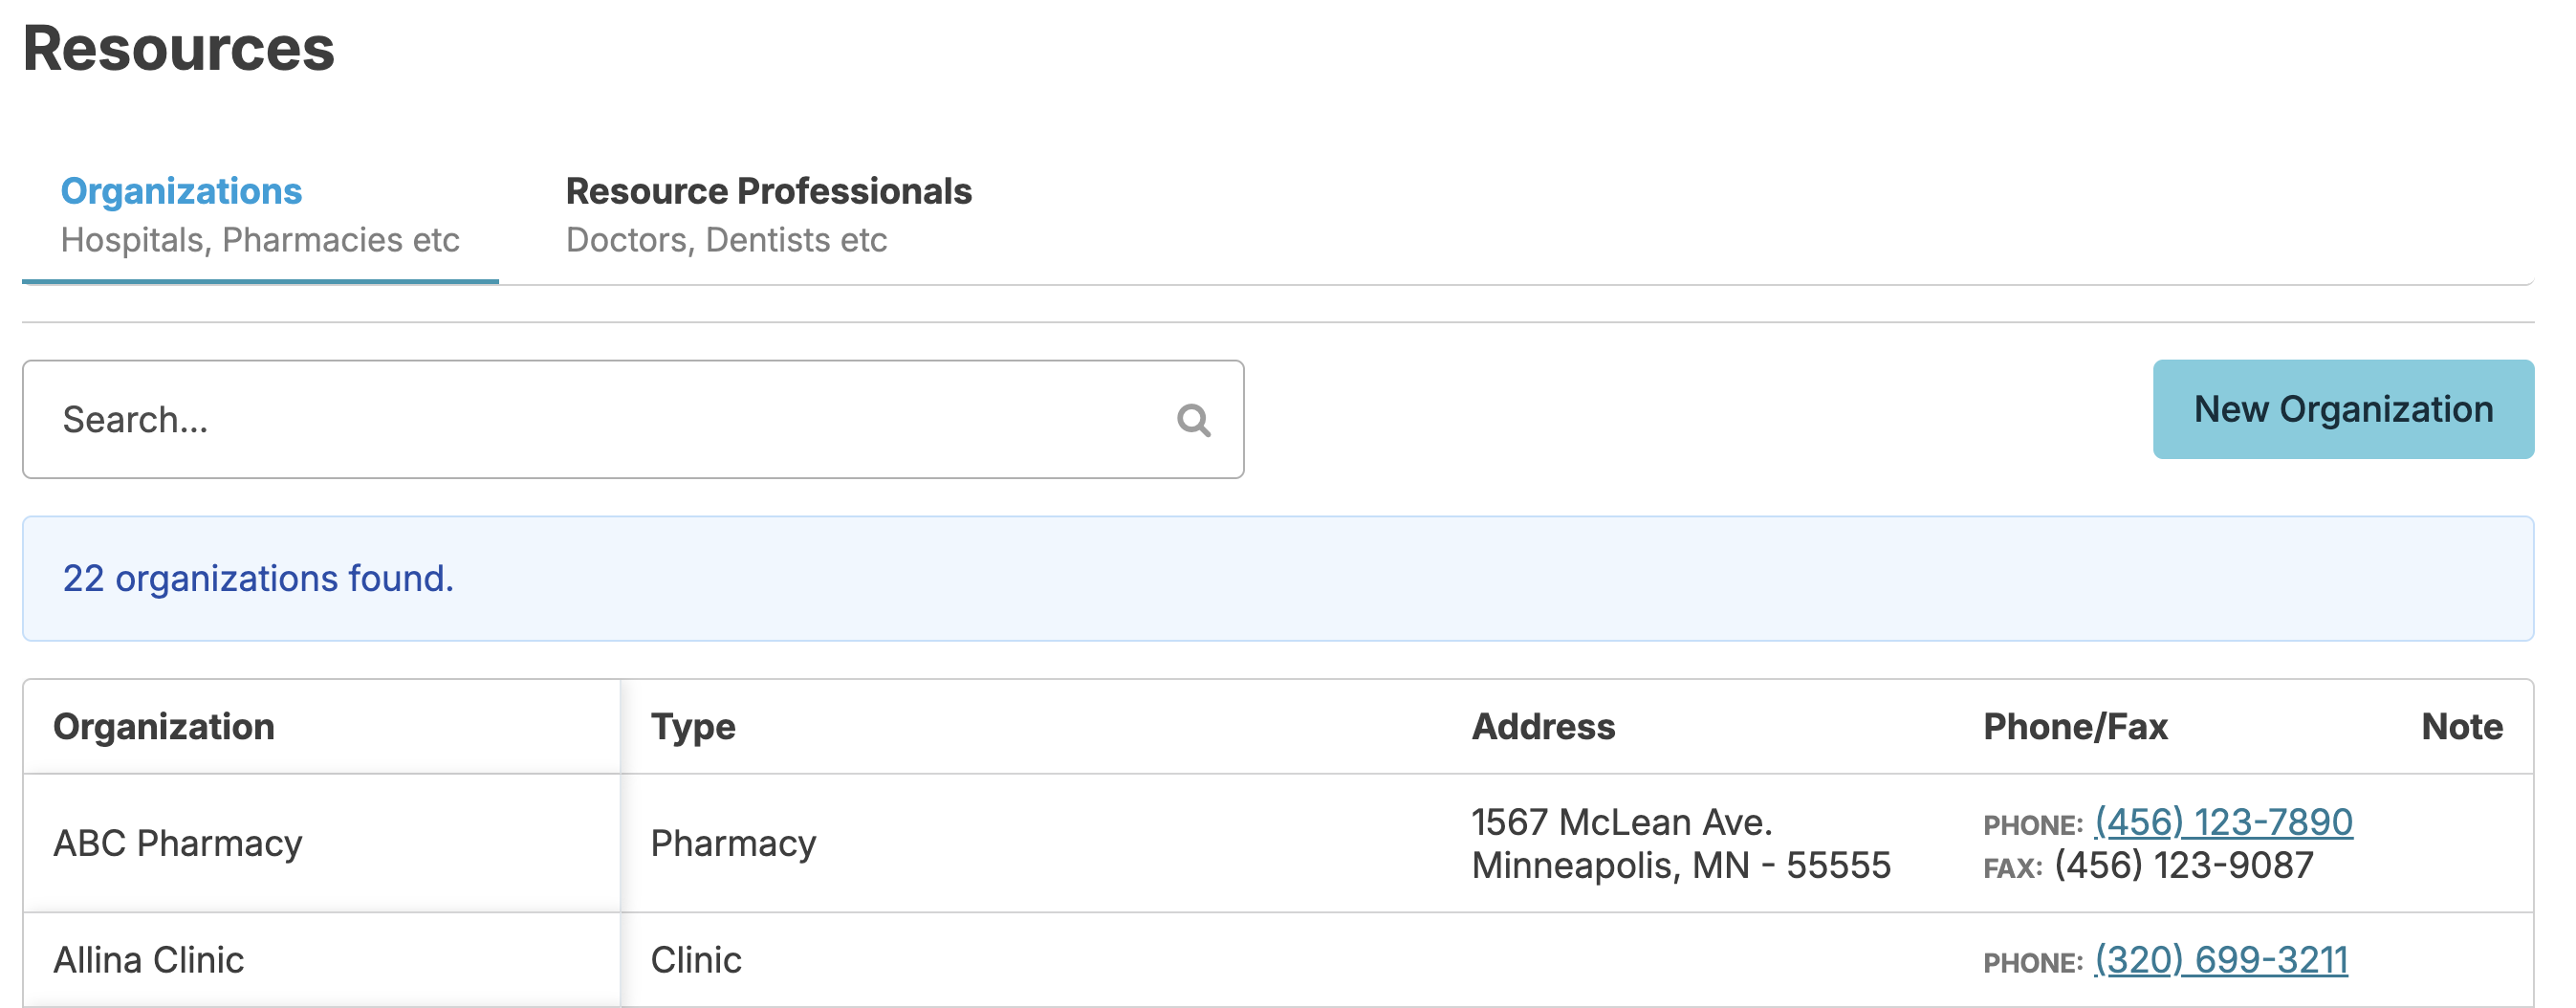
- Click the New Organization button at the top to create a new organization. From this screen, you can click Managenext to› Type to manage your available organization types.
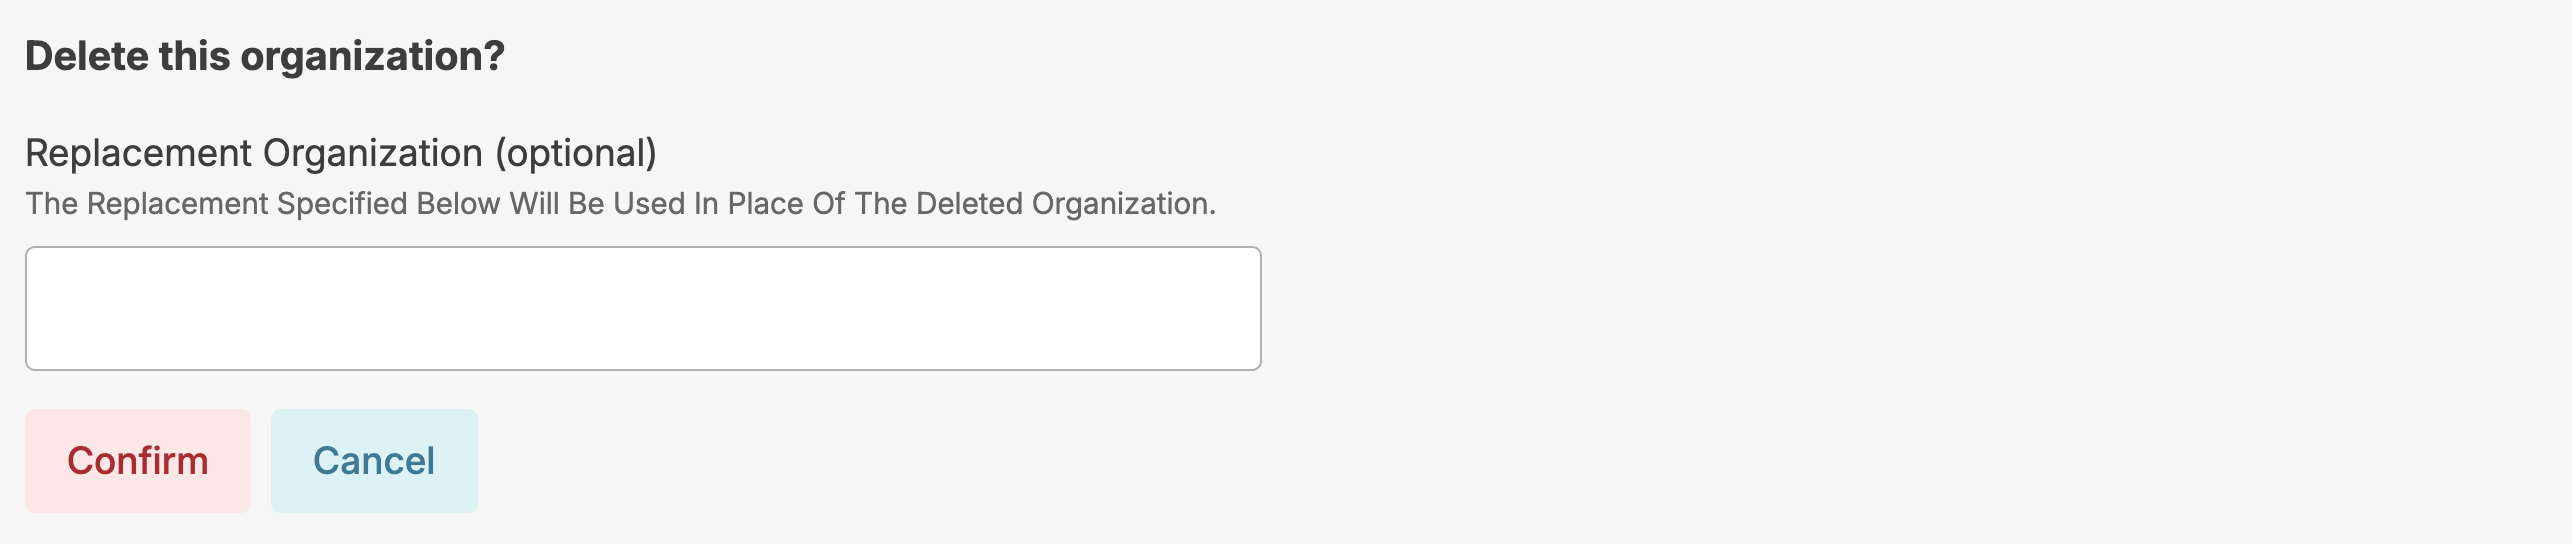
Delete/Merge organizations
- You can completely delete an organization from your records from its profile screen.
- If the organization is already affiliated with a resident/prospect, you can also optionally replace it with another organization, updating every affiliated resident and prospect and associating them with a new organization of your choosing.
You can also edit a resource professional from the organization profile by selecting the resource professional you wish to edit. Additionally, to change the organization the resource professional is linked to, simply select a different organization in the designated field when editing.
Resource Professionals
Click on the Resource Professionals tab to manage professionals associated with your residents. Click on any resource professional to edit their details.
Delete/Merge Resource Professionals
- You can completely delete a resource professional from your records if they are no longer associated with a resident.
- If the resource professional is already affiliated with a resident/prospect, you can also optionally replace it with another resource professional, updating every affiliated resident and prospect and associating them with a new resource professional of your choosing.
Marketing Capability
Marketing campaigns can be added to specific organizations. This will allow you to indicate how a prospect heard about your facility and track the effectiveness of marketing efforts.
To add a campaign to an organization, navigate to:
- Residents > Resources > Organizations
- Select the Organization
- Click + Add Campaign
- Enter the campaign name, start date, and optional end date
- Enter a note as needed
All campaigns are visible on the organization screen. Ended campaigns will be greyed out. Campaigns will sort by date on the organization screen.
Marketing reports can be found under the Prospect category on the reports screen.
Managing Resident Status
Resident status options allow you to manage census information, resident status history, hospitalization rates and discharge process.
Care Status Options
By default, only nurses, managers, supervisors, and administrative users can change client status. If you need other provider types, such as direct support persons (DSP) or HHAs to have this ability, please email support@residex.ai.
The following care status options can be managed from a resident profile:
Reserved
When planning for a future admission, we recommend using the Prospects feature to allow for accurate billing and census data of current residents. The prospect feature is specifically designed for managing potential residents before they arrive. If you do admit a resident with a future intake date, they'll be placed under a 'Reserved' status. When the resident arrives, you can navigate to the resident profile > Change Status > Make Active button to make them active so that their services and medications will populate to the Today screen for documentation.
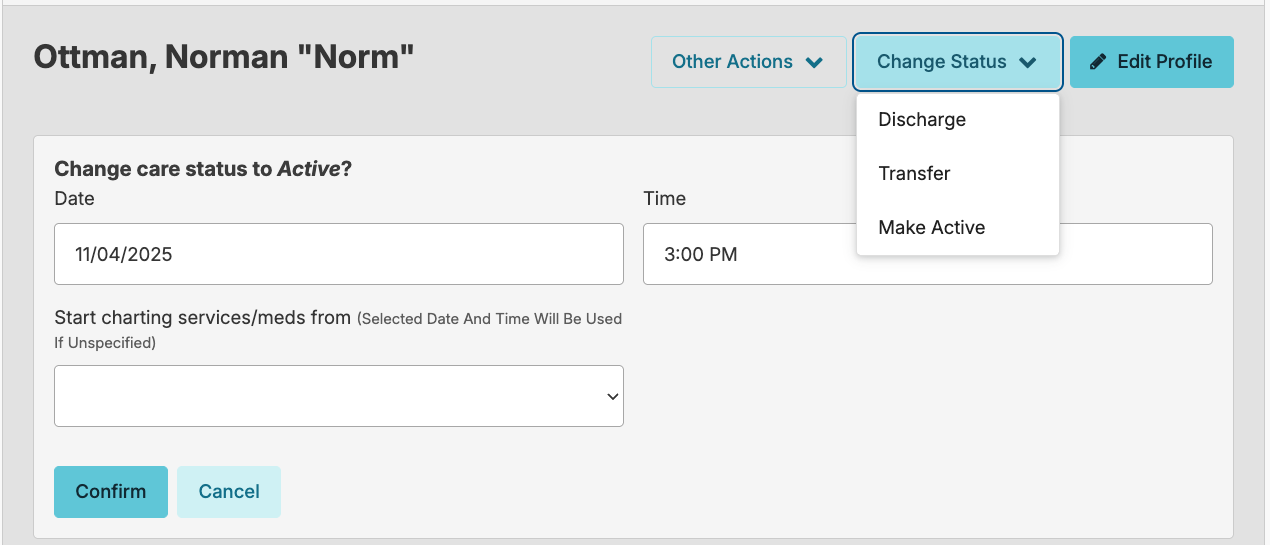
Active
This status indicates the resident is at the facility or their home and that meds and services can be documented.
Hold
If the resident is hospitalized or goes on a leave of absence from the facility, navigate to the Resident Profile >Change Status > Put on Hold button. Select the date and time that the services should be paused for that resident. Services scheduled earlier (but not yet charted) will remain active and available to chart up until the 'hold' time. Selecting the reason 'hospitalization' will allow you to track hospitalization and re-hospitalization rates for your campus.
When a resident returns, go to their profile and select Change Status > Make active, using the date and time fields to indicate what time the resident returned. You will also be asked what time you would like the first services for the resident to populate to the Today screen. If the resident returns at 12:00 PM but needs to have a 9:00 AM service provided or med administered, you can select the 9:00 AM option from the dropdown so staff can chart those meds or services.
Staff with Administrator (Role 411) or Administrator Assistant (Role 410) can manage the hold reason types by navigating to the Resident Profile > Change Status > Put on Hold > clicking the blue Manage button next to the hold Reason, and clicking New Reason. On the Add new Reason screen, you will enter the reason and select the reason type, Institutional (Hospital, SNF) or Other (Family visit, Other). The hold reason type will affect how holds are billed.
NOTE: Medicaid Hold Types
Institutional hold claims cannot be submitted for the admission date to a healthcare facility, but may be submitted for the return date from the institutional setting.
Other (Non-Institutional Leaves) claims may be submitted for both the departure date and return date, provided the resident received services on those days.
Discharged
To discharge a resident, navigate to their profile > Change Status > click the Discharge button > enter the date, time and reason for discharge. Users with Administrator (Role 411) or Administrator Assistant (Role 410) can manage the reason for discharge by clicking the manage button next to the reason field. The chart will no longer be active but will remain accessible in Residex by clicking the Current Residents drop down and switching to Discharged Residents.
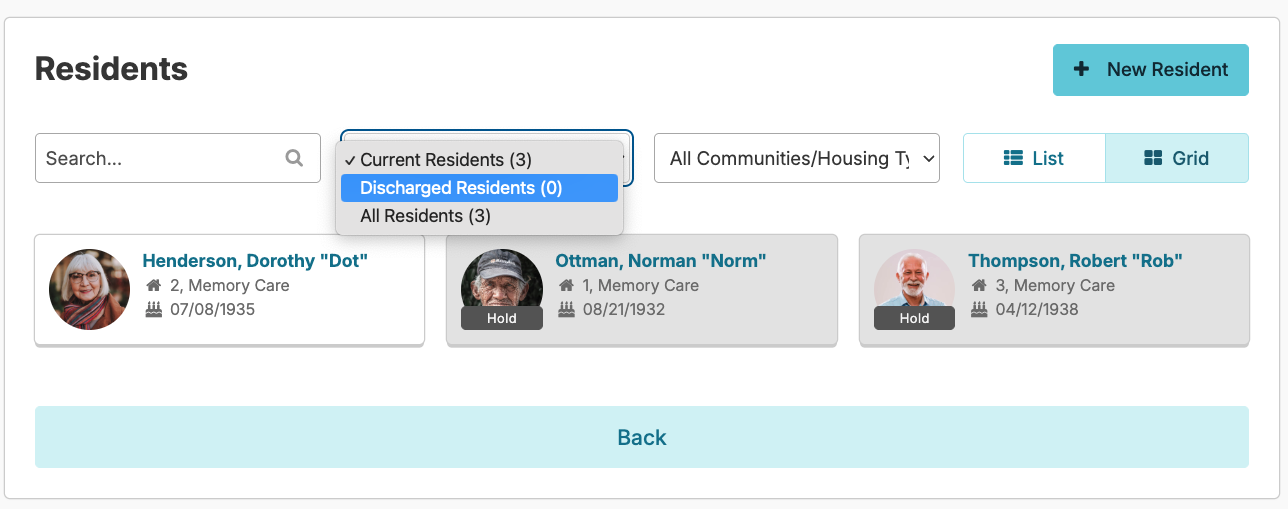
Users with the Administrator (Role 411) can delete a discharged resident if the resident has not had any charting completed.
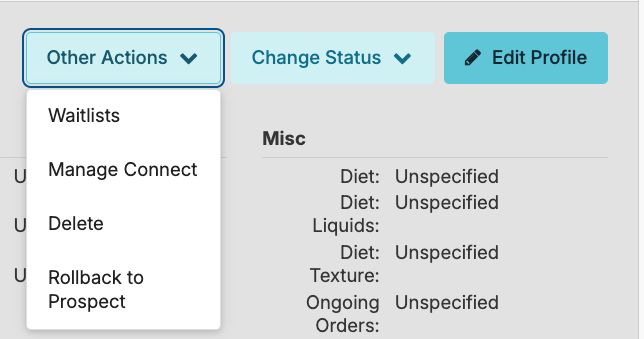
Rollback to Prospect
Sometimes prospects are admitted early but then don't arrive as planned. Users with the Prospects (Role 52) are able to convert the discharged resident back to a prospect given these 4 pre-requisites:
- The resident must be discharged
- The resident must have no billing pending
- The resident must have no charted services
- The resident must have previously been a Prospect in Residex
If all prerequisites have been met, simply click the Other Actions > Rollback to Prospect button beneath their picture.
Reactivating/Readmitting a Resident
If a previous resident is returning to your facility, you can reactivate their existing profile rather than creating a new one. Follow the steps below:
- Navigate to the resident's Discharged profile.
- Click Change Status.
- Select Make Active.
- Update the status as needed.
- Click Confirm.
The resident's profile will then appear on the Active Resident list, where you can update their information as necessary.
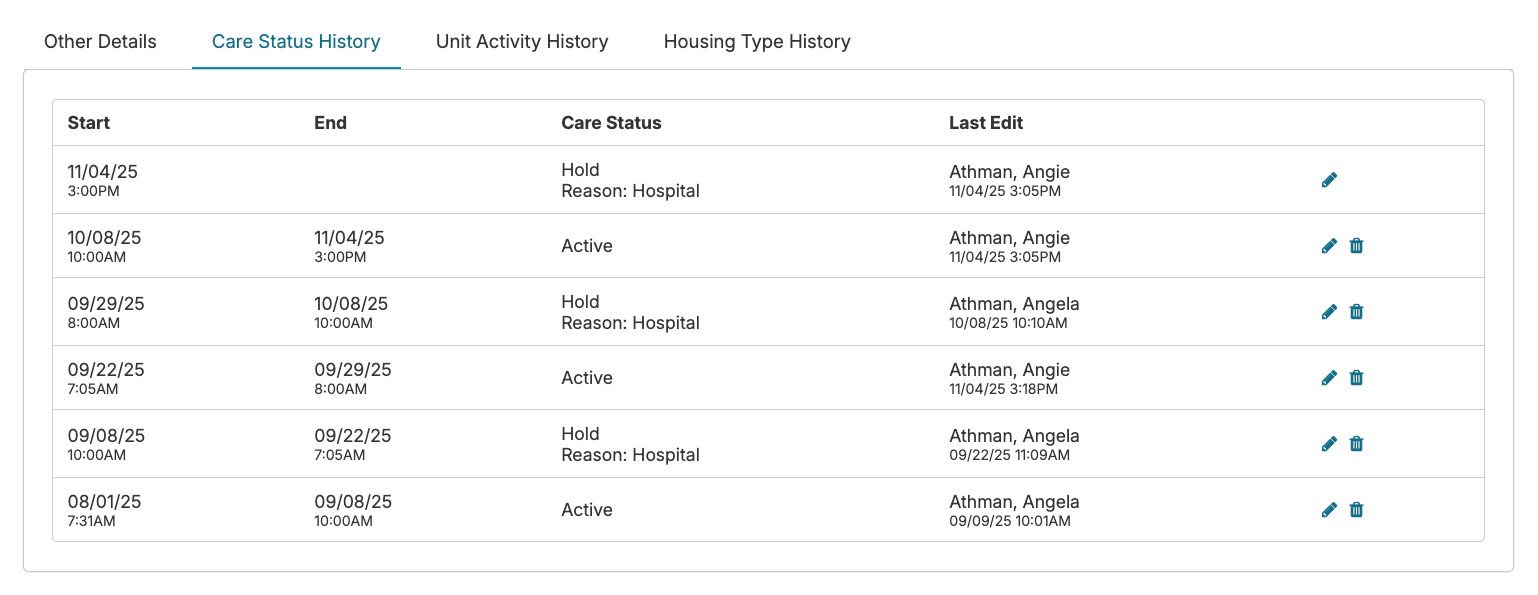
Clicking on the Care Status History link located in the Resident Profile will allow you to view all care status changes for that resident. If there are discrepancies in care status, such as a return date earlier than a leave date, the discrepancies will be highlighted and are available to edit using the blue pencil to the right of the care status line item. Discrepancies will interfere with accurate census and billing reports.
Resident Notes
Narrative notes recorded here can be viewed alongside Service Notes, Appointment/Provider Contact and Incident Follow Up Notes to create a cohesive timeline of events and observations about the resident.
Enter a Resident Note
You can enter a resident note by navigating to Clinical > Resident Notes > New Resident Note or from the resident profile > Notes > New Resident Note.
Enter the Occurrence Date > Occurrence Time. Residex will still track the actual date and time the note is entered. Enter the Resident > Note Type > Topic, and the narrative note itself.
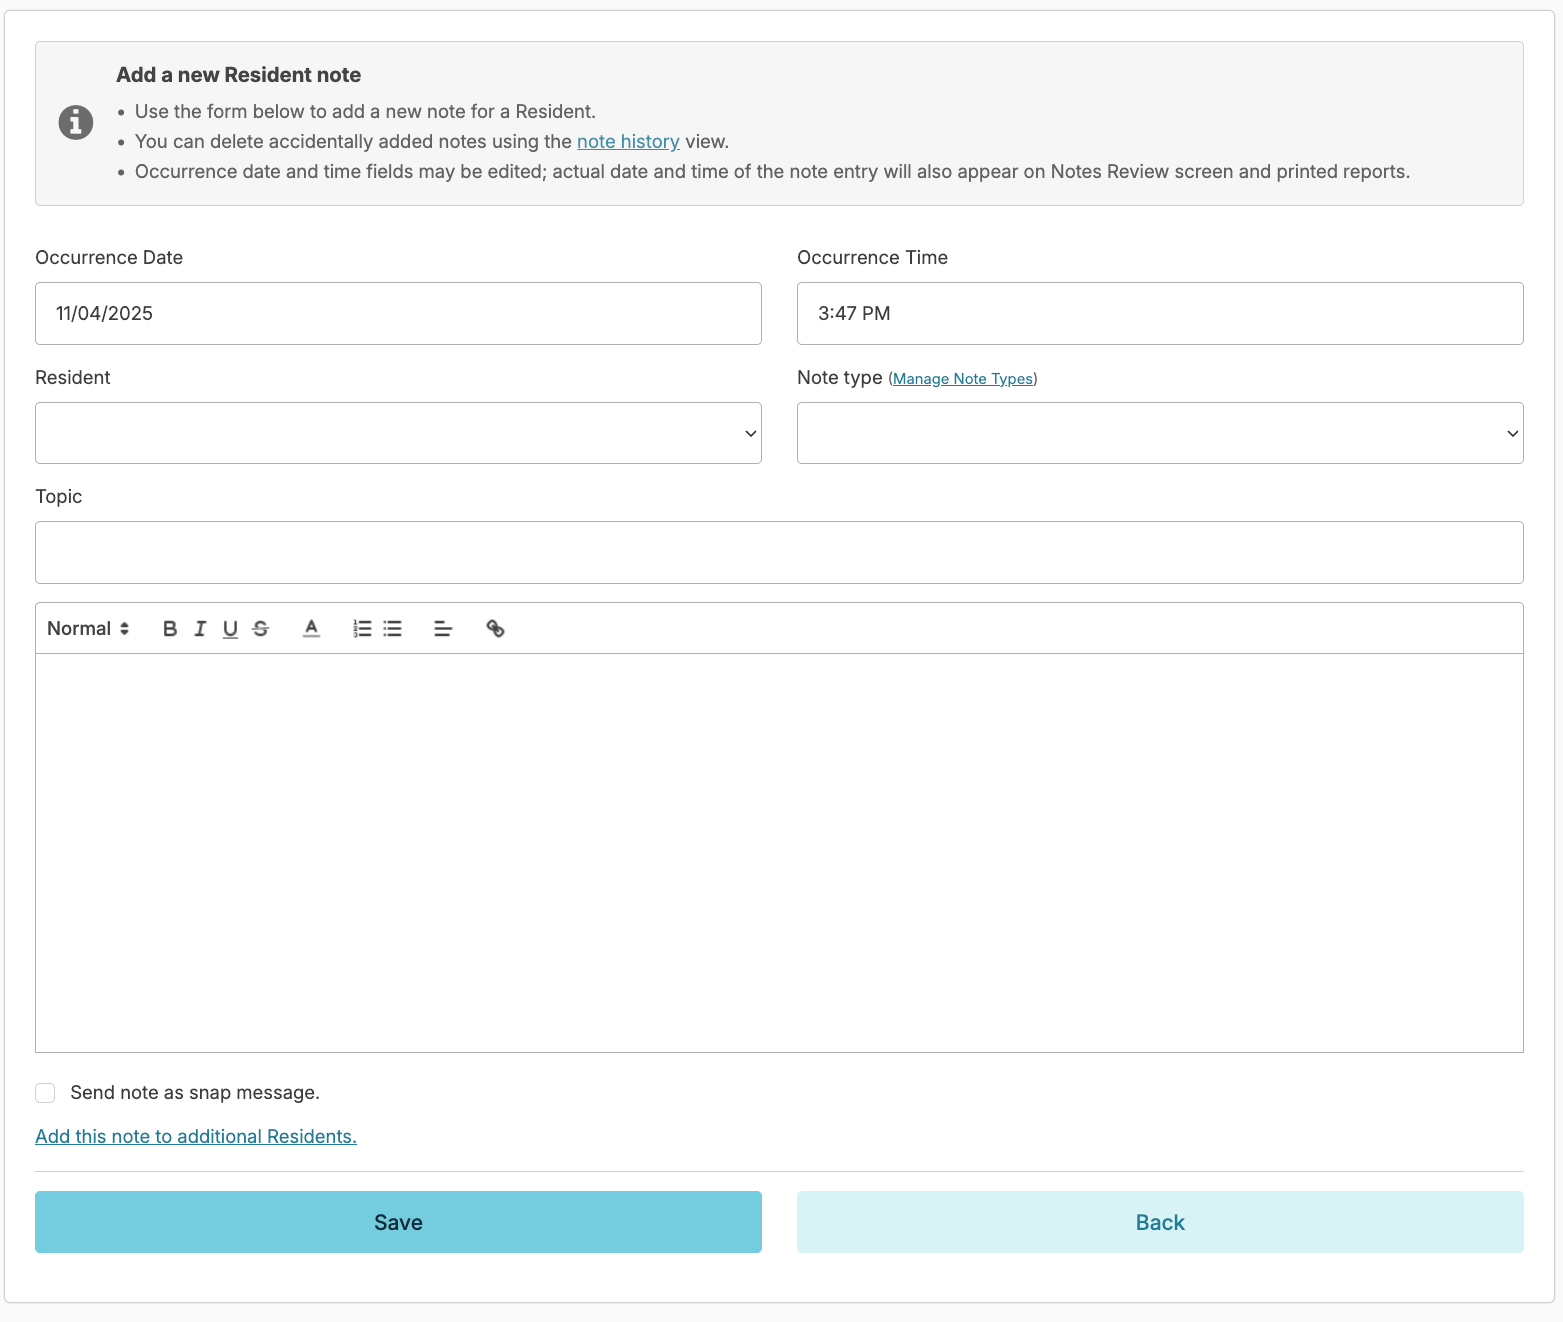
Selecting the Send Note as Snap Message option will allow you to send a copy of the note as a snap message to a colleague or group of providers, once the Save button is clicked.
Prior to saving, you can also optionally select the Add this note to additional residents link allowing you to select all or some residents for whom this same note should be added.
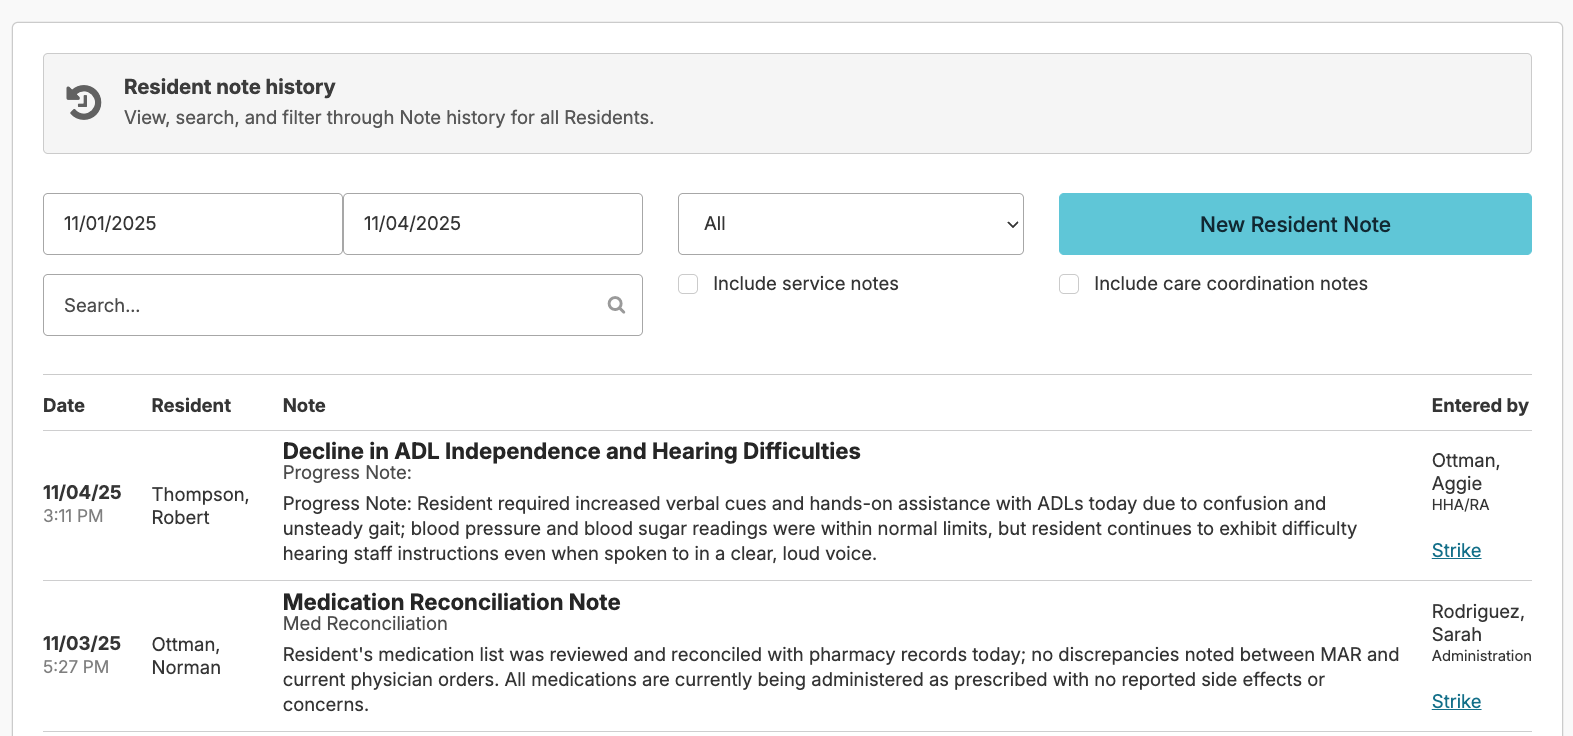
View Resident Notes
Resident notes can be viewed from a resident profile > Notes or from Clinical > Resident Notes. You can optionally select Include Service Notes and Include Care Coordination Notes to view notes entered in those locations.
Notes can be edited by the writer for a period of time determined by your facility's configurations and can be stricken by a user with Supervisor (Role 13), Administrator Assistant (Role 410) or Administrator (Role 411). This will remove it from the screen view, however, stricken notes are able to be viewed by a report. Note: Service notes cannot be stricken. To edit or delete a service note:
Editing or Deleting a Service Note
- Navigate to the Today screen.
- Locate the date and assignment on which the service was completed.
- Search for the service and click Redo at the bottom.
- Update the note as needed.
- Click Complete to save the changes
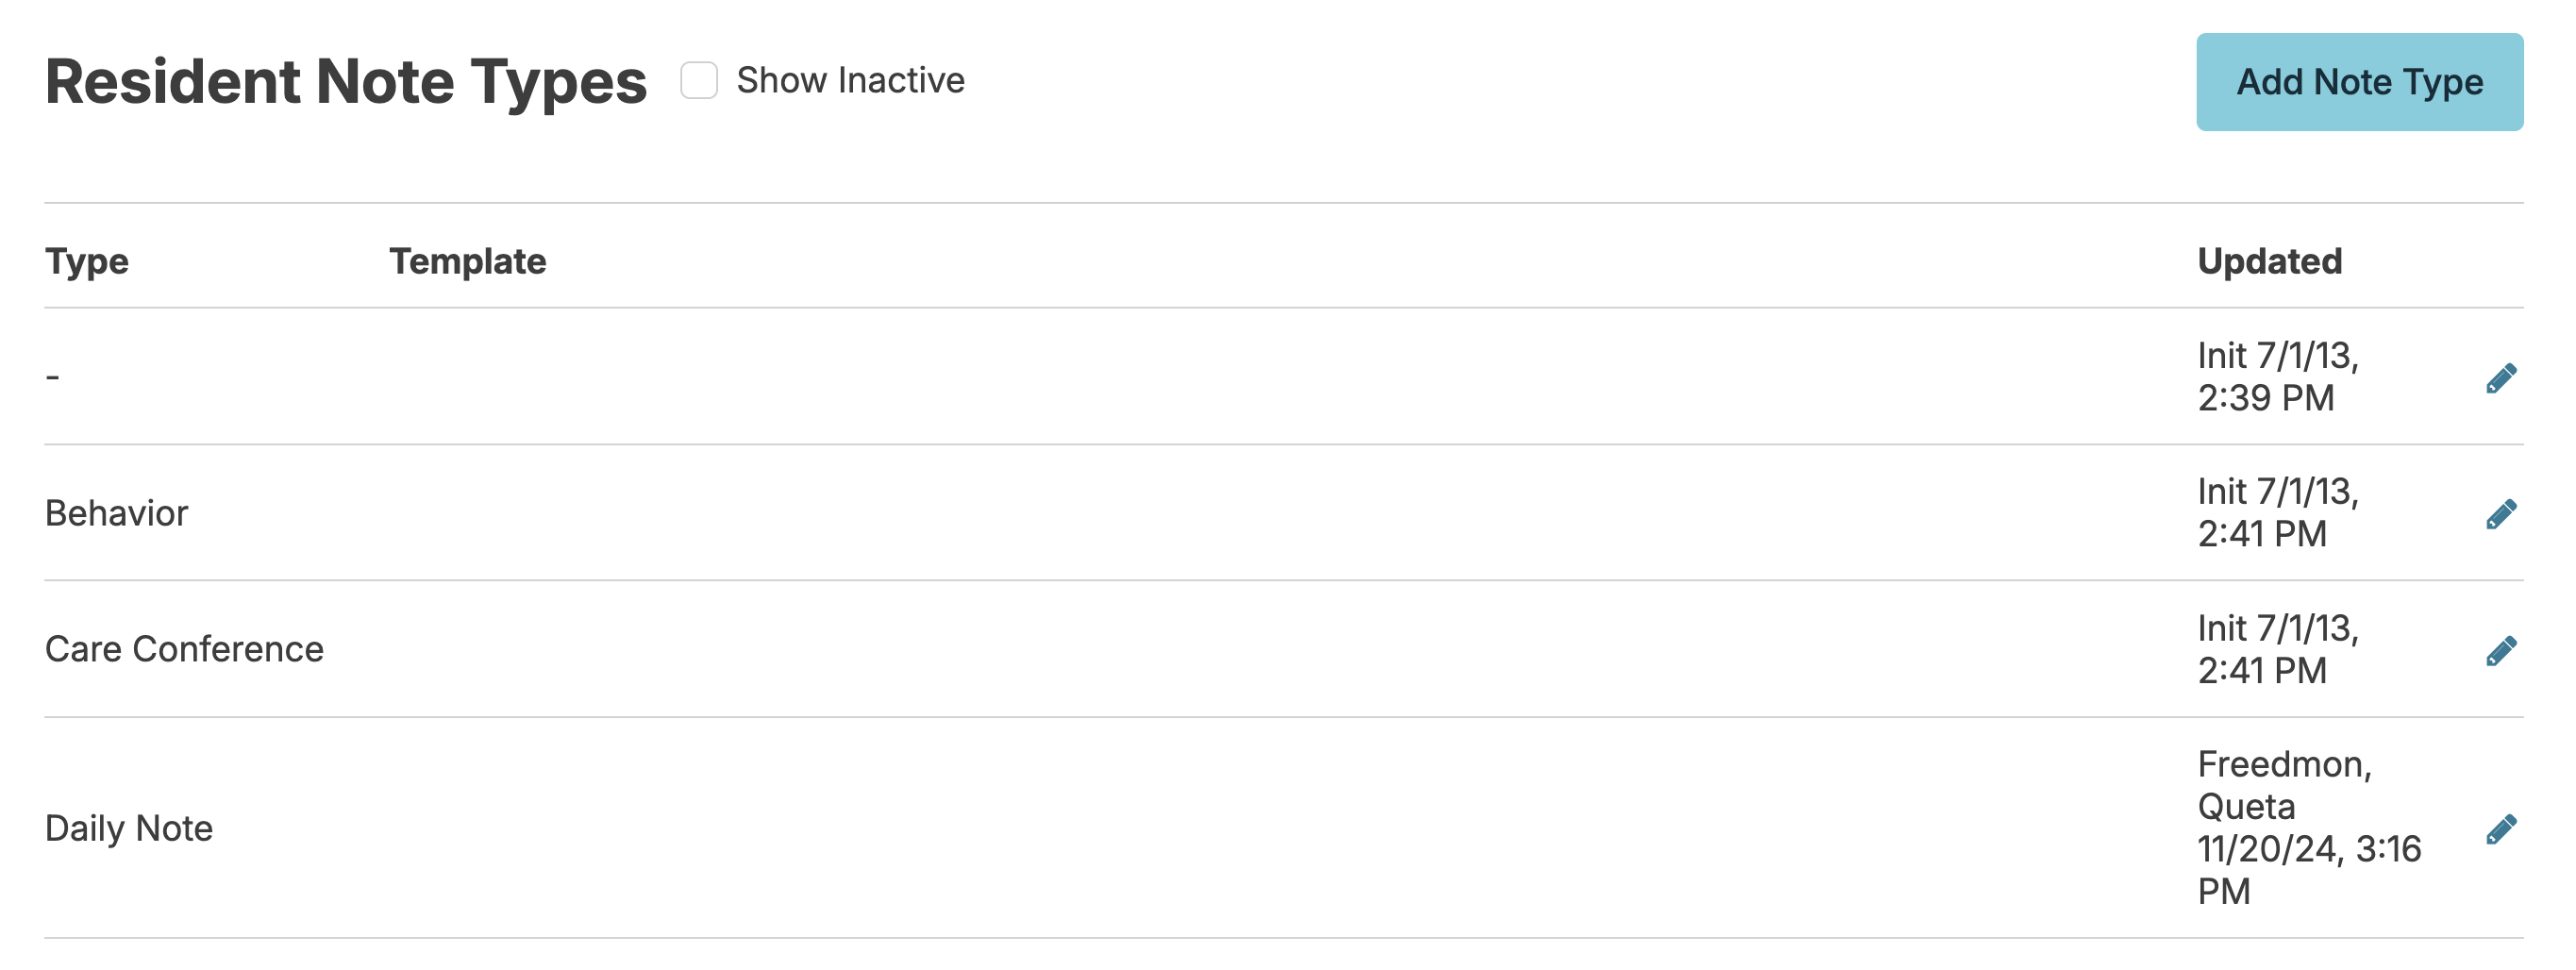
Manage Note Types
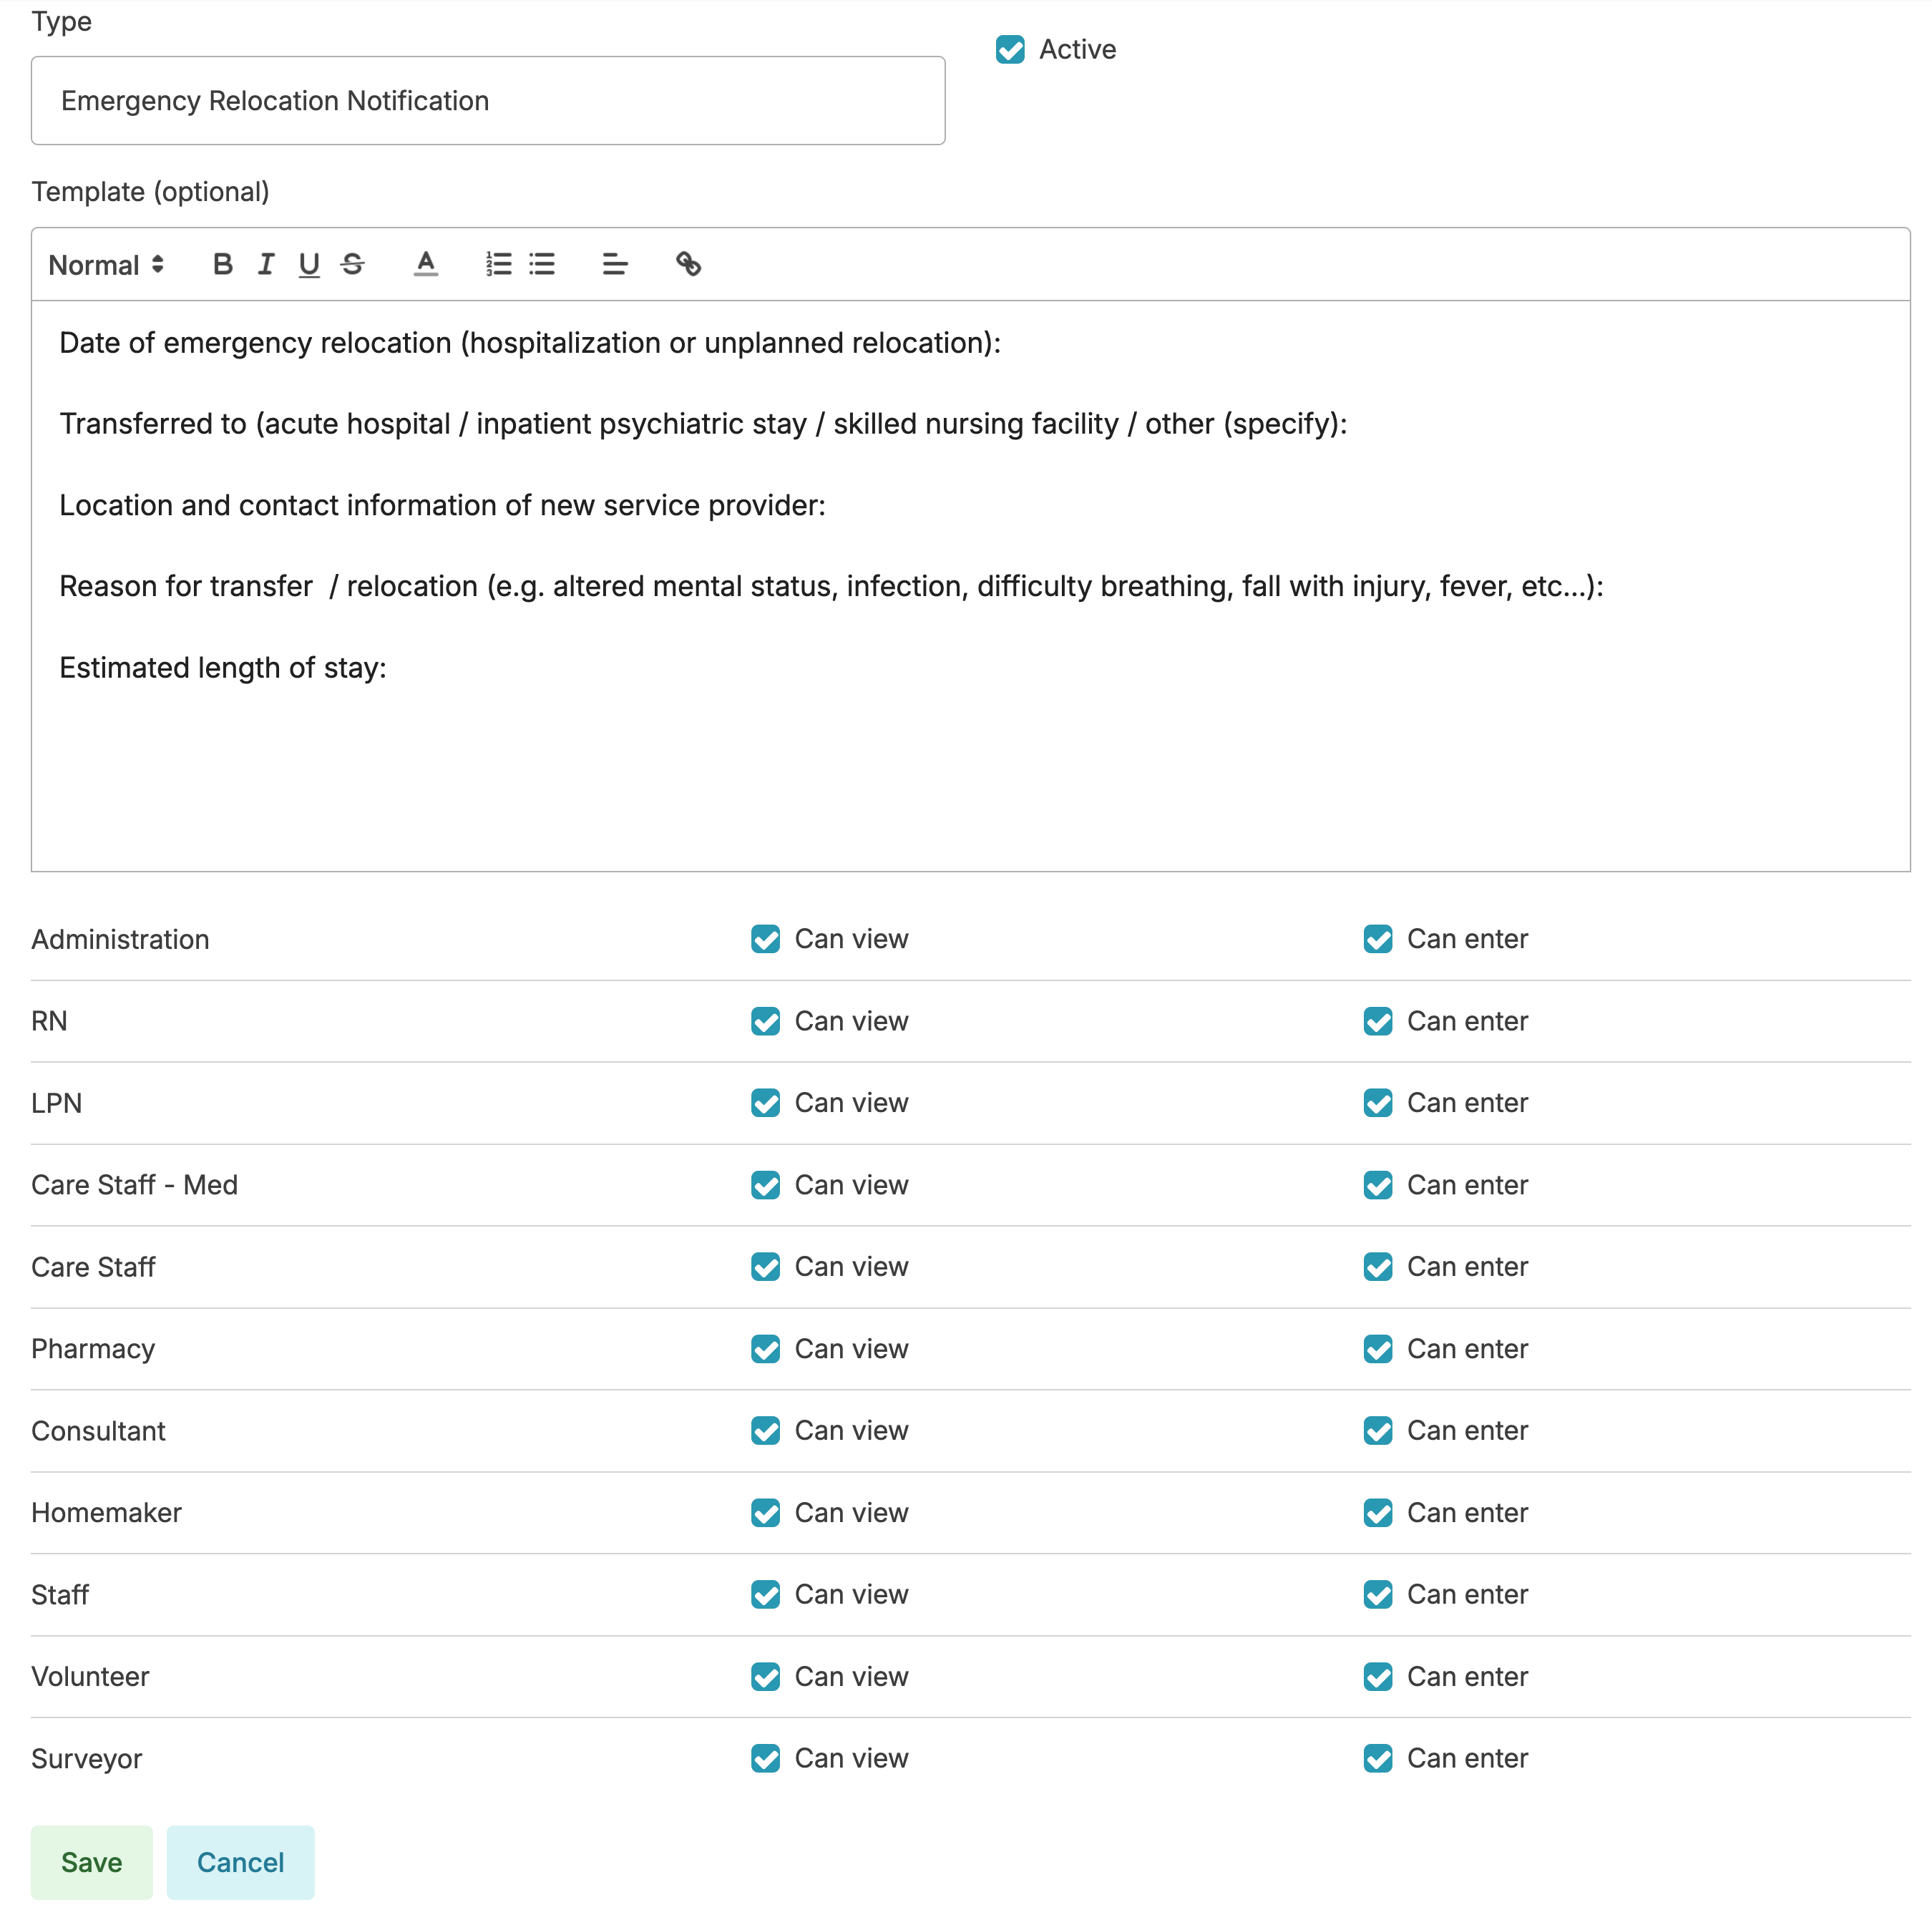
Users with Administrator (Role 411) can manage note types from the Admin > Resident Note Types screen. This includes adding new notes types, adding note templates, and managing which provider types can view and/or enter note types.
You can create a new note template by selecting the Add Note Type button or update an existing note template by selecting the blue pencil to the far right of the specific note type you wish to edit. Creating note templates, or outlines, can prompt staff to include certain details when entering a note. Structured notes like this are handy for admission notes or care conference notes.
Resident note types allow you to:
- Organize resident notes
- Pull notes of specific type(s) into relevant reports
- Limit access to certain note types to only administrators
- Create a structured note template of required elements for staff to follow when entering notes of that type
Examples of note types for which structured elements might be helpful include 'Care Conference' notes, 'On-Call' notes, or perhaps a Therapy or Hospice note.
To Manage Note Types navigate to Admin > Resident Note Types
Select a Type to edit:
- Make a Type Active/Inactive
- Setup structured Note Templates
- Limit Visibility of Notes belonging to the Type to Administrators only
Add a new type by selecting the Add Note Type button.
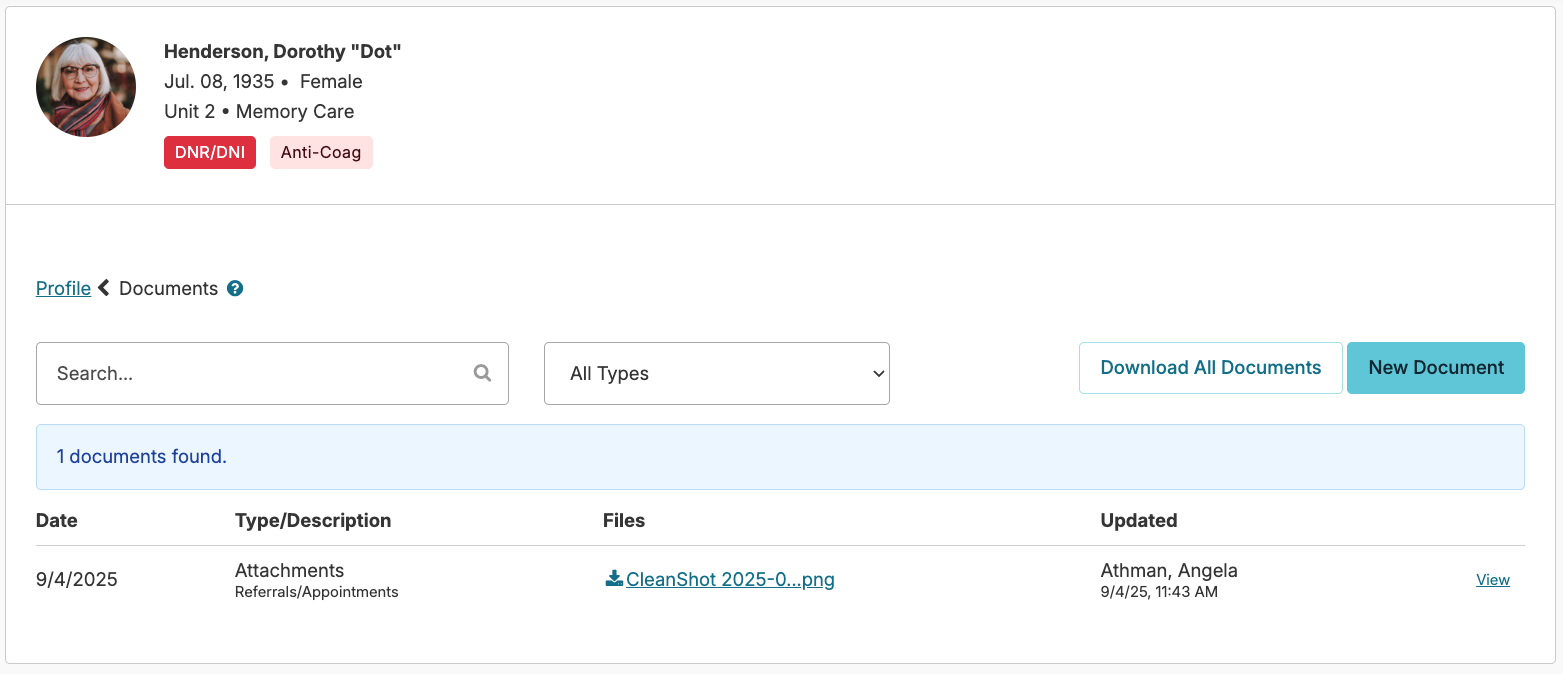
Resident/Prospect Documents
Store paper documents (admission paperwork, lab data, signed provider orders, insurance cards, etc...) by scanning and saving here as a document OR by receiving a fax in Residex and filing it here.
Documents
You can upload documents by navigating to a resident or prospect profile > Documents > New Document > enter the document description > select the type, date, and either upload the scanned item or drag and drop it to the screen > click Save. Users with the eFax option can process and save faxed documents directly into Documents as well.
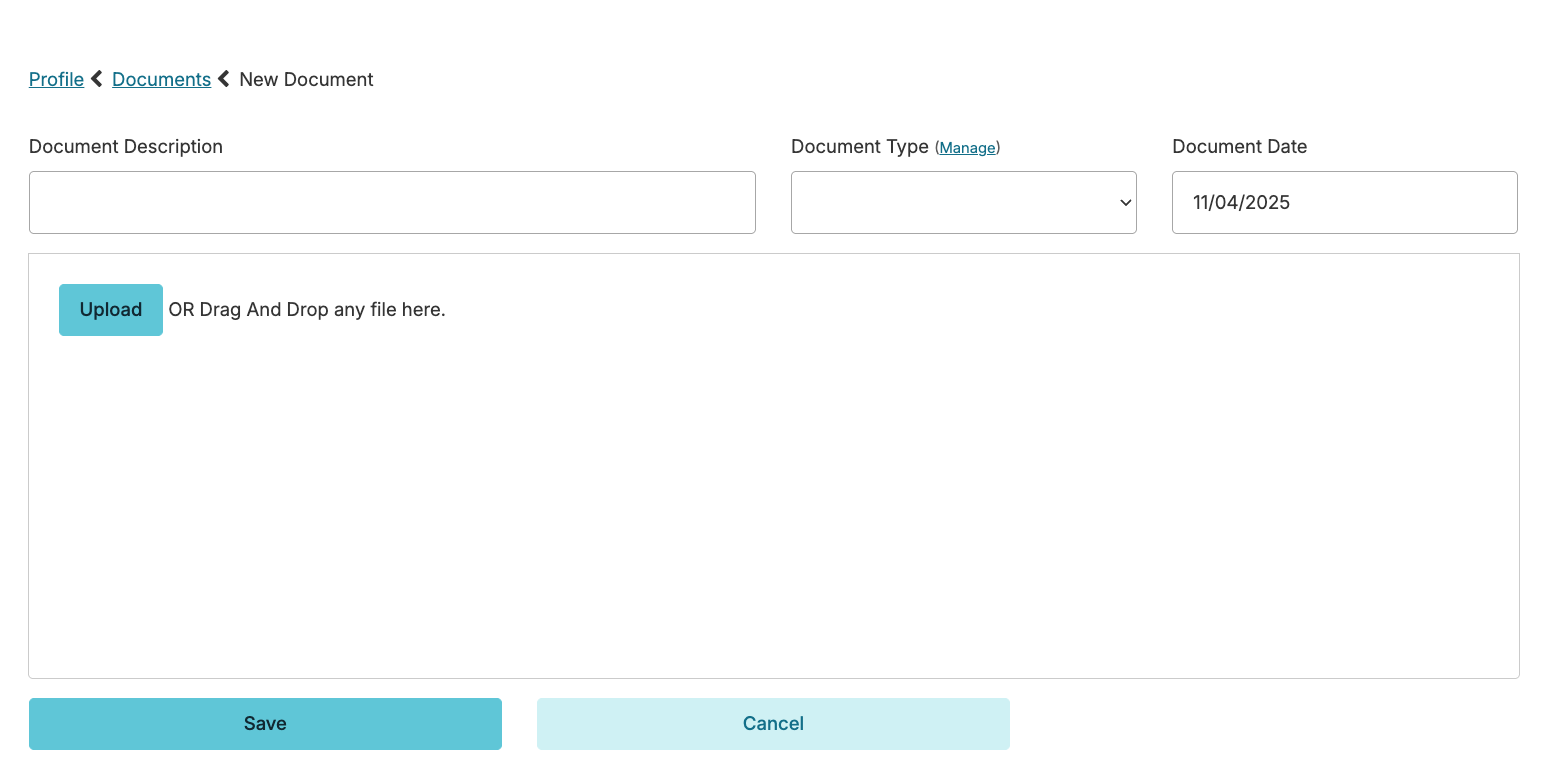
The person uploading a document or staff with the manager or supervisor roles is able to edit or delete an uploaded document.
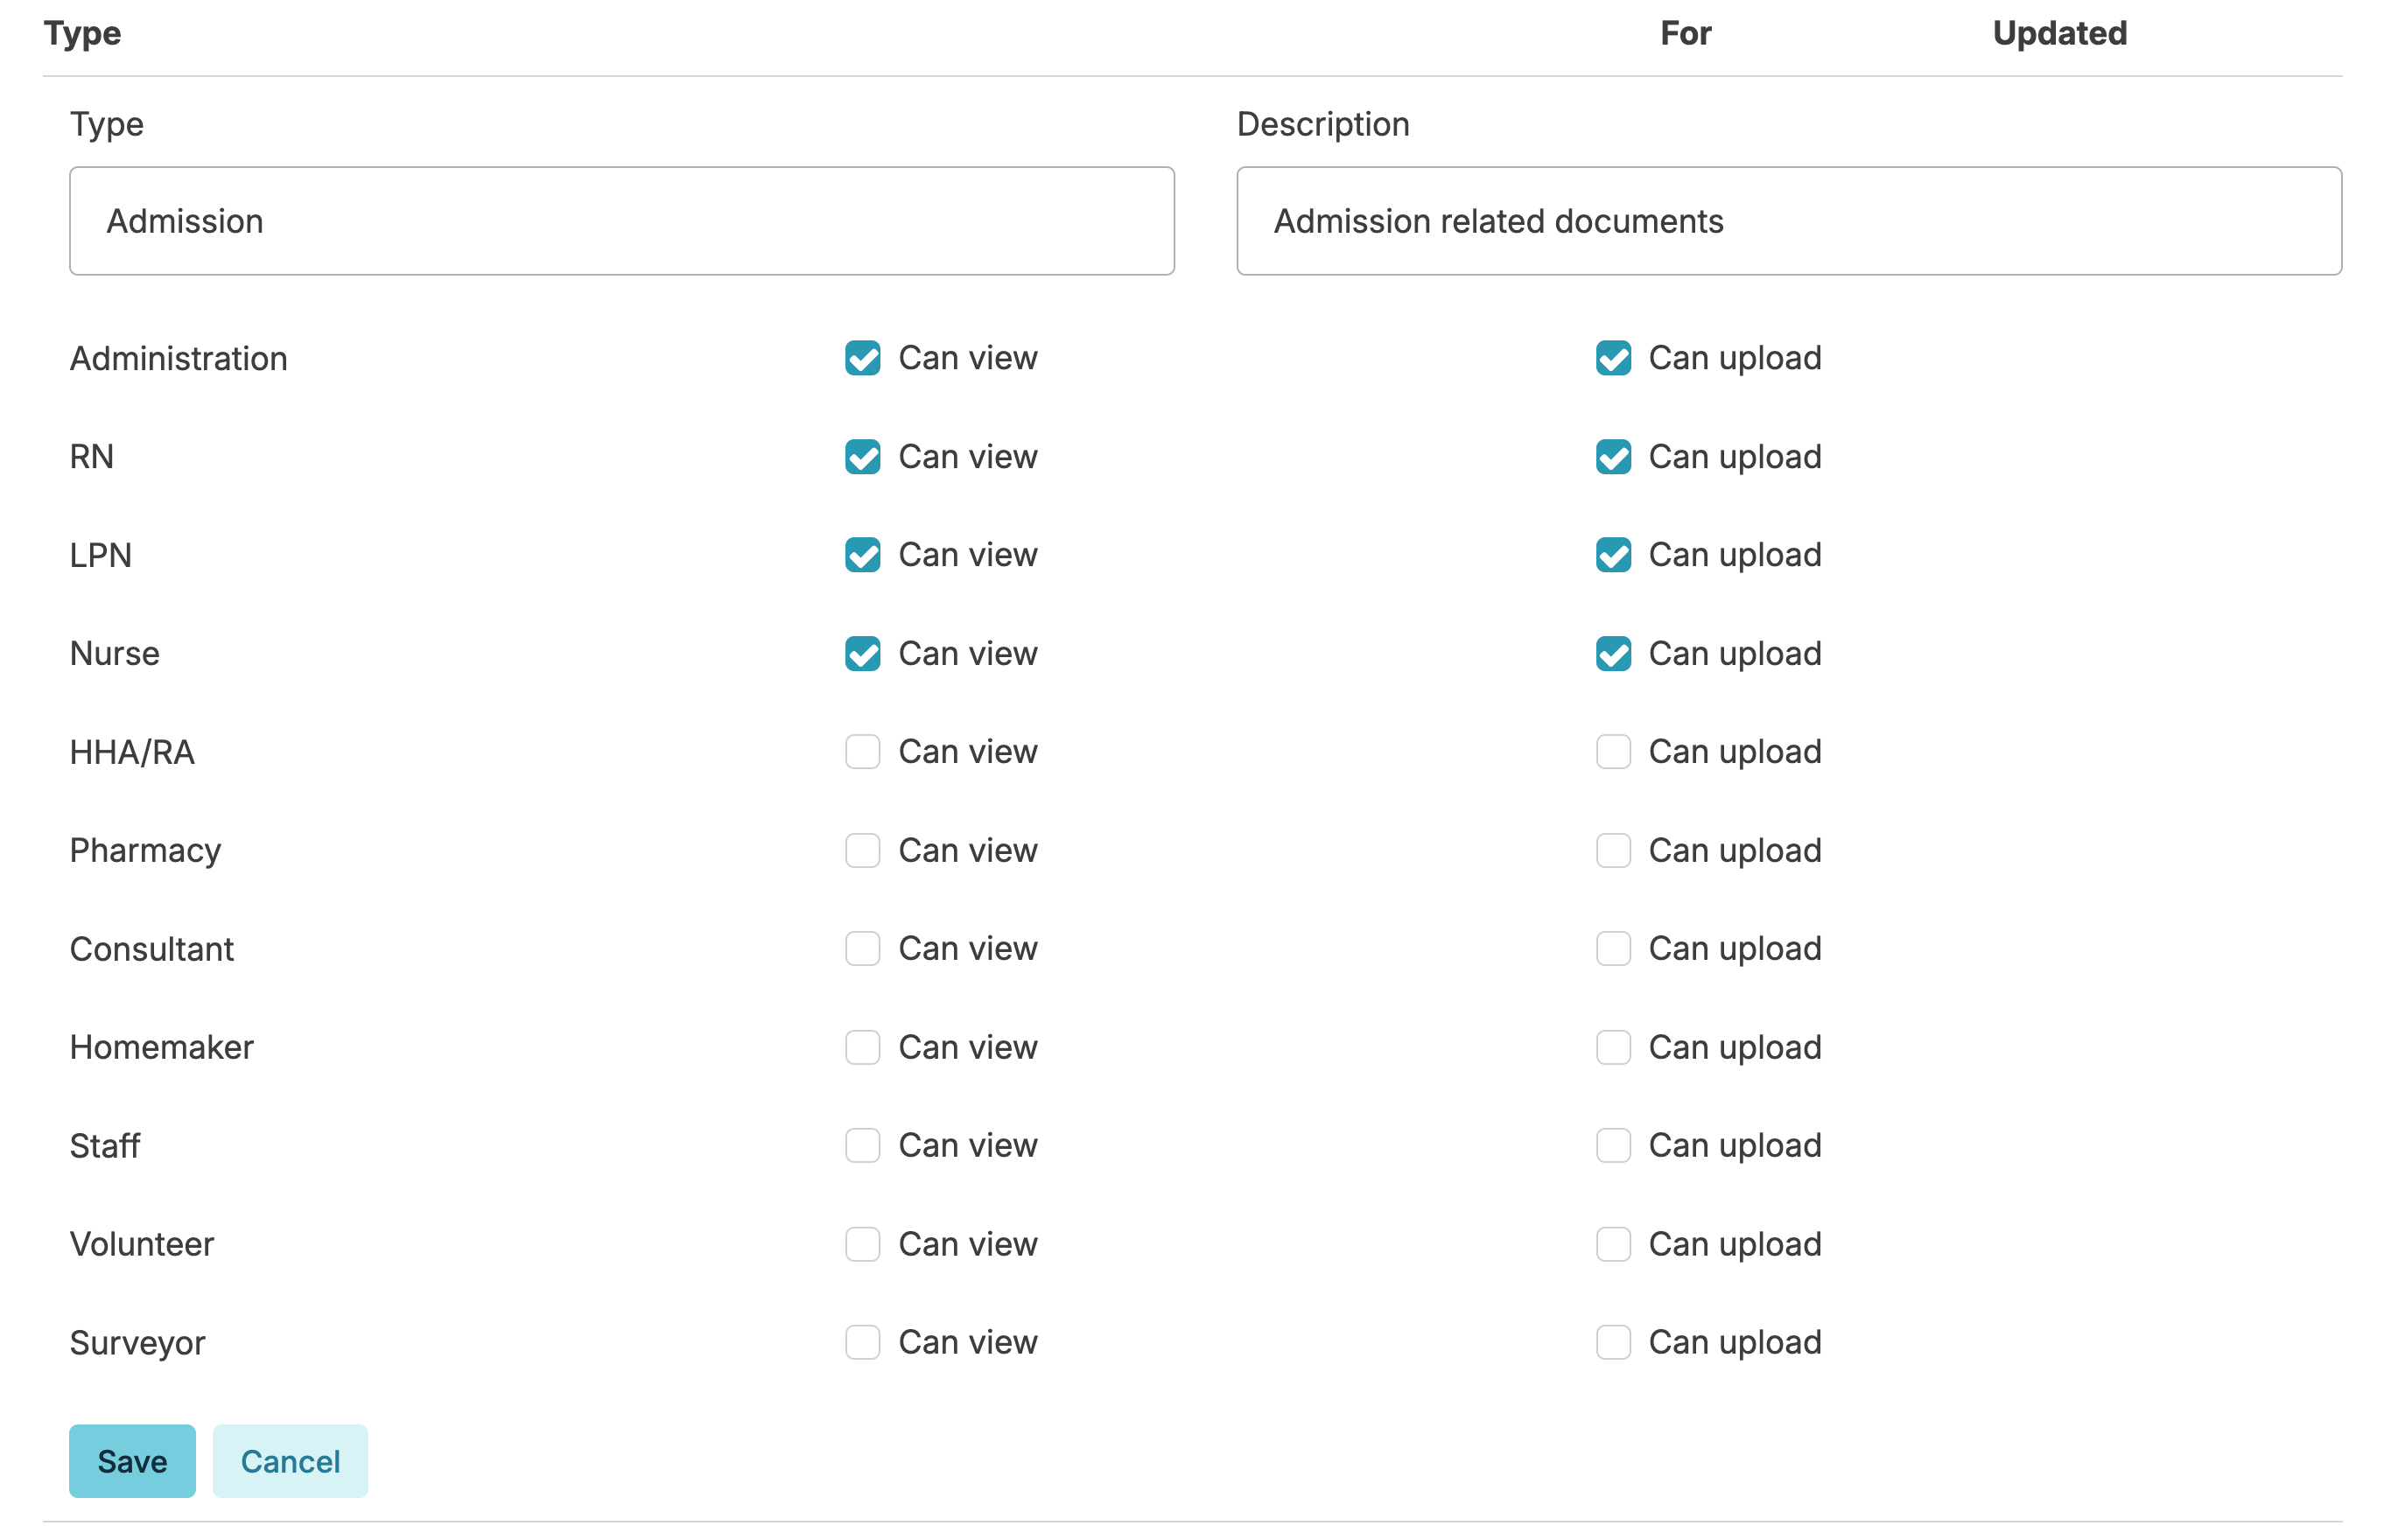
Managing Document Types
Document Types can be managed by navigating to Admin > Document Types OR by clicking the Manage button near the Document Type field when uploading a document. Users with the Administrator (Role 411) are able to add or edit types and identify what provider types should be able to either view or upload these documents. Document types entered in error or not in use can be deleted.
Once a document is added, you can retrieve the document at any time by opening the attachment and clicking the link.
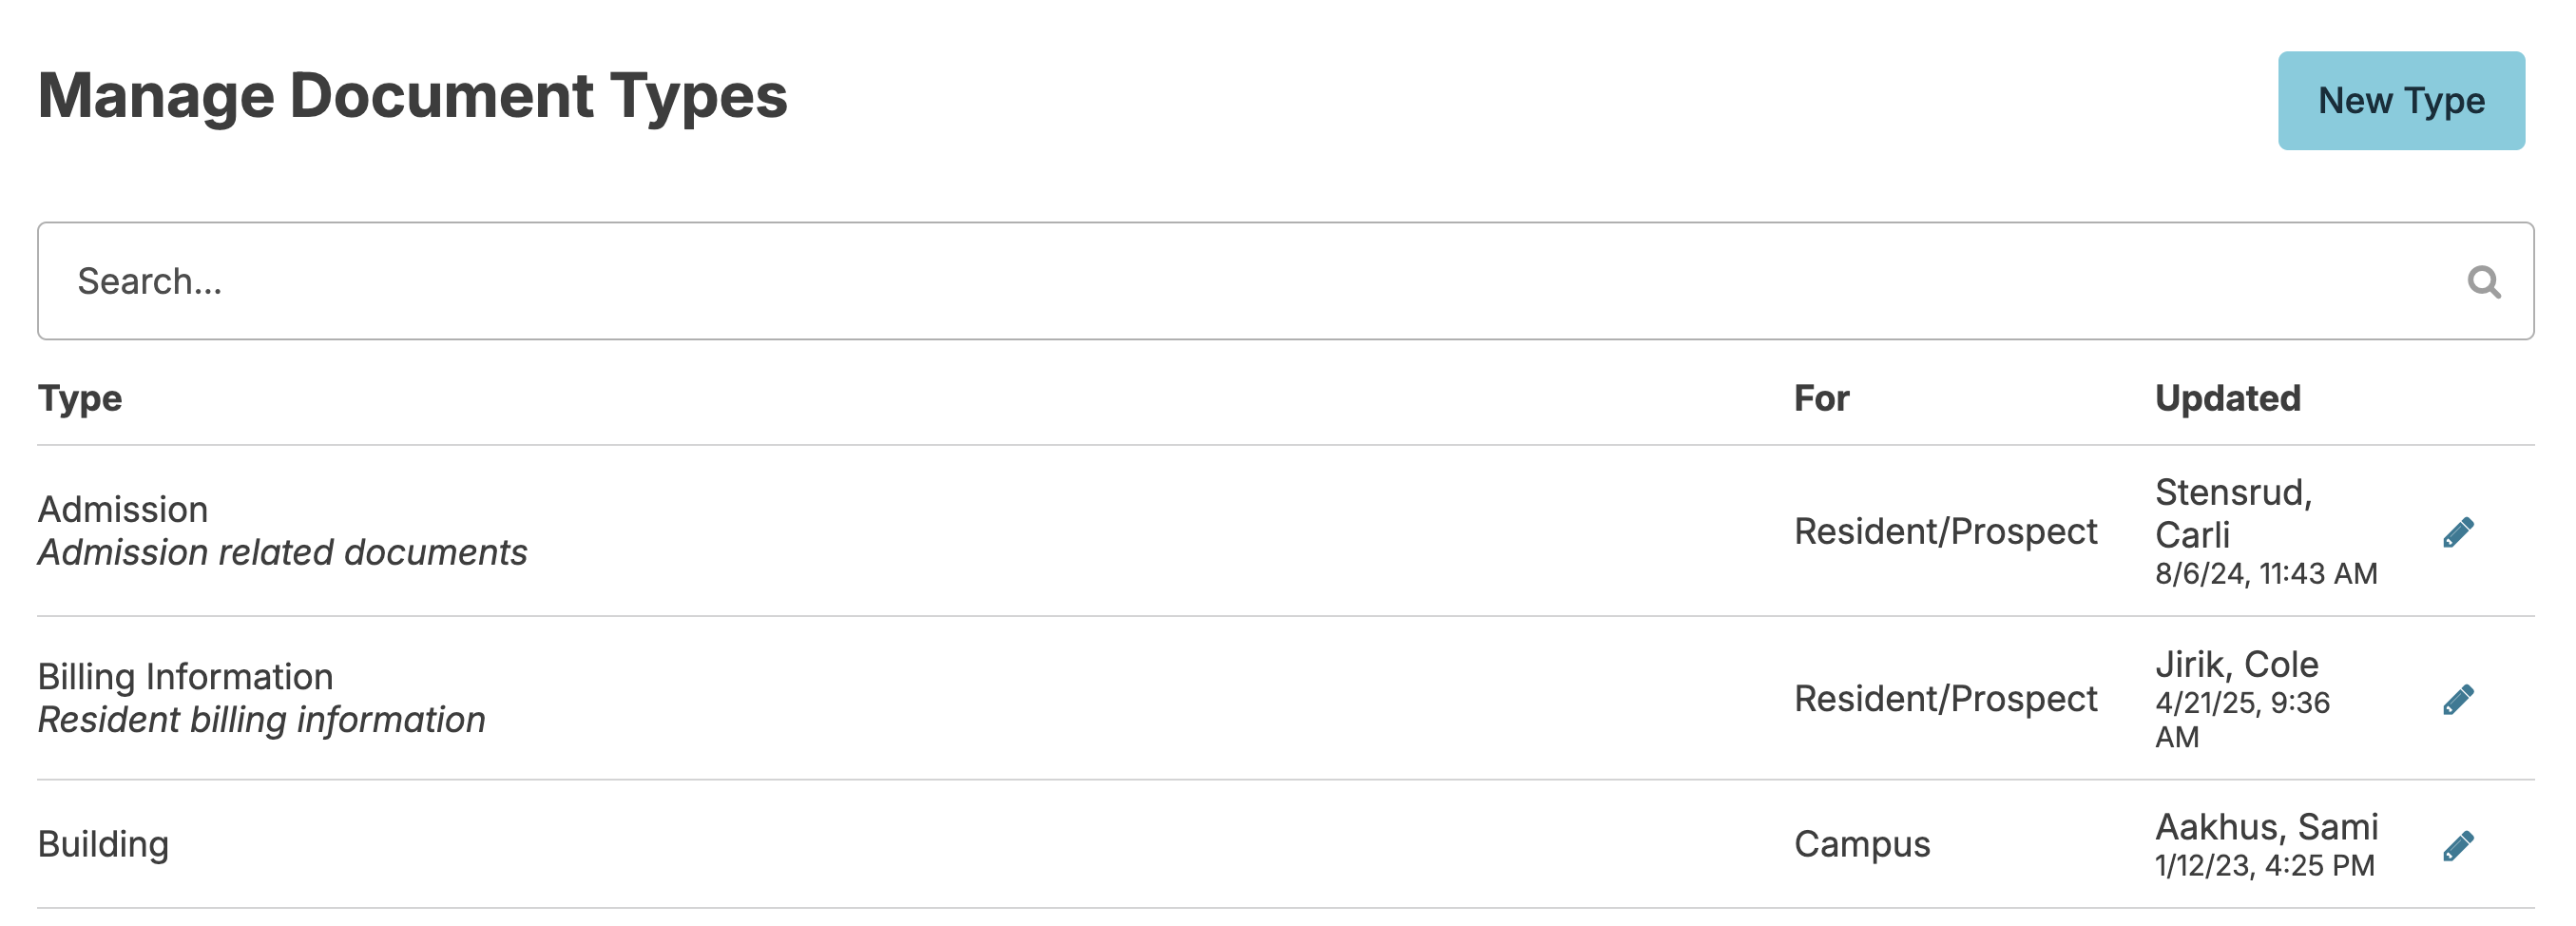
You can add or edit document types as well as set controls on what provider types at your organization can either see or upload those documents.
Downloads
Administrator (Role 411) users can download all documents attached to a resident. This includes uploaded documents, attached faxes, and any documents attached to Provider Orders and Care Coordination documents.
Clicking the Download All Documents button will initiate a download request. The request can take a few seconds to several minutes to complete. You don’t need to stay on the screen or stay logged in. You can leave, come back later and Residex will let you know when your file is ready. You can also refresh the screen to check the status. The downloaded zip file will contain subfolders for each document type with files in each folder.