Table of Contents:
- About eCharting
- Unscheduled Charting
- Disconnected Charting
- Reviewing Care Plans, Policies, Etc.
- Claim Services/Chores
- Check-In/Check-Out
- Shift-to-Shift Communication
- Supply Tracking
- ADS Clock-In/Clock-Out
About eCharting
The Today Screen
The Today screen is your 'To Do' list. It shows you a list of items that need to be marked as complete or declined. These items may be assigned to you personally or to the assignments for the shift. Marking items complete will move them from the To Do list over to your Done list. When your charting is complete, your 'Today' screen will be empty, and your Done list will be full.
Items assigned to you personally
Some items on the Today screen will be assigned to individual users, no other users can see them except the individual to whom they are assigned. For example: Tasks (giving a tour, maintenance, audit, fire drill, etc.) or reviewing information you are responsible for reading (resident care plans & biographies, company policies & procedures).
When you open the Today screen, items assigned to you will appear whether you have selected an assignment or not. If the Complete button is visible, you can click on it to mark the item done or click the item to see more information/record notes. If the Complete button is not visible, you must click on the item and follow additional steps.

Services, Medication Administration, & Chores
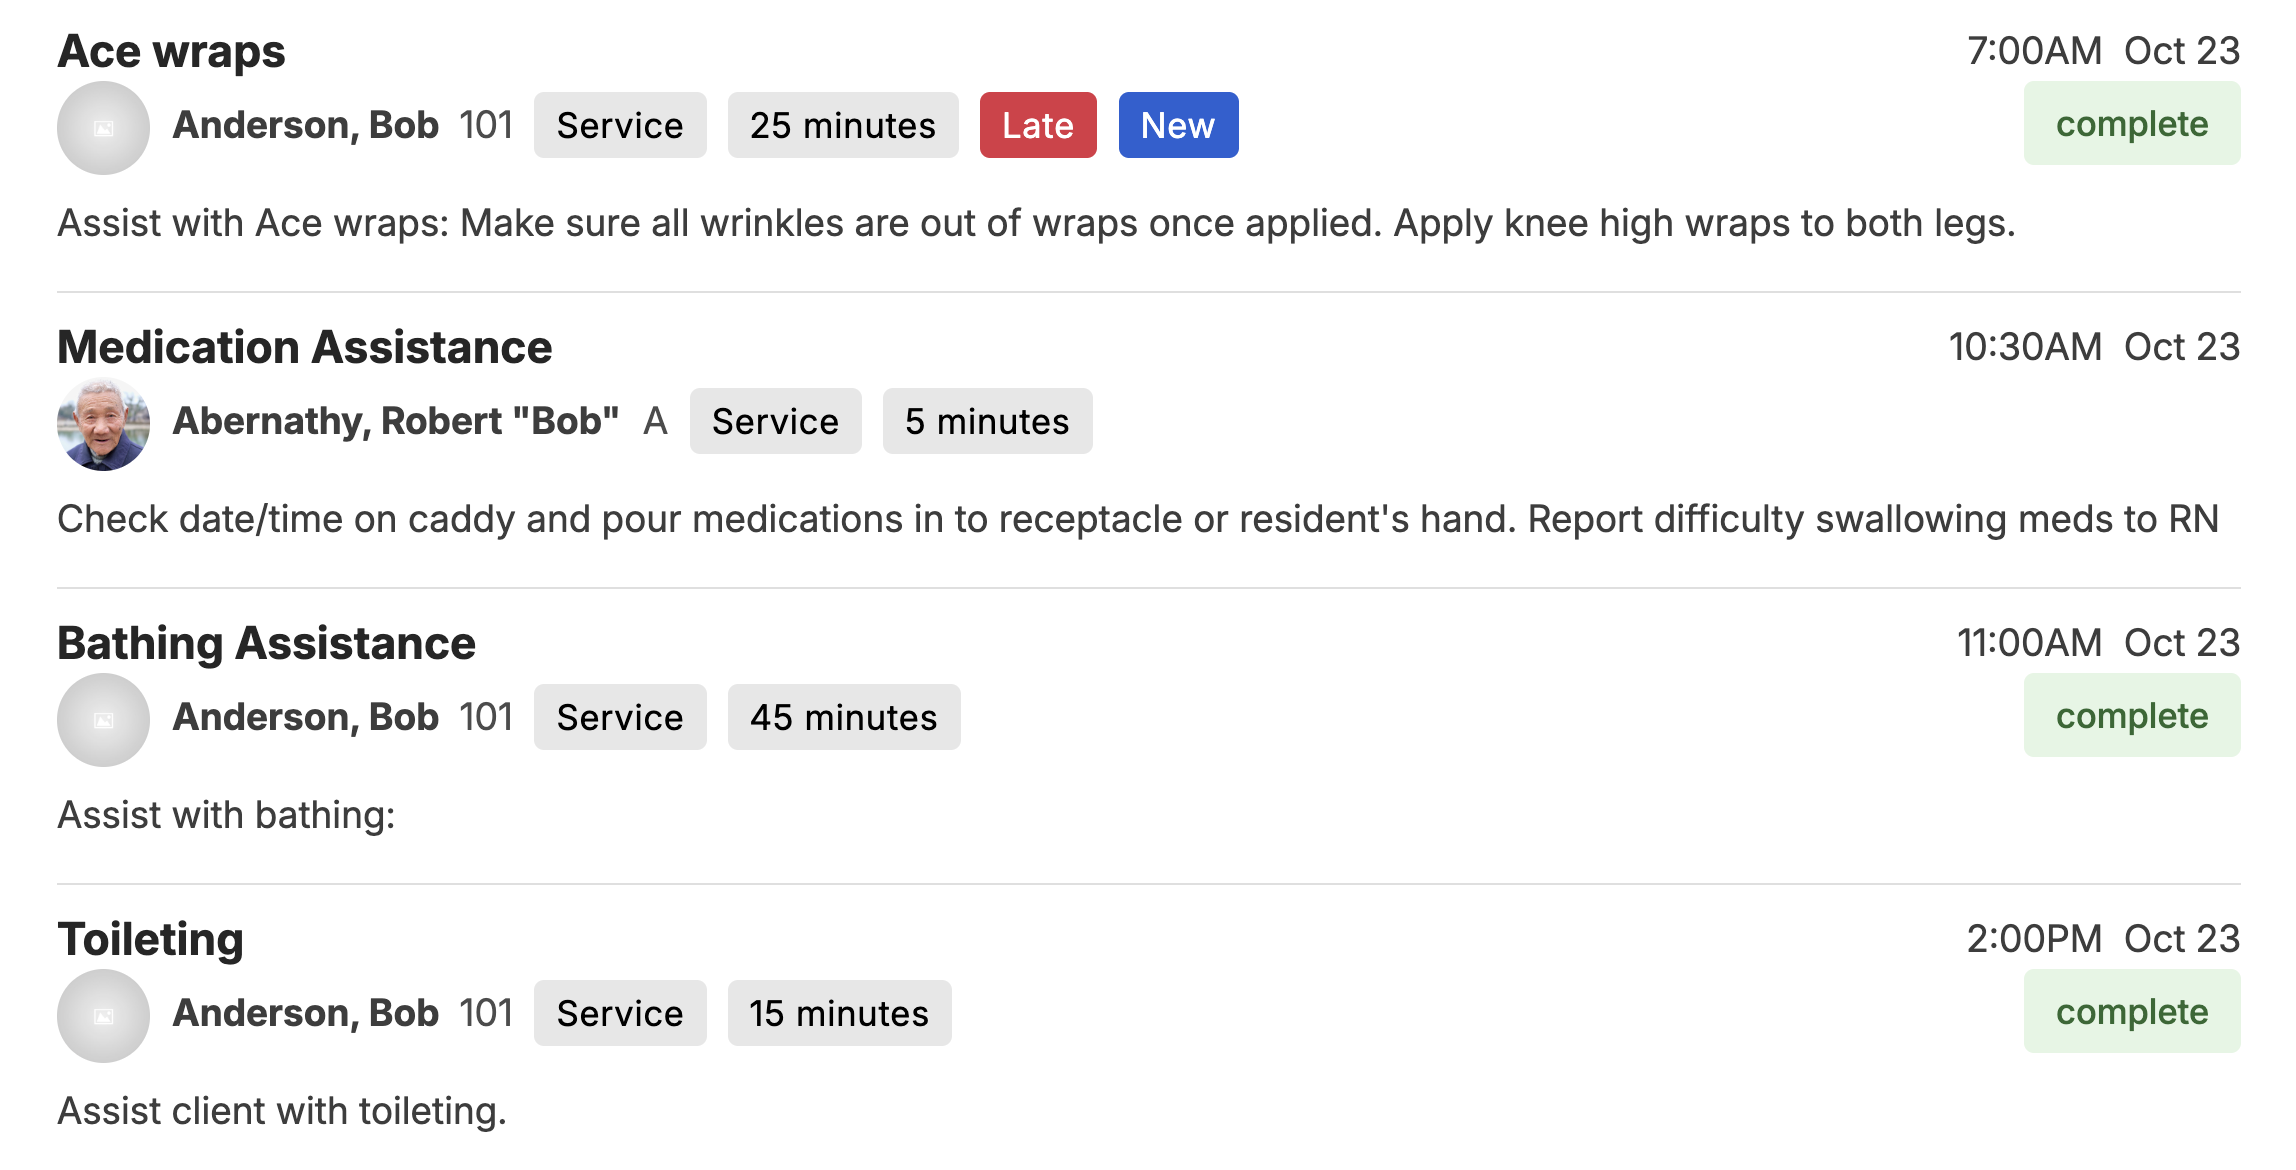
On the Today screen, select an Assignment. This will show you a list of the scheduled duties for that assignment. These may include services (housing and health care work assigned to specific residents), medication administrations, and/or 'chores' (a recurring job not associated with an individual resident). The 'New' or 'Updated' tags for services on the To Do list display for seven days to alert you to a newly added service.
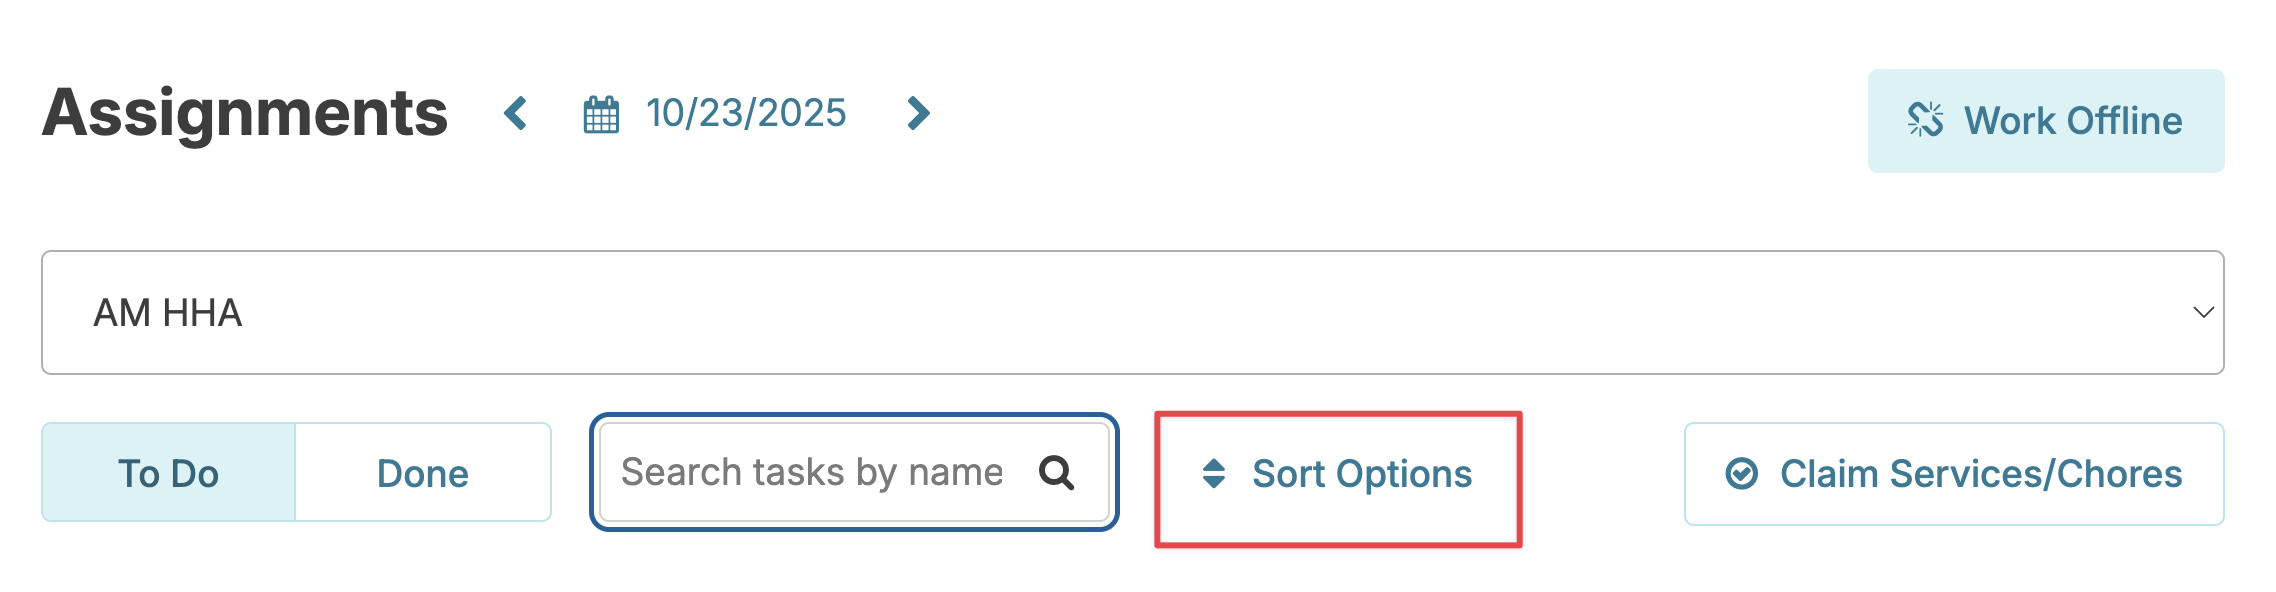
Search
You can filter down what is displayed on the 'Today' screen using the 'Search' field (type a resident name, type of service, room number, etc. to find matches).
Sort
Change how your Today screen is organized by using the Sort Options link.
Charting the basics
Some simple jobs will display with a green 'complete' button or green arrow to the right.
- You can quickly chart these items by clicking the Complete button (or swiping the arrow to the right), or
- You can click elsewhere on the item to record notes, mark them as refused, etc.

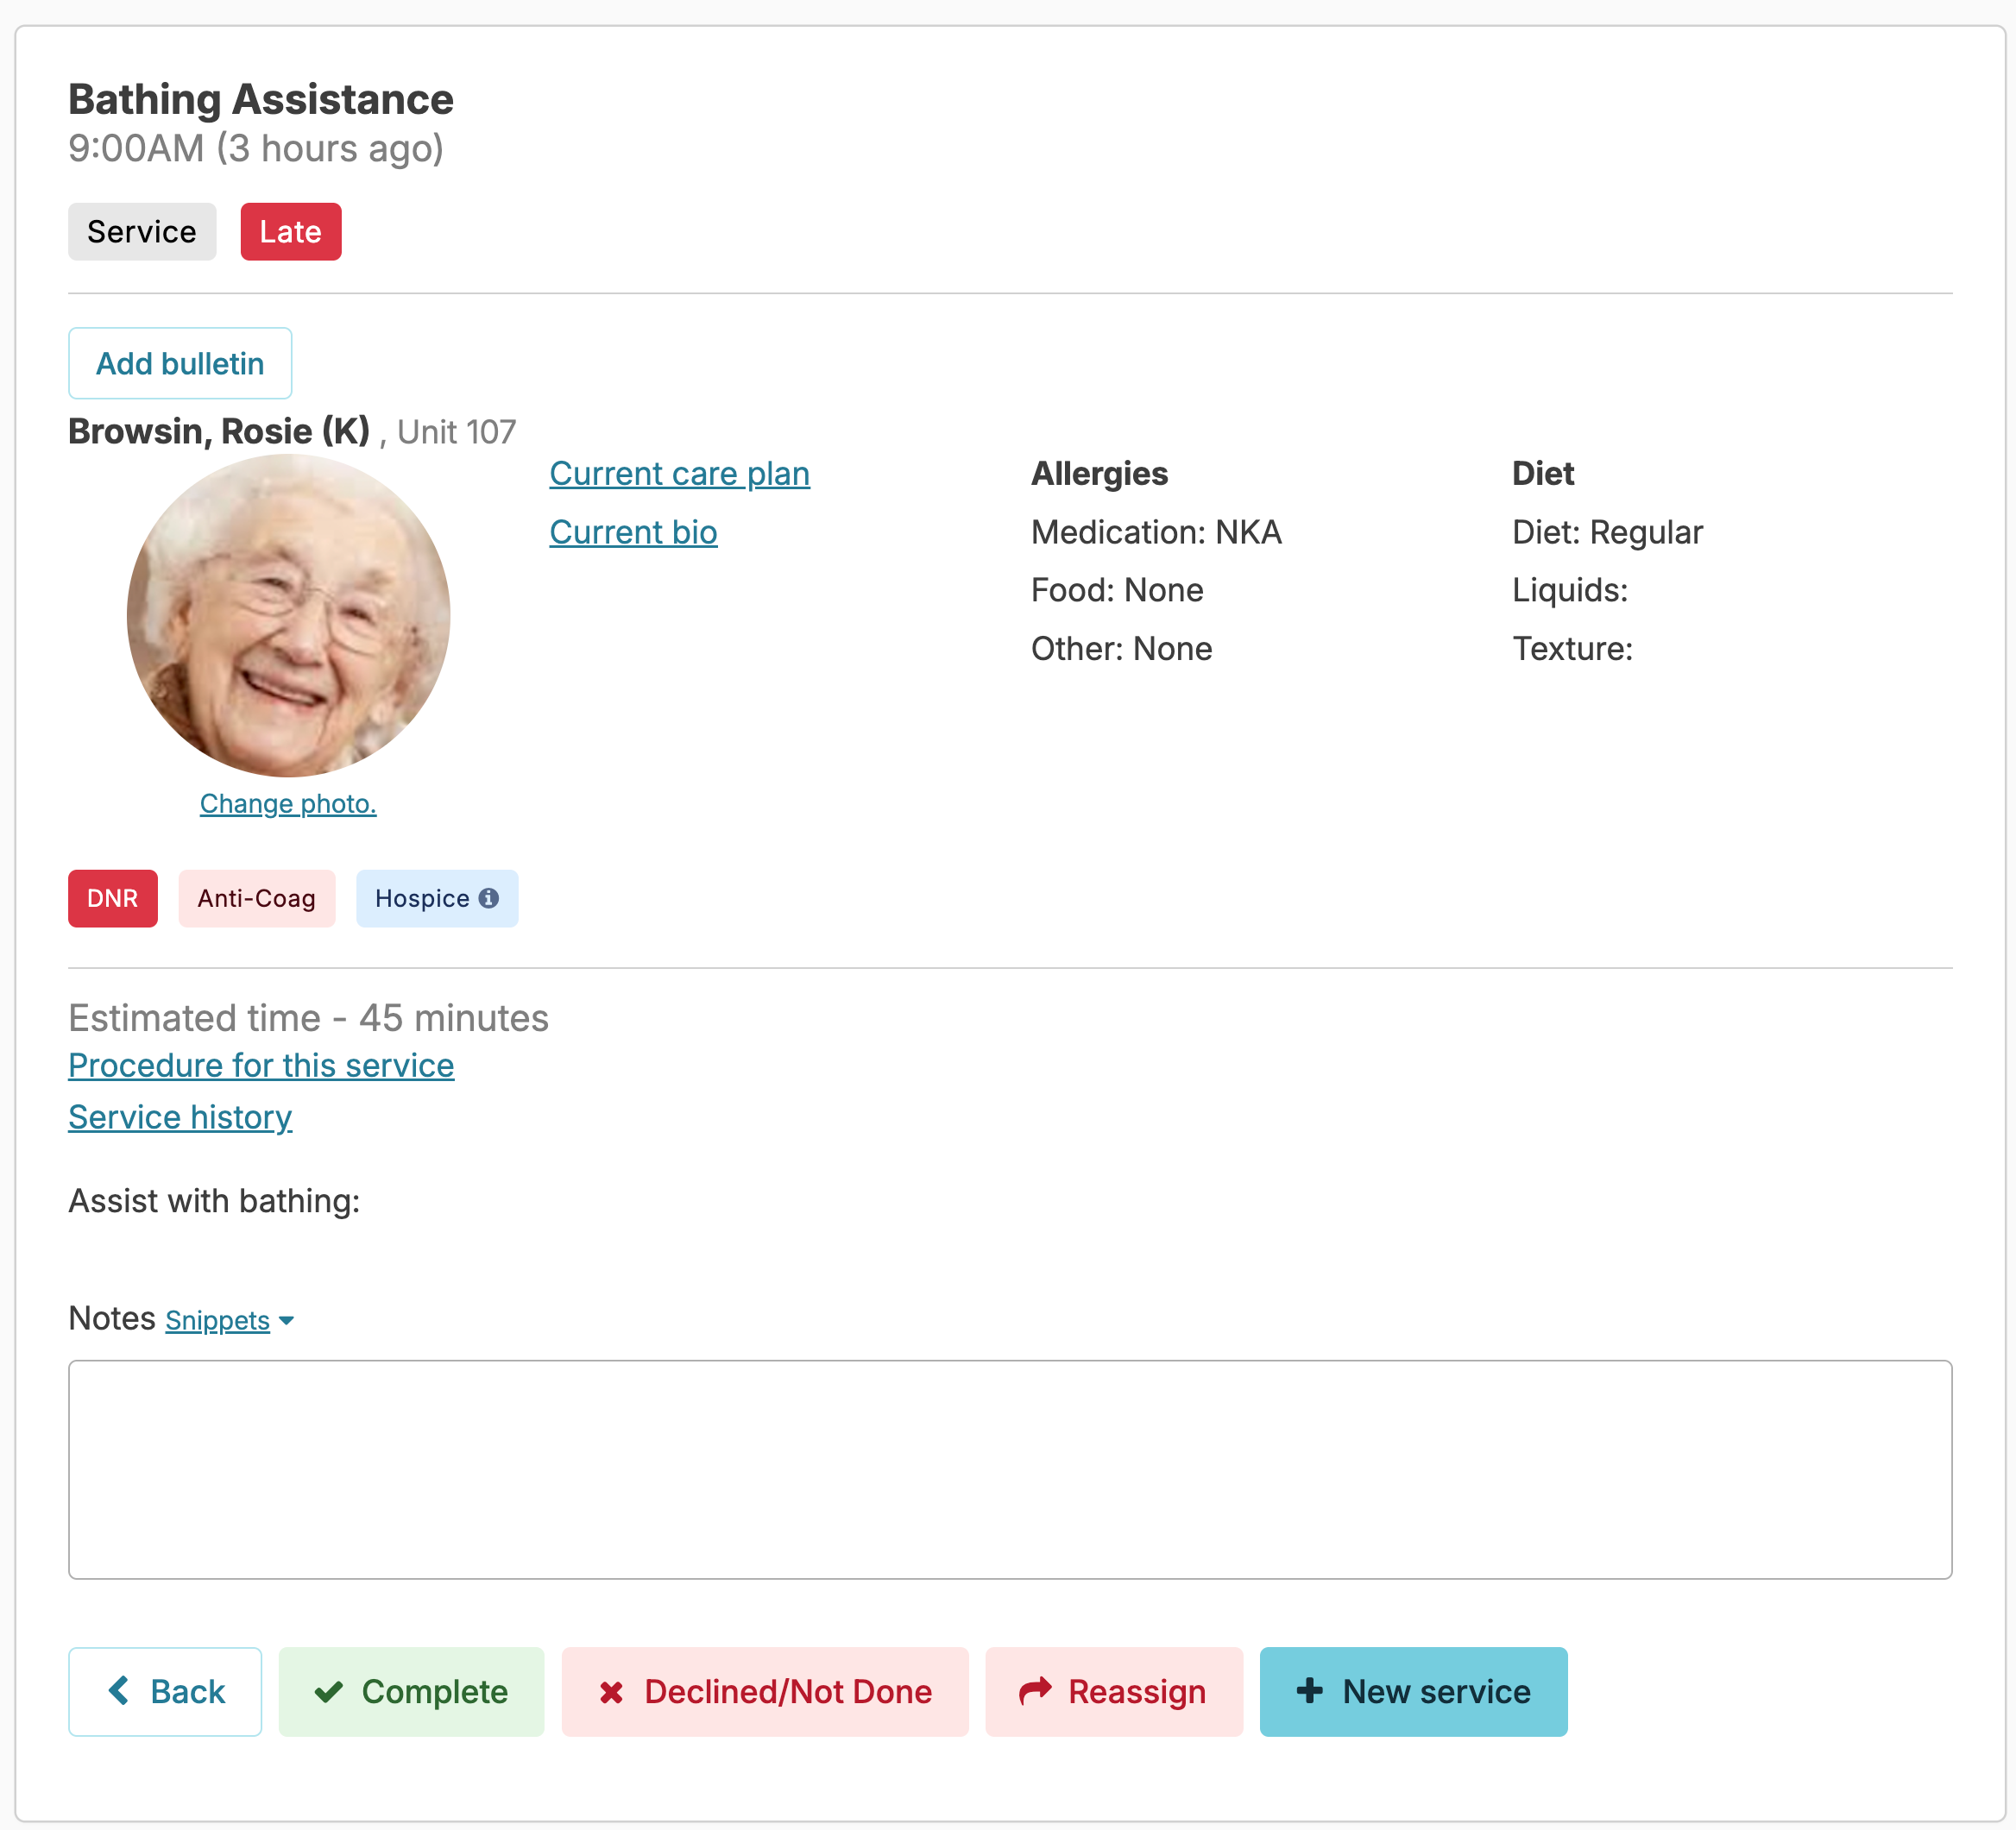
Some jobs do not display the quick 'Complete' button because they require more detailed feedback. Click anywhere on one of these jobs to record the details of the work:
When viewing the details:
- You can record a note about providing the service (sometimes this is required)
- You can opt to send a value or service/chore note as a Snap Message
- You can mark the service as Declined/Not Done
- In some cases, you may be able to reassign a service. (The service will only allow you to reassign X number of days from the original date/time of the scheduled service based on the service setup in the global service list.)
- If your home uses the time tracking feature, you can specify how long it took you to provide a service, or you can use the blue clock symbol as a stopwatch to record time duration as you go. Simply click the icon to start a timer and click again to stop it. The duration field will then be filled with the total time you spent (rounded to the nearest minute).
Reassign a Service
As stated above, certain services may be able to be reassigned based on their setup in the global service list. When you see the red Reassign button, you will be able to select a new date and assignment and enter a reason for reassigning the service.
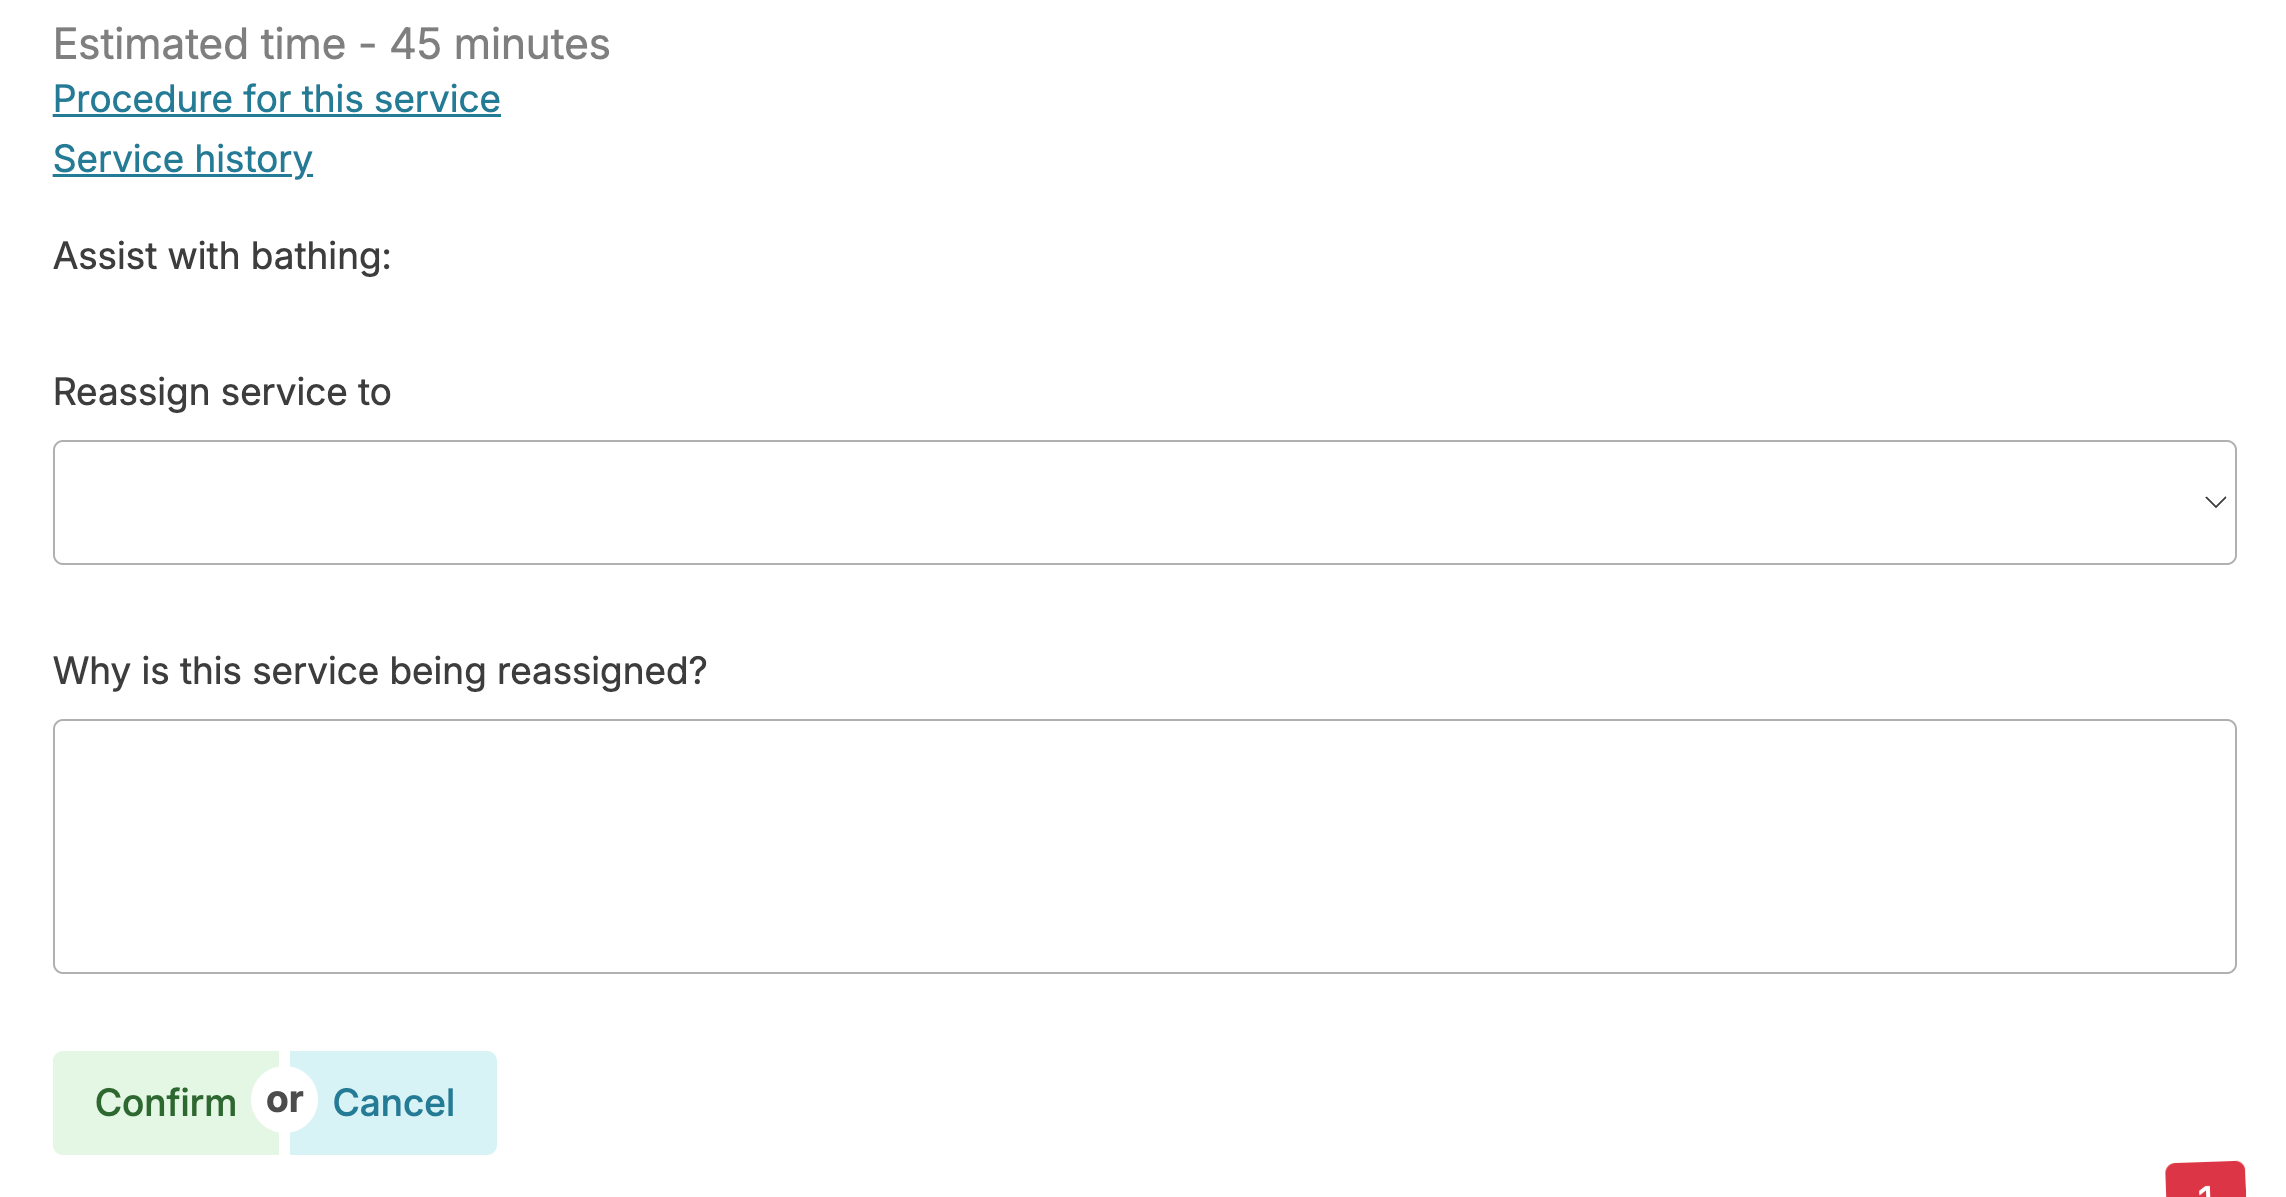
When the service is reassigned, it will display on the Today screen under the Assignment selected. A note at the top of the screen will indicate the original schedule of the service and any note entered.


Charting Restrictions
Staff permissions will determine how early or late you can chart.
- Aides can chart care services up to 12 hours early or up to 7 days late
- Aides may chart housing services (housekeeping, laundry, etc) up to 3 days early or up to 14 days late.
- Nurses, Managers, or Supervisors are able to chart up to 12 hours early/14 days late for Scheduled medications and 3 days early/14 days late for housing and care services; they may chart a PRN medication up to 3 days late.
Charting Scheduled Activities
Activities
Life enrichment activities may also be scheduled for you to chart. These work a little differently than other work you chart on the Today screen.
Activities will show up on the screen just like any other job. Once you click on an activity, you will see a screen prompting you to record the Location where the activity took place, optional Notes about the activity, and then a place to document who attended. You will see a list of residents:
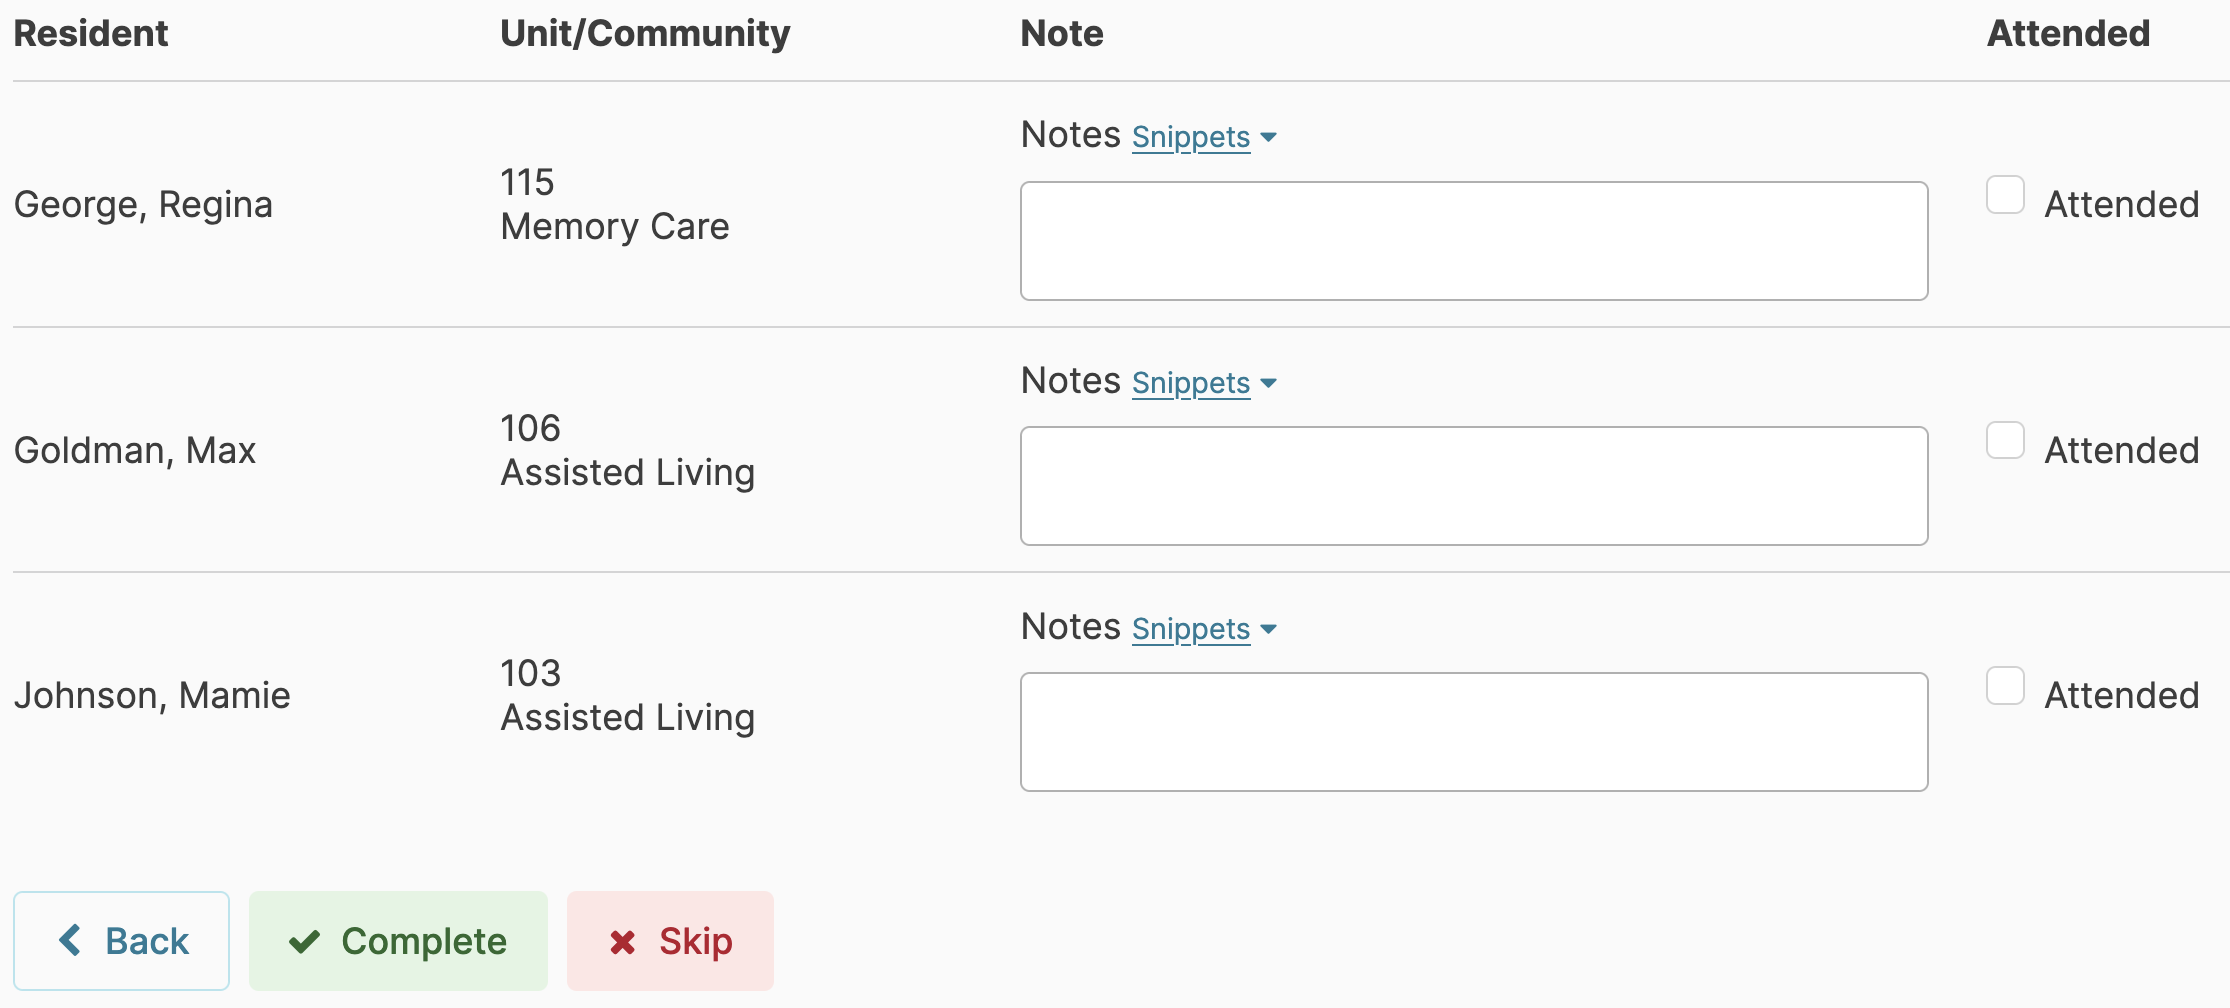
- You can Filter by Community if you have a large home split into different groups, so you don't have to sort through residents from another community.
- You can check that all residents Attended the activity by selecting Mark All Attended. This option can be hidden by turning on the configuration Activity Screen - Hide the 'Chart All' option.
- Or you can go through and check one at a time that residents Attended.
- Finally, you can record Notes about each individual resident (e.g. present and observing, but not participating,' 'disruptive,' or 'invited and declined'). The Snippets tool will make this go very quickly.
Resident Council Meetings
Some states and licenses require Resident Council Meetings to be held; some only require they be offered and have a place if residents want them, and others do not have any related requirements. These meetings can be charted by selecting the "Resident Council" activity type and following the above steps.
When you've completed your charting for the activity, press the Complete button at the bottom of the screen!
Unscheduled Charting
Residex allows users to document duties they complete during their workday that were not scheduled. These can include unscheduled chores, services, vitals, and activities.
To document something on an unscheduled basis, navigate to the Clinical dropdown.
Unscheduled Services
Unscheduled services include personal assistance services provided to specific residents. These can be charted on an unscheduled basis when they are needed/completed, or added as a one-time care to an assignment list.
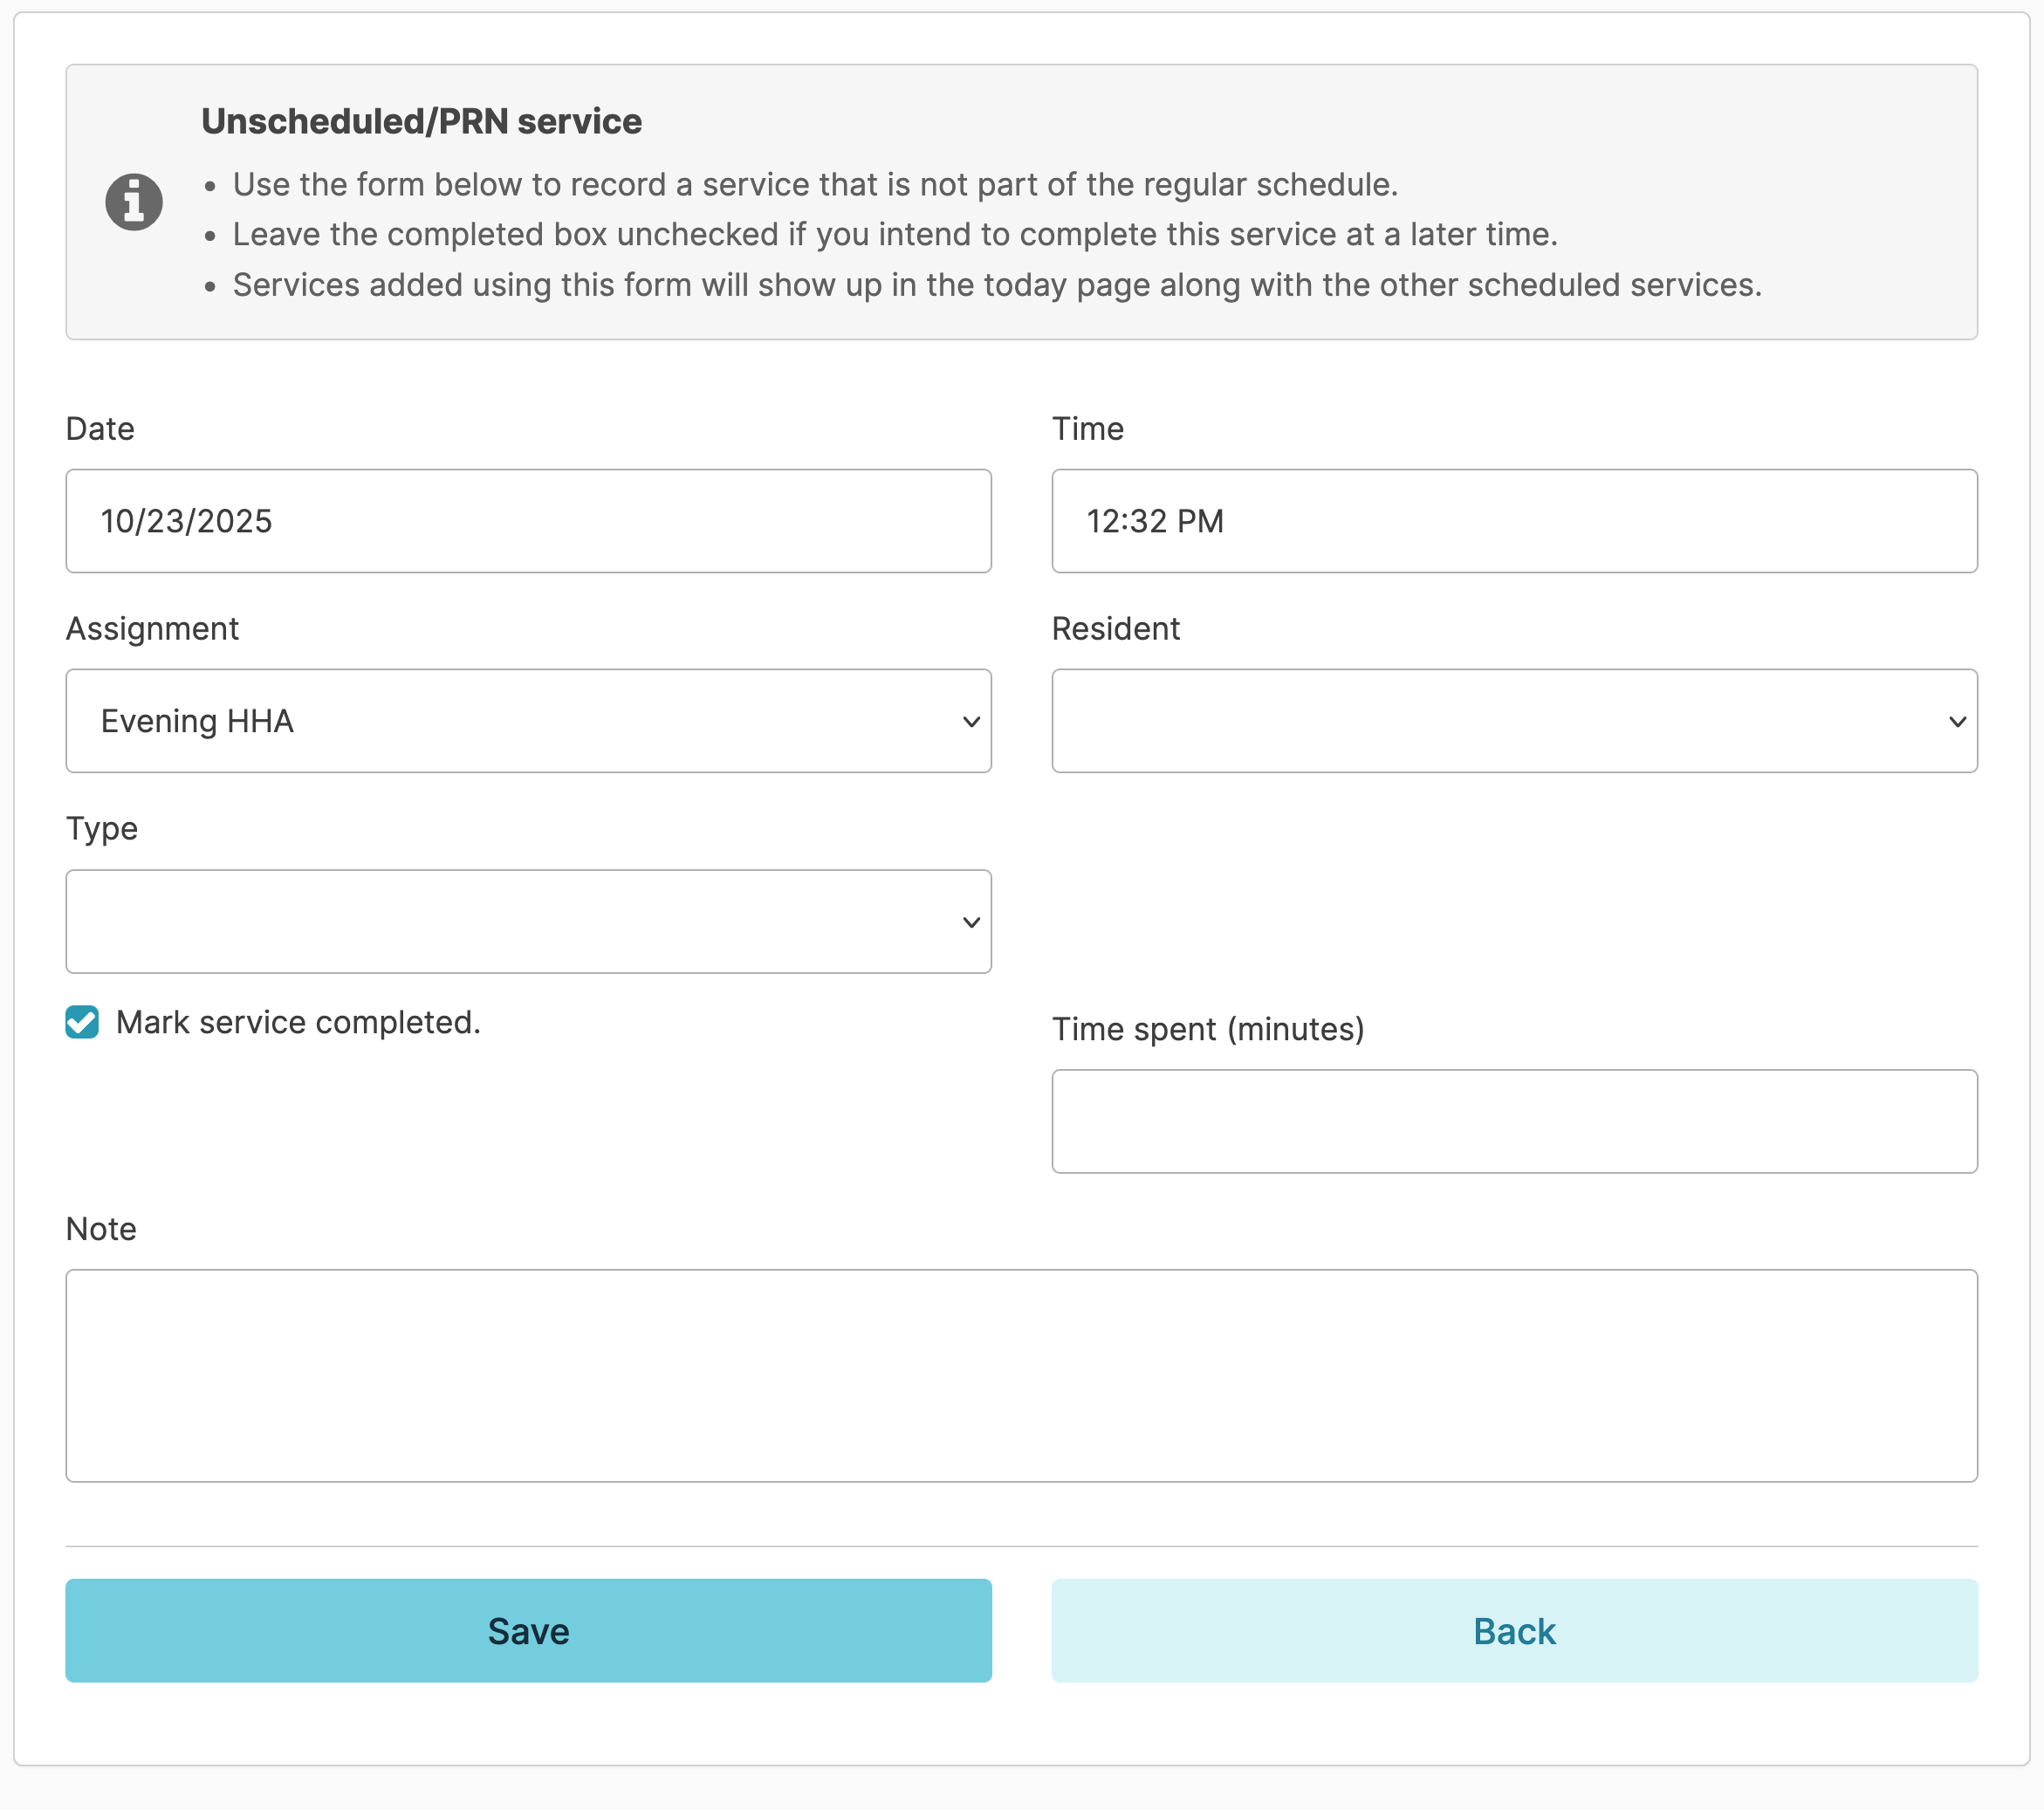
Click on Unscheduled/PRN Service to chart:
- The current Date and Time will appear by default. You can change these if needed. You can schedule a service to be charted in the future as a one-time thing if needed.
- Specify your Assignment
- Specify the Resident you are assisting
- Specify the Type of service you provided
- Provide a note on what was done, and why it was needed.
- Mark service completed box - If you have already provided this service, check this box. If you are scheduling a one-time service to be provided in the future, leave it unchecked.
- Record Time spent if this section appears for you, and press Save
This completed service will now appear in the "Done" section of the Today screen, which can be updated/corrected if needed.
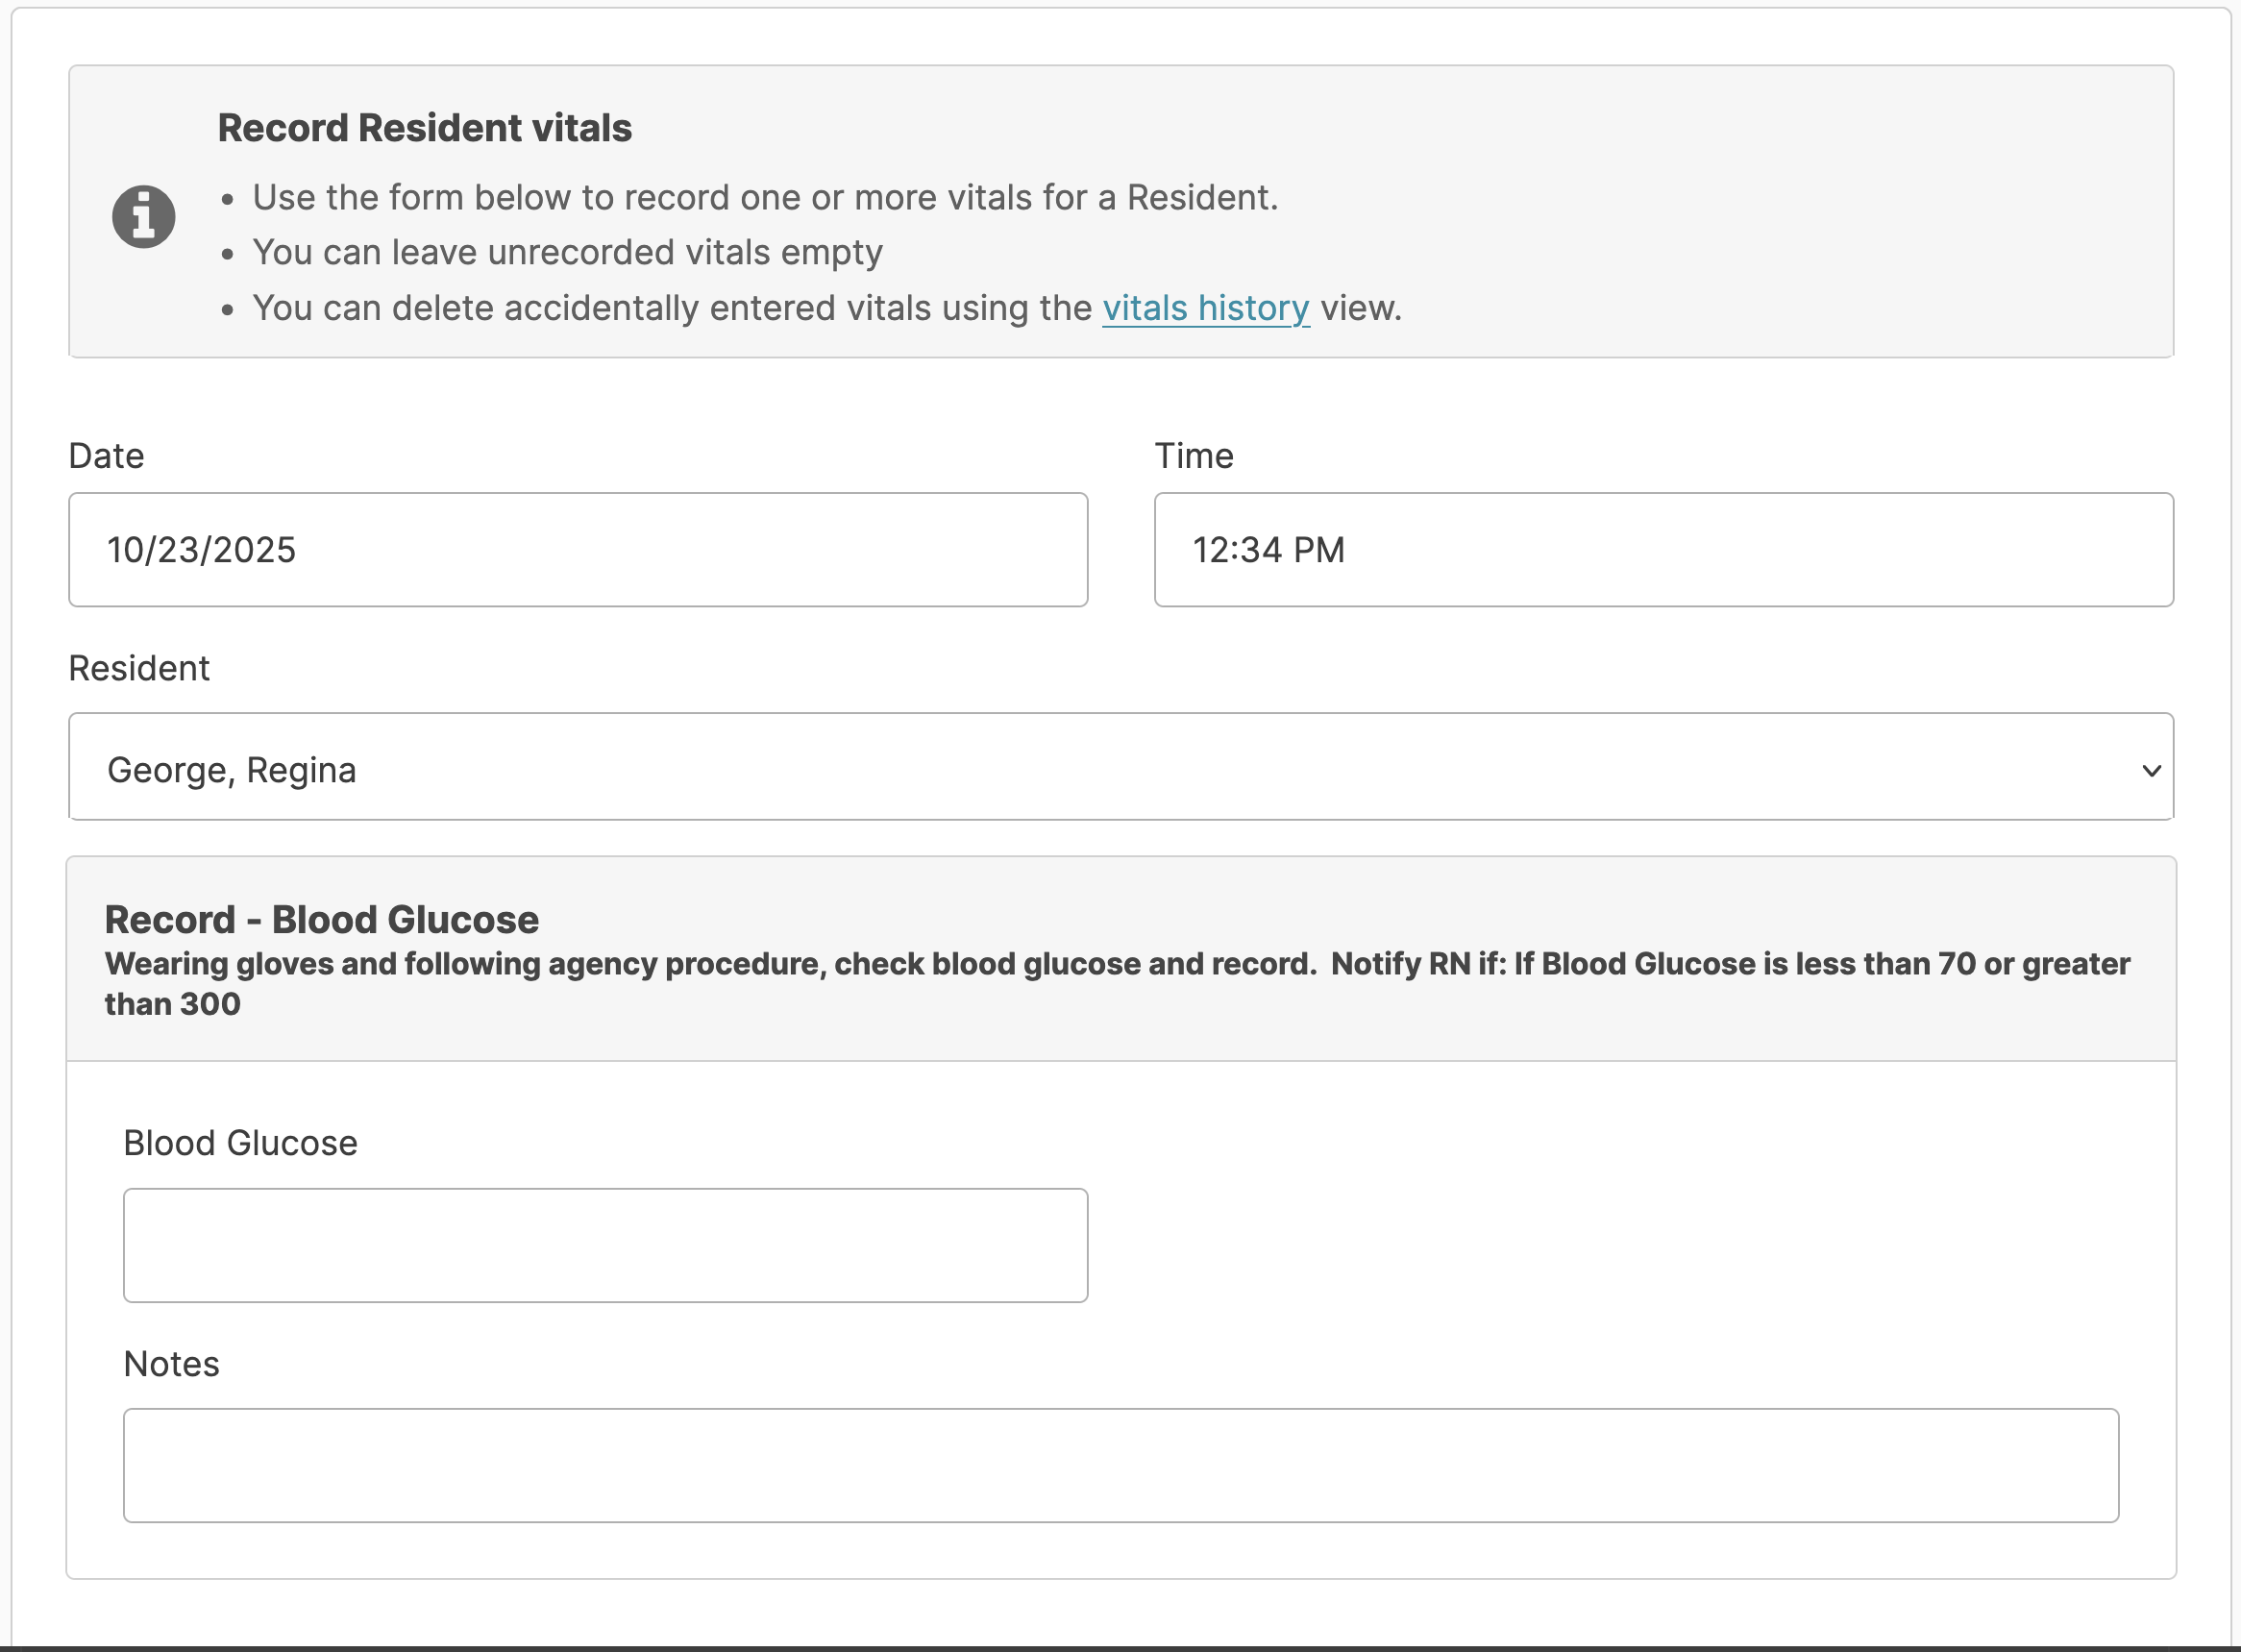
Vitals can be scheduled on a regular basis, but can also be recorded on demand for any reason, by going to Clinical > Unscheduled Resident Vitals.
- The current Date and Time will appear by default; you can change these if needed.
- Specify the Resident whose vitals are being recorded
- You will then be presented with every type of Vital sign tracked by your organization. You can record one, some, or all of them all at once. Provide any relevant notes explaining why you are recording these vitals, along with the vitals themselves.
- Note: If you have resident specific information you would like to have appear on the 'Unscheduled Vitals' screen, you will need to add a PRN vital service to the resident's service plan with those specific instructions.
Note: Unscheduled vitals can be deleted by a nurse or user with Supervisor (Role 13) for up to 14 days after entry. This can be done by navigating to: Clinical > View Resident Vitals OR Residents > Residents > Vitals.
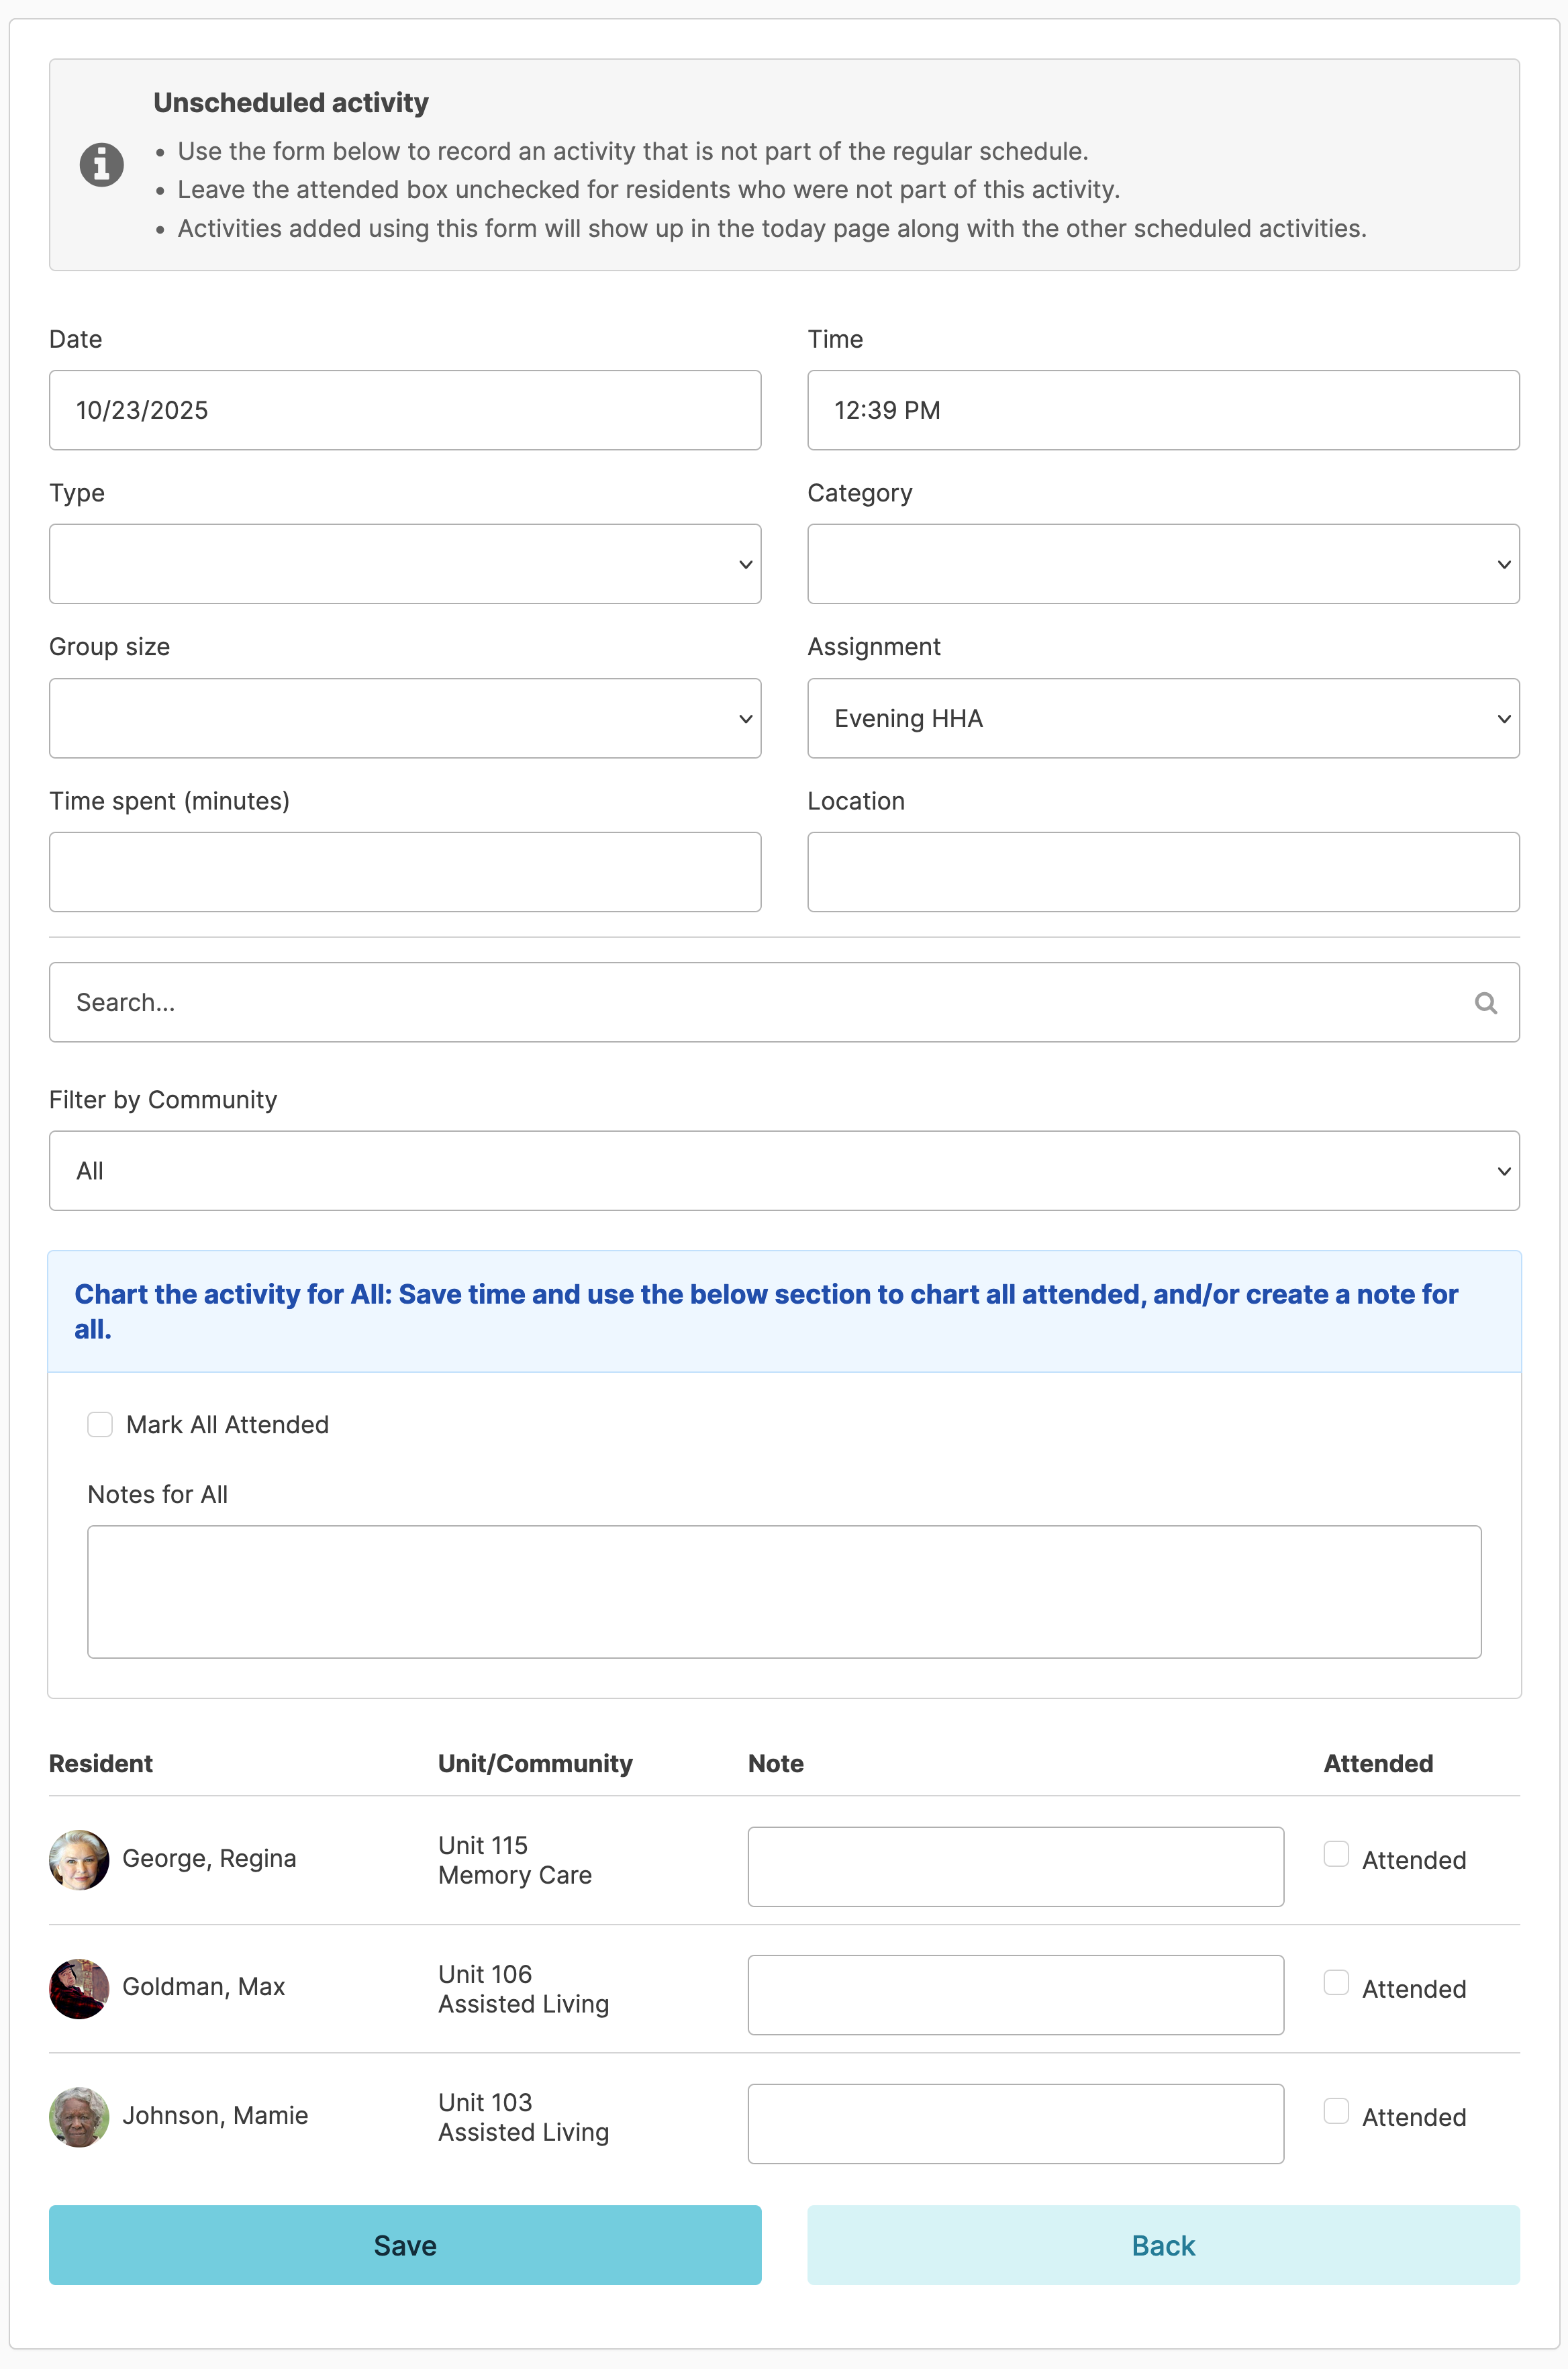
Unscheduled Activities
Activities are life enrichment events like games, group activities, exercise, entertainment, spiritual worship services, etc. While these events are often scheduled in advance, they can also be documented on an unscheduled basis.
Navigate to Clinical > Unscheduled Activity
- The current date and time will appear by default / you can change these if needed.
- Specify the Type, Category, and Group Size of activity being documented.
- Specify your Assignment
- Specify Time spent (the duration of the activity) if prompted,
- Optionally specify the location of the activity
- Specify which residents participated in the activity along with their level of engagement.
- Mark service completed - If you have already provided this service, check this box. If you are scheduling a one time service to be provided in the future, leave unchecked.
- Save when finished!
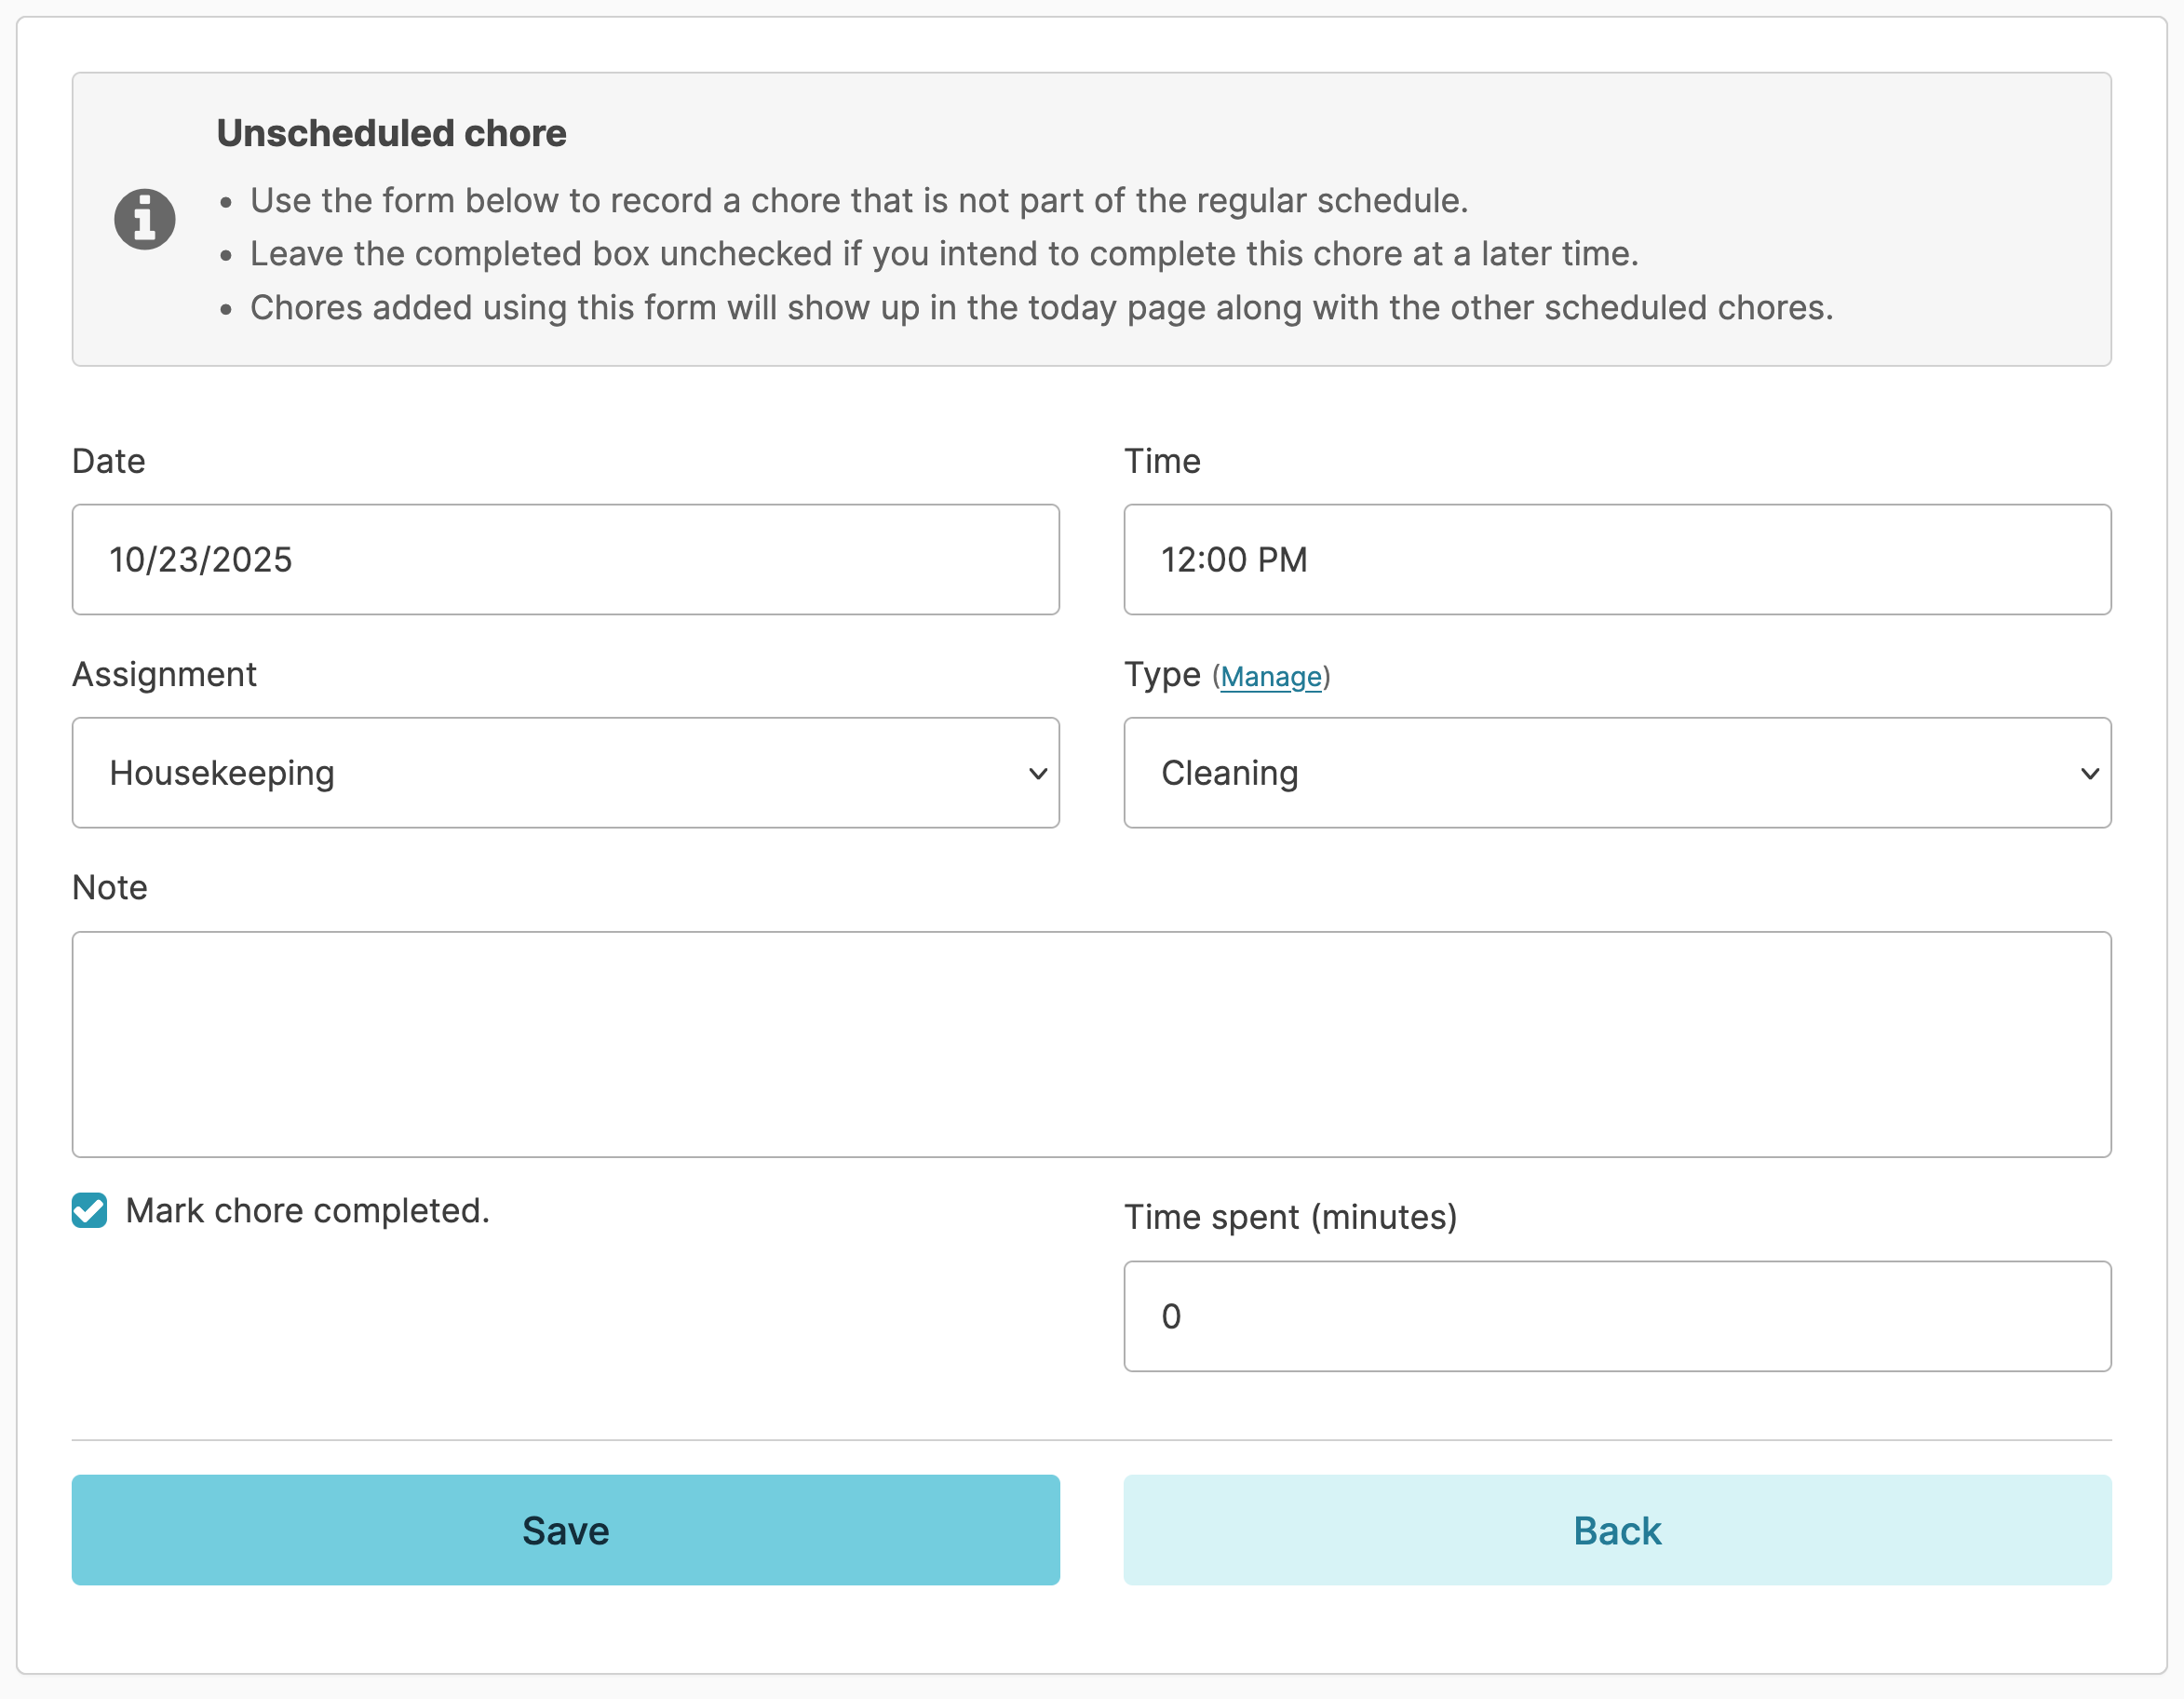
Navigate to Clinical > Unscheduled Chores.
- The current date and time will appear by default, but you can change these if needed.
- Specify the Assignment you are working as
- Specify the Type of chore you are doing
- Enter a note describing the work completed, and why it was needed
- Specify Time spent - the duration of the time you spent doing the chore, and Save
Disconnected Charting
Disconnected Charting is a tool to mitigate issues with the availability or reliability of Wi-Fi Internet connectivity. You can still chart electronically despite imperfect internet access.
All that is required is a way to connect to the internet for a few moments before and after your charting. This could be one location in your building with internet access, or a hotspot.
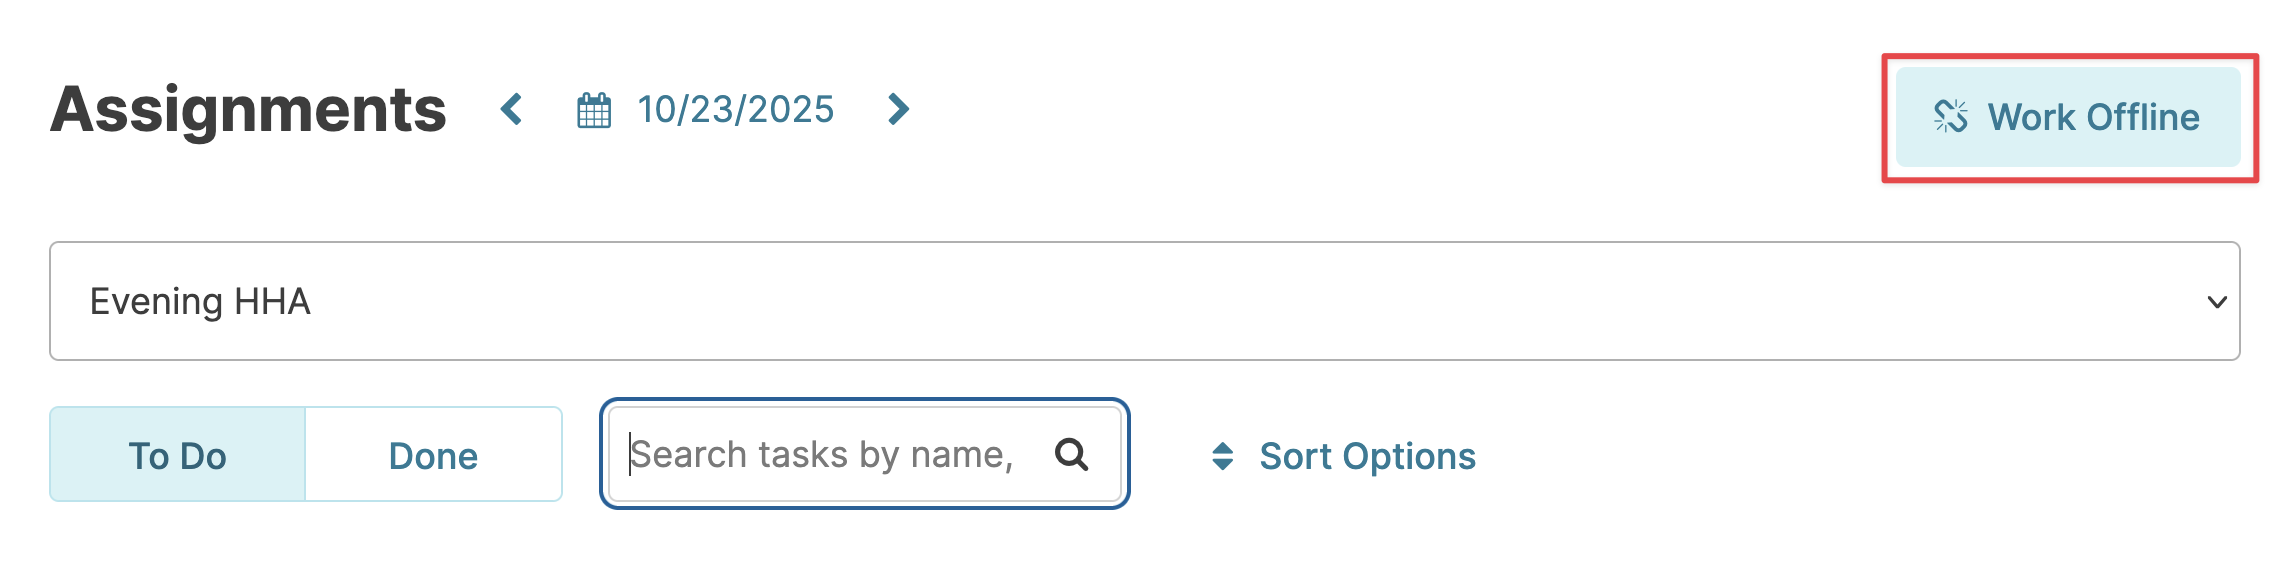
How to use Disconnected Charting
- Connect to the internet on your device, and then log into Residex
- Select an Assignment
- Click "Work Offline"
- Chart services, chores, and medications as you would normally. Note: the ability to see charting history is not available while in offline mode.
Reconnect to Residex
When you return to an area with a known wifi connection and reconnect to the internet, you can return to charting online. Charting online will "upload" all of the items that have been marked complete and display any new information added since you began working offline. To return to charting online, click the banner at the top of the screen.

Charting while in Disconnected Mode
While you are disconnected, you will have limited functionality. You will have access to:
- Scheduled and unscheduled services, chores, and tasks
- Resident notes
- Scheduled and unscheduled (PRN) medication administrations
- Scheduled and unscheduled activities
- Messages to staff (will send once reconnected)
- Track supplies
You will not have access to other features until you return to 'online' mode. NOTE: You will not have access to medication witnesses while offline.
REMEMBER!
- Always return to Work Online before administering a PRN to view when it was last given. Document the PRN, then work offline again.
- Return to Work Online every hour or two to sync charted services and allow others to see what you have done.
- Always return to Work online before you sign out or leave for the day. If you do not return to online, the services you charted will not be "synced" to the database.
Reviewing Care Plans, Policies, Etc.
In the course of your day-to-day routine, supervisors will send documents to your Today screen asking you to review and acknowledge them. These documents include Care Plans, Resident Bios, and Policies & Procedures.
Ideally these items should be read and marked as reviewed as soon as possible after you first see them.
Care Plans
Care plans provide a comprehensive view of the plan of care for a resident based upon needs identified by a nursing assessment. Each time a clinical assessment is completed by a nurse for a resident, a care plan will be generated and will appear for you on the Today screen. This means, depending on your state's regulations, you may need to review the care plan for a resident multiple times per year.

When you need to review a care plan, it will show up on your Today screen
- Click on the care plan & read it
- Check the "I acknowledge I have reviewed the Plan of Care ..." option at the bottom of the plan, and press the Acknowledge button. You're done!
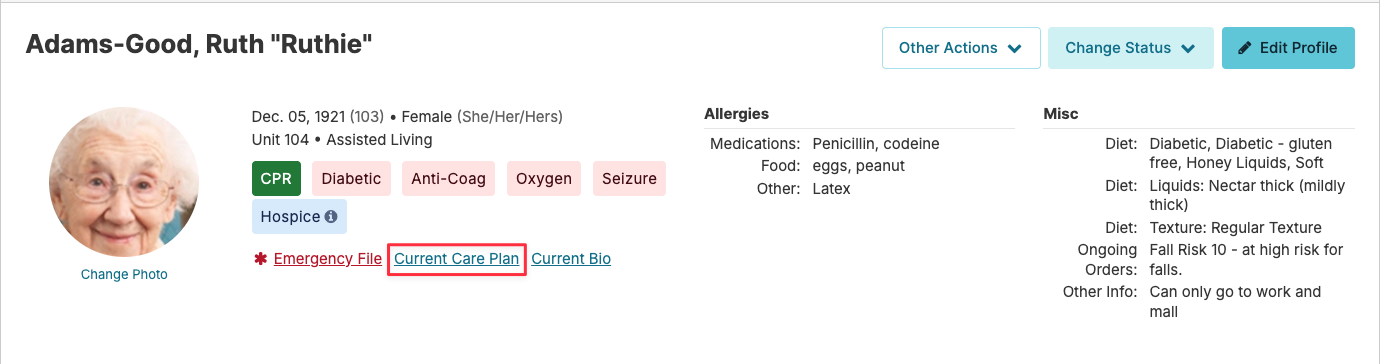
Care Plan visibility
In addition to officially Acknowledging the Care Plan, you will be able to access and review a care plan on demand from the Residents > Residents > Resident Profile screen, or by clicking any service assigned for the resident.
A brief resident biography may be made available, called a Bio/History Review. These allow you to review a brief history of the resident's personal life and some of their personal preferences. These will help you get to know your residents on a deeper level.
Reviewing a Bio/History is done in the exact same way as a resident Care Plan - they will show on the Today screen, you will click on one, read it, and acknowledge it.

The Bio/History will also always be available to you from any service assigned for a particular resident, or from their resident profile, again in the exact same manner as the Care Plan.
Policies
Policies define expected procedures and practices for your organization. As with the Care Plan and Bio/History, Policies may appear on your Today screen.
Click on a policy, read it, and Acknowledge it. You're done!
Anytime you are charting a service that has a related policy, that policy will be available within the service for you to reference on demand as you need.

Claim Services/Chores
This optional feature allows staff to claim responsibility of services for certain residents as well as claim specific chores at the start of a shift. This is used by facilities that may opt to have just one AM HHA provider, for instance, but have multiple staff working to complete the services assigned to that single provider. Claiming will let coworkers know you will be responsible for the services and chores you claimed. Claimed residents will automatically sort to the top of your Today screen todo items.
On the Today screen, the Claim services / chores option will display if this feature has been enabled for your organization. Click on it to begin.
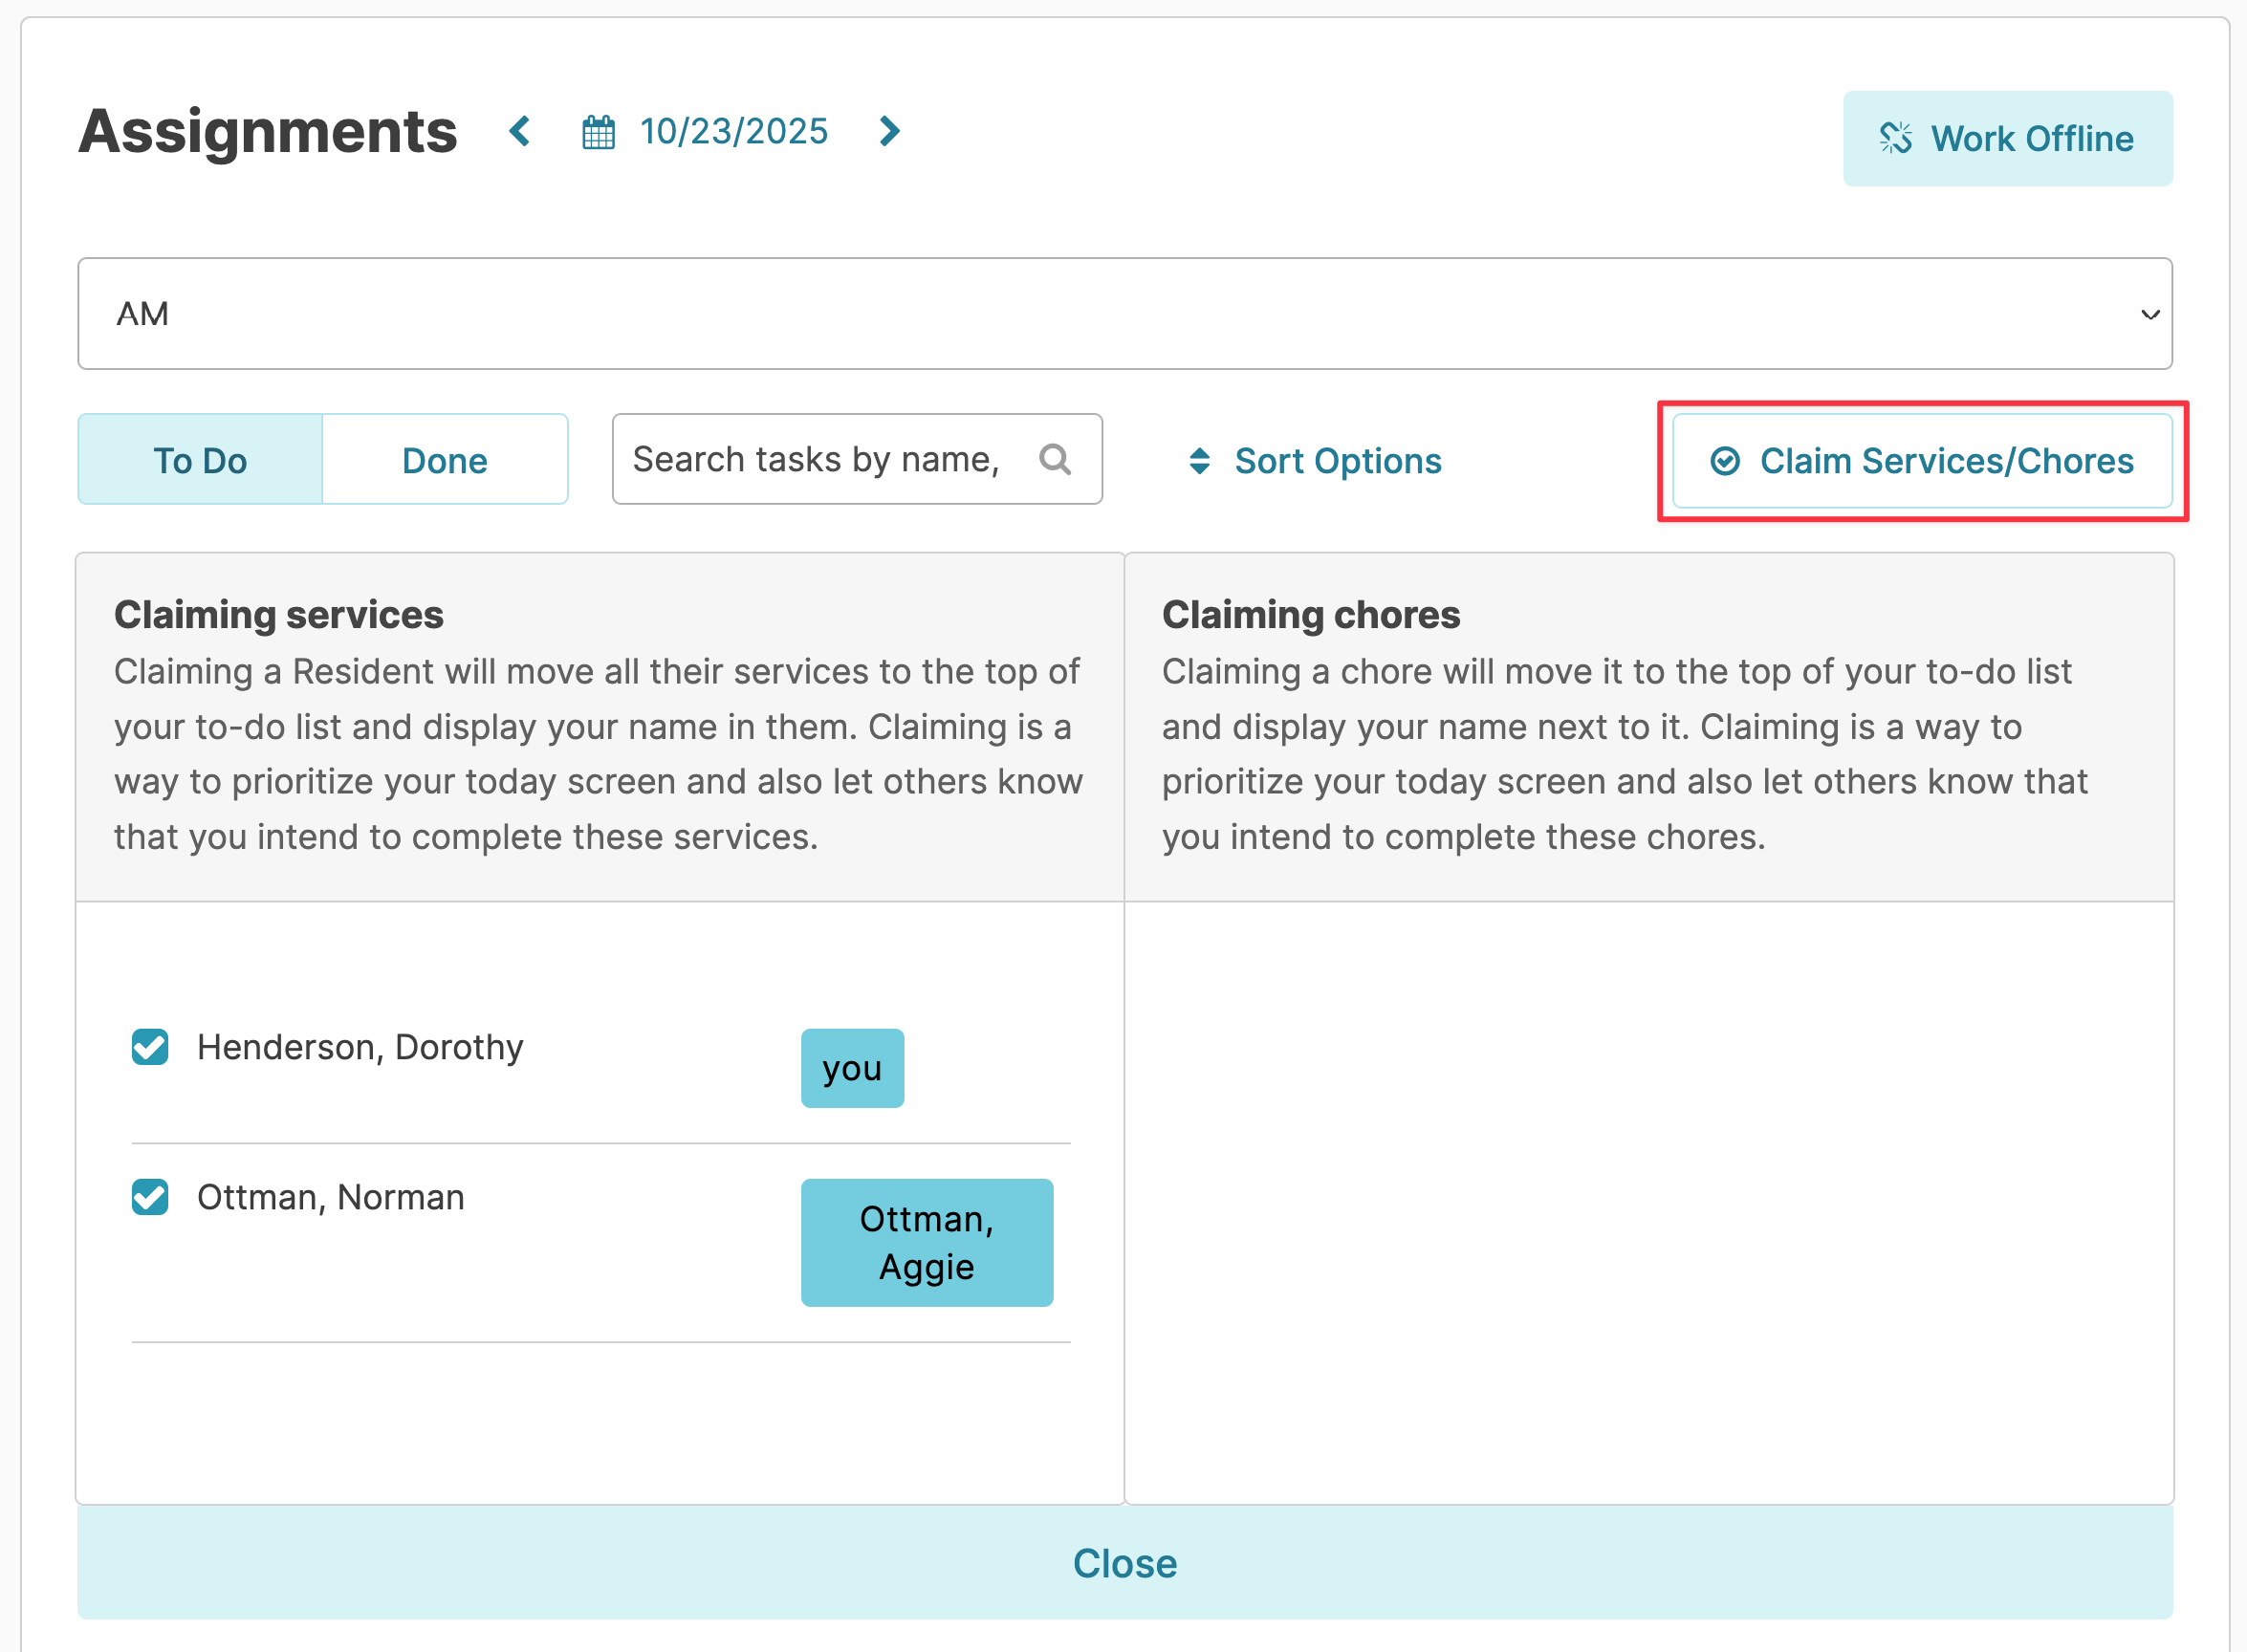
A window will appear to select residents. Click the box by the resident(s) name and chore(s) you wish to claim responsibility for.
Click Close when finished.
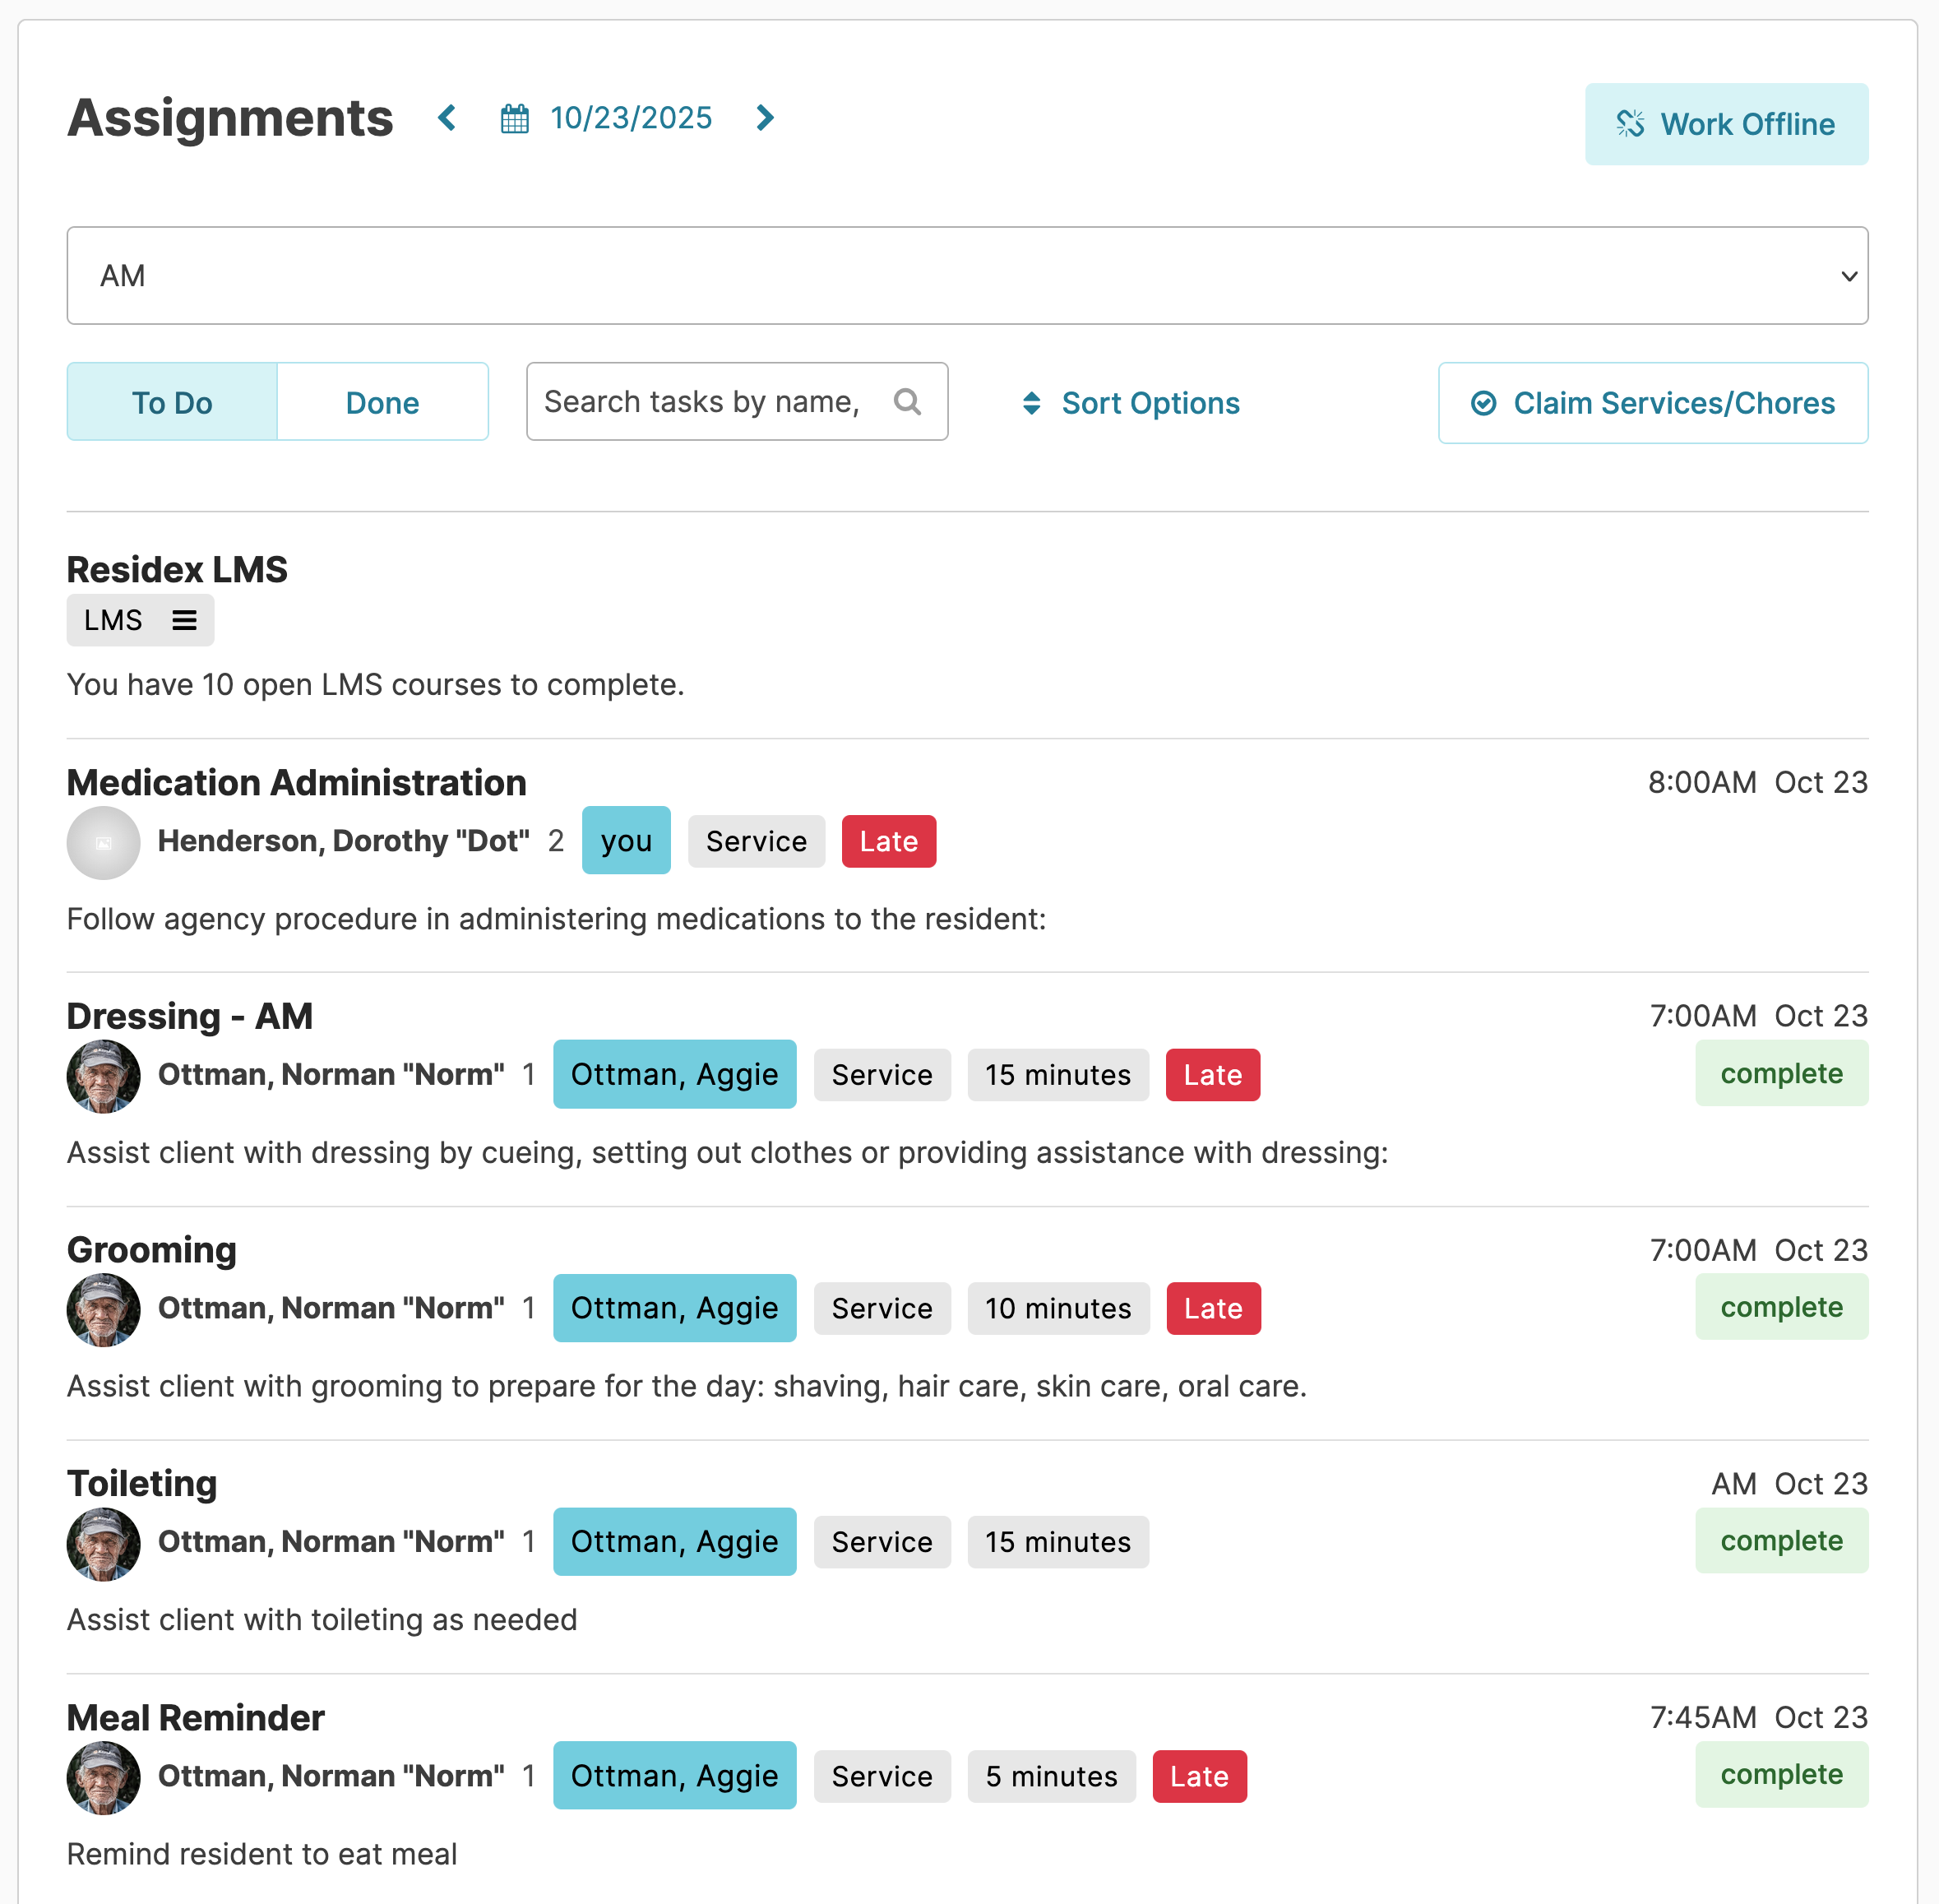
Your Assignment screen will display services for the residents you claimed at the top of your todo list, and will be flagged with your name on them for all to see.
Check-In/Check-Out
Residents leaving the building for short term outings or appointments can be 'checked out' by staff when leaving and documented 'checked in' again upon returning.
This feature is intended for use for other outings where resident location needs to be tracked, and not for medical appointments (where the Referral Appointments feature is used.) This feature is not enabled for everyone; it can be turned on or off based on each organization's needs.
"Checking out" is not the same as putting a resident on "Hold". When checked out, a resident's scheduled services and meds will still appear on caregiver assignments.
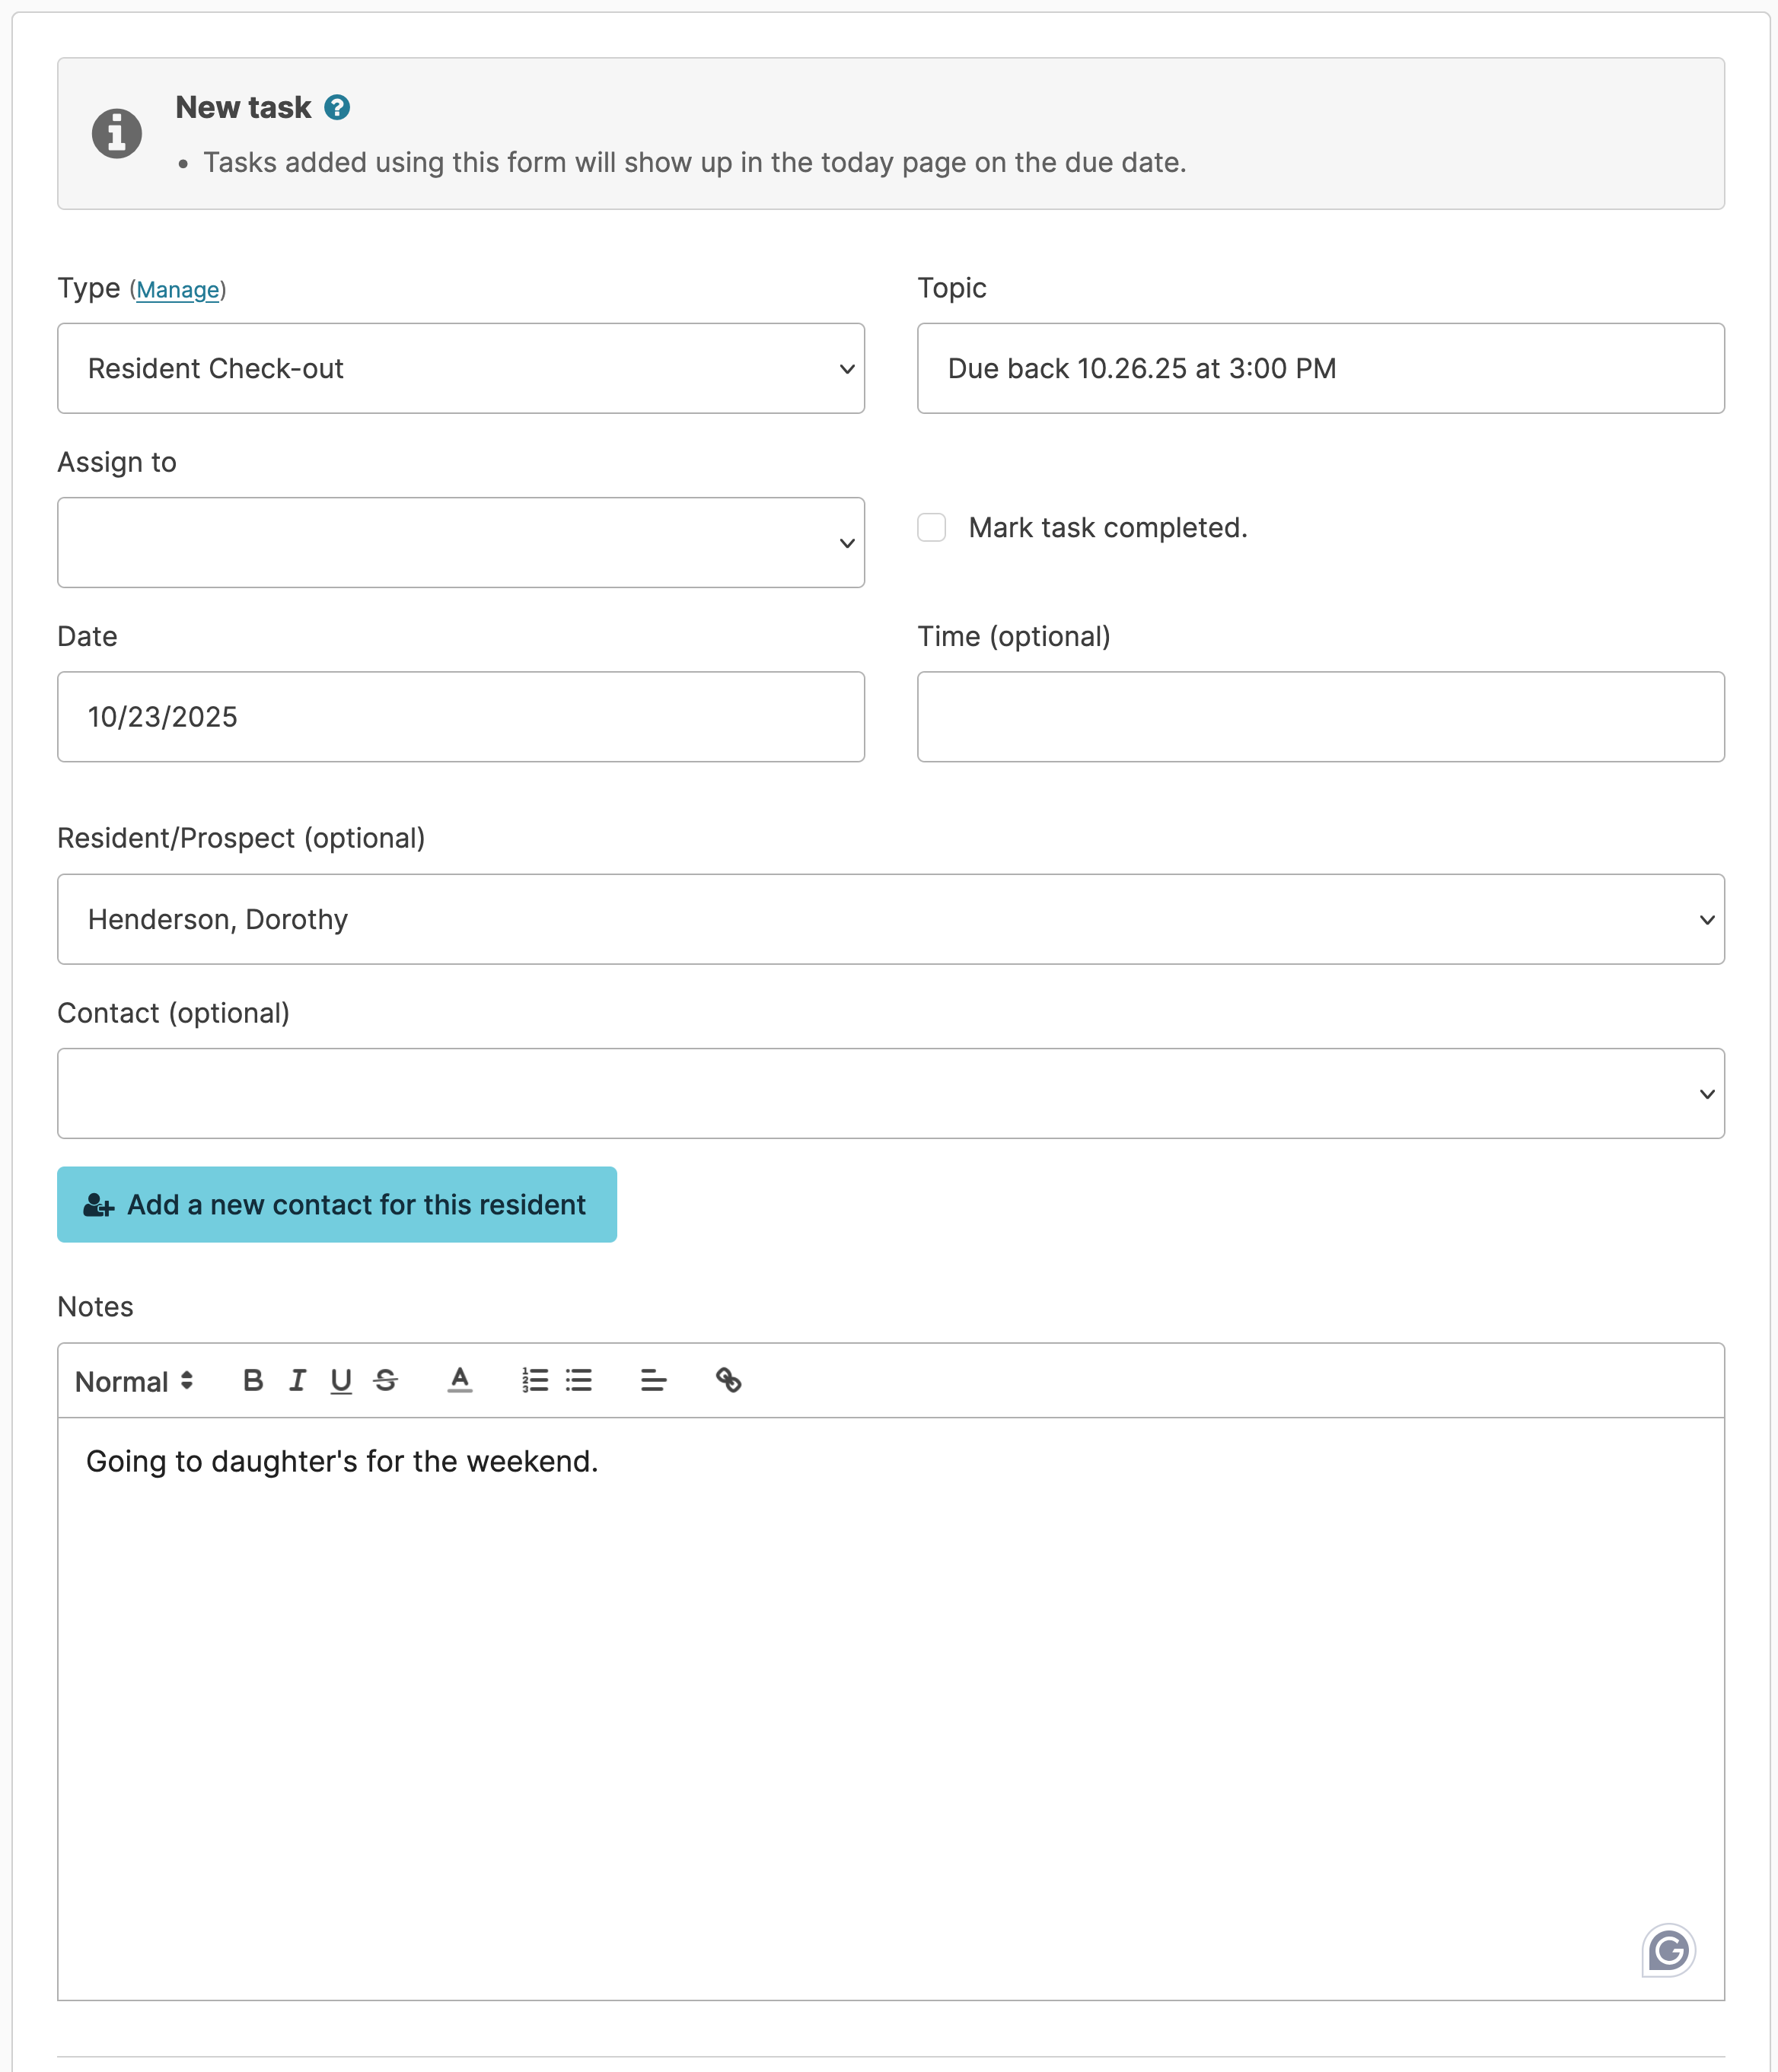
Resident Check-Out
From the Admin > Tasks > New Task
- Select the Task Type 'Resident Check-Out'
- Enter specific 'task' name (ie. Due back at 6pm)
- Assign to - select a staff name
- Do NOT mark task completed as you will leave the task open until the resident returns
- Select Date, Time (optional)
- Select Participant, Contact
- Enter any notes needed
- Press Save
Dashboard / Login Report
Once the resident check-out task is created, the task information will display on the report Residents Out of Building. This report can be added to the Dashboard/Login Report to notify staff when residents are out.
Today Screen
When a resident is checked out, an open task will remain on the Today screen in order to check the resident back in when they return.
Resident Check-In
Upon a resident's return, find the resident check-out task under Admin > Tasks or on the Assignment screen (under the 'assigned to' person's login).
Click on the task, record details about the resident's return, and press Complete.
Shift-to-Shift Communication
Sharing information between shifts is important, and while the login report can inform the incoming shift about concerns (e.g. incidents, missed meds, services, etc.), there is often informal information to be shared.
Shift-to-shift communication notes can be edited by the staff person who entered them.
You can view the last 24 hours of shift notes by navigating to Today > Shift-to-Shift Communication. Add a new note by selecting Add Note, selecting the resident and entering the information.

Shift-to-shift communication notes are visible for 24 hours and purged/removed from the database after a set number of days based on your configuration (Up to 90 days). The last 5 days of shift notes can be viewed from the report category: Shift-to-shift Communication > Report: Shift-to-shift Communication - Last 5 Days.
There are also various Shift-to-shift Communication reports that can be added to the Dashboard/Login Report screen to view shift notes entered during the last 12, 24, 48 or even 72 hours.
Supply Tracking
Supply Tracking is an optional feature in Residex. When enabled, it allows you to create a supply list, chart resident supply usage, and bill appropriately for supplies.
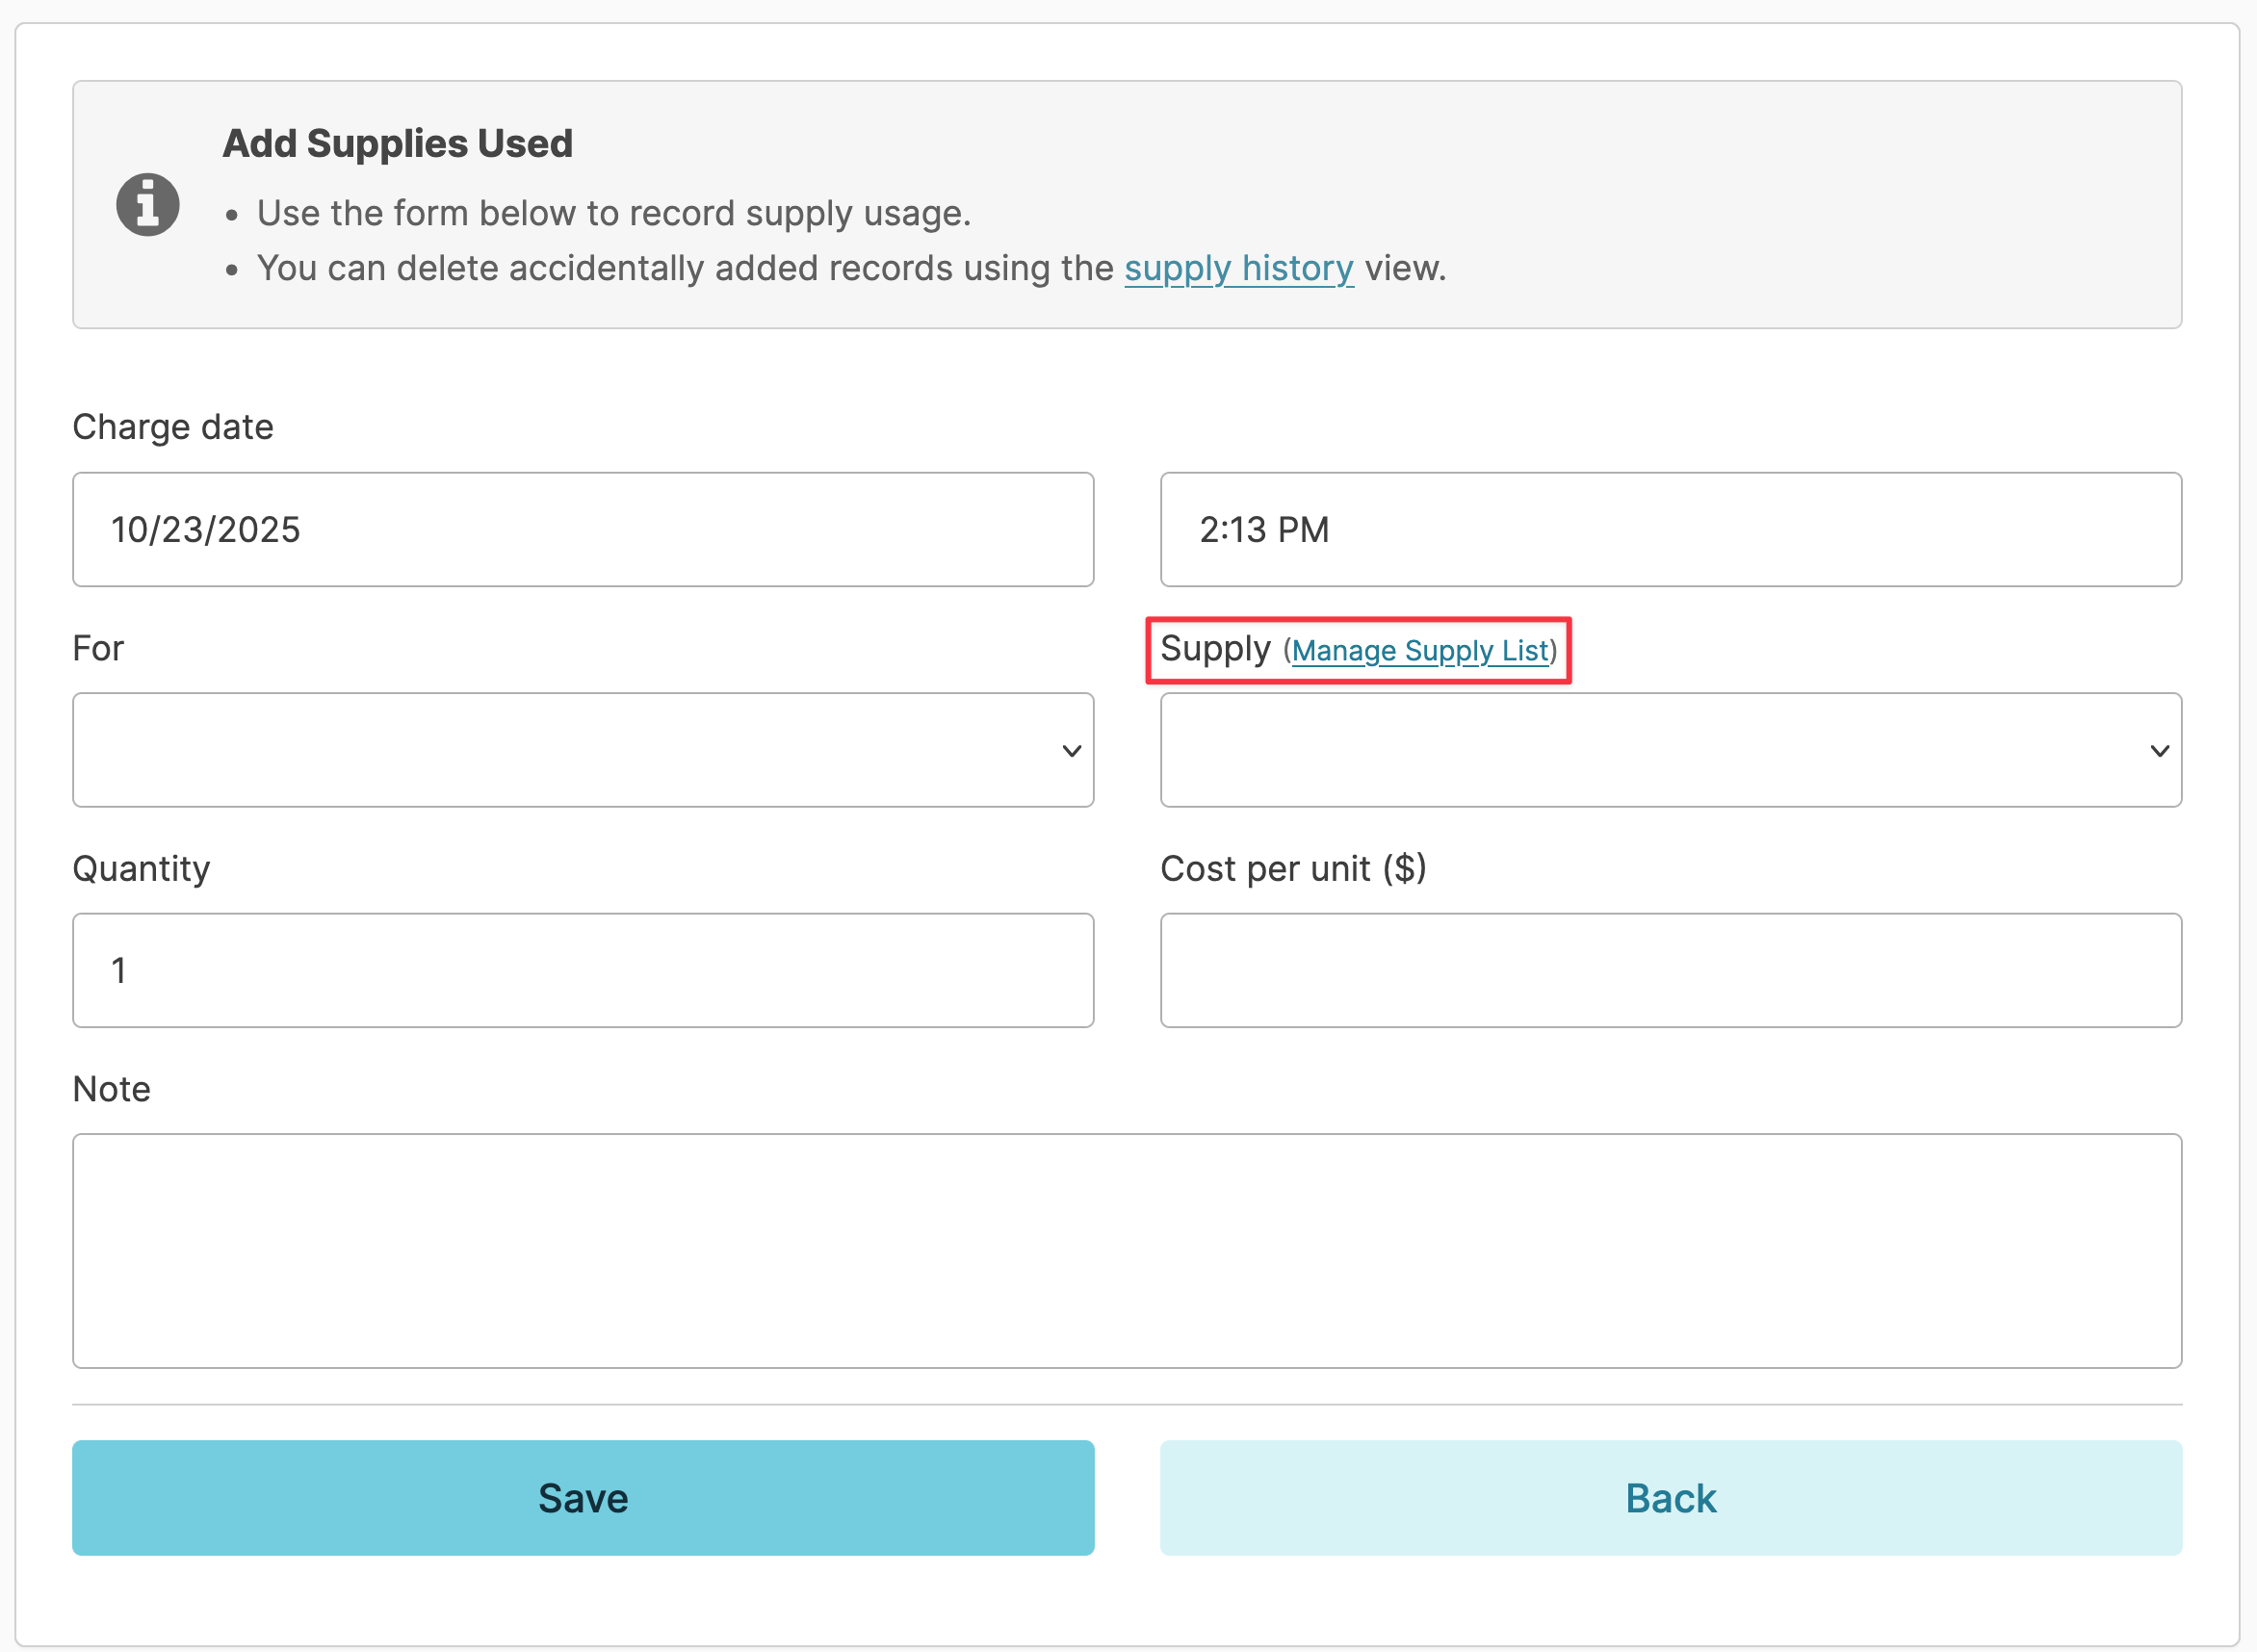
Manage Supply List
From Residents > Record Supply Usage > Select the Manage Supply List link where you will have the ability to add, edit or deactivate a supply.
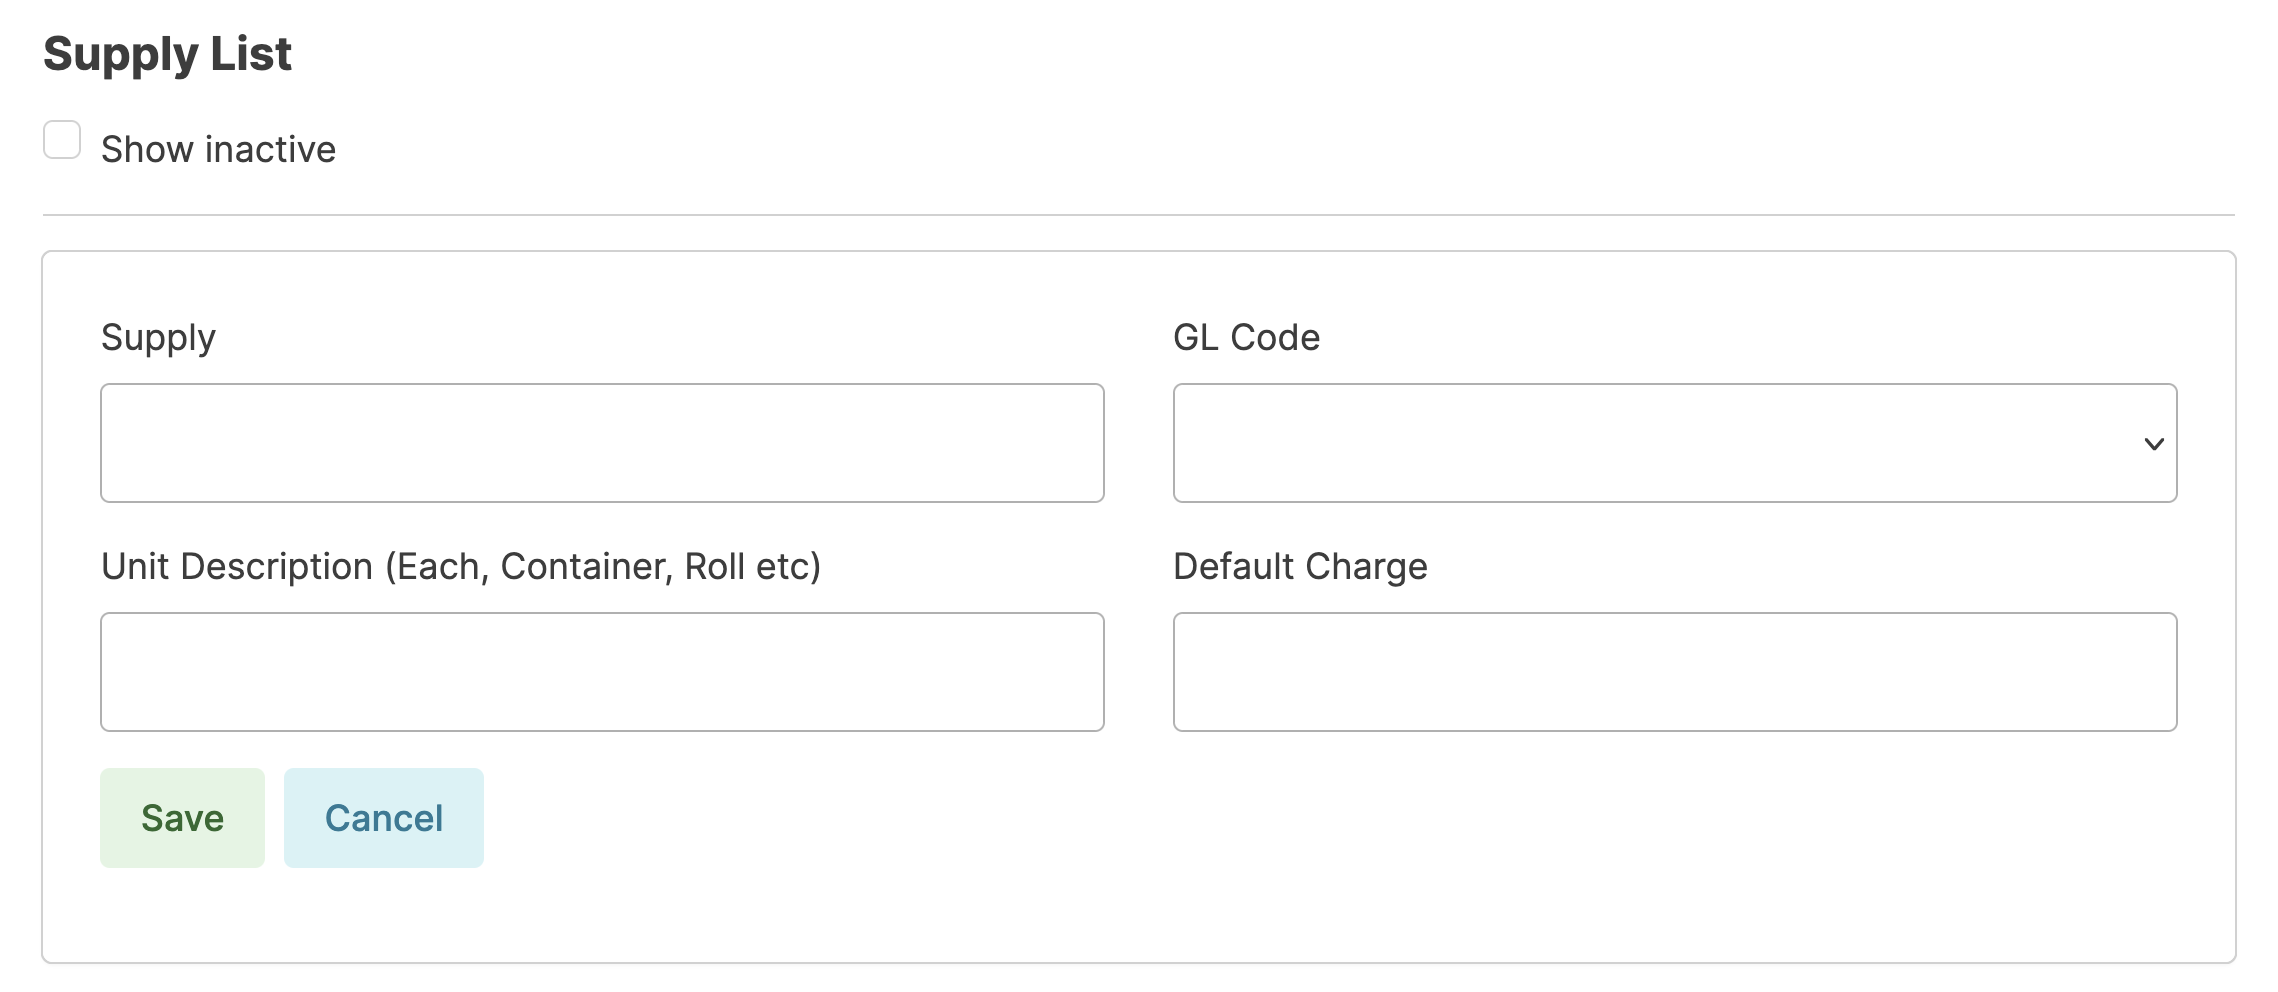
Add Supply
- From the Manage Supply List screen, click Add Supply
- Enter supply name
- Select GL code (Choosing a GL Code is a required field. If your facility does not use GL Codes select any GL Code)
- Enter Unit Description
- Enter Default Charge
- Click Save
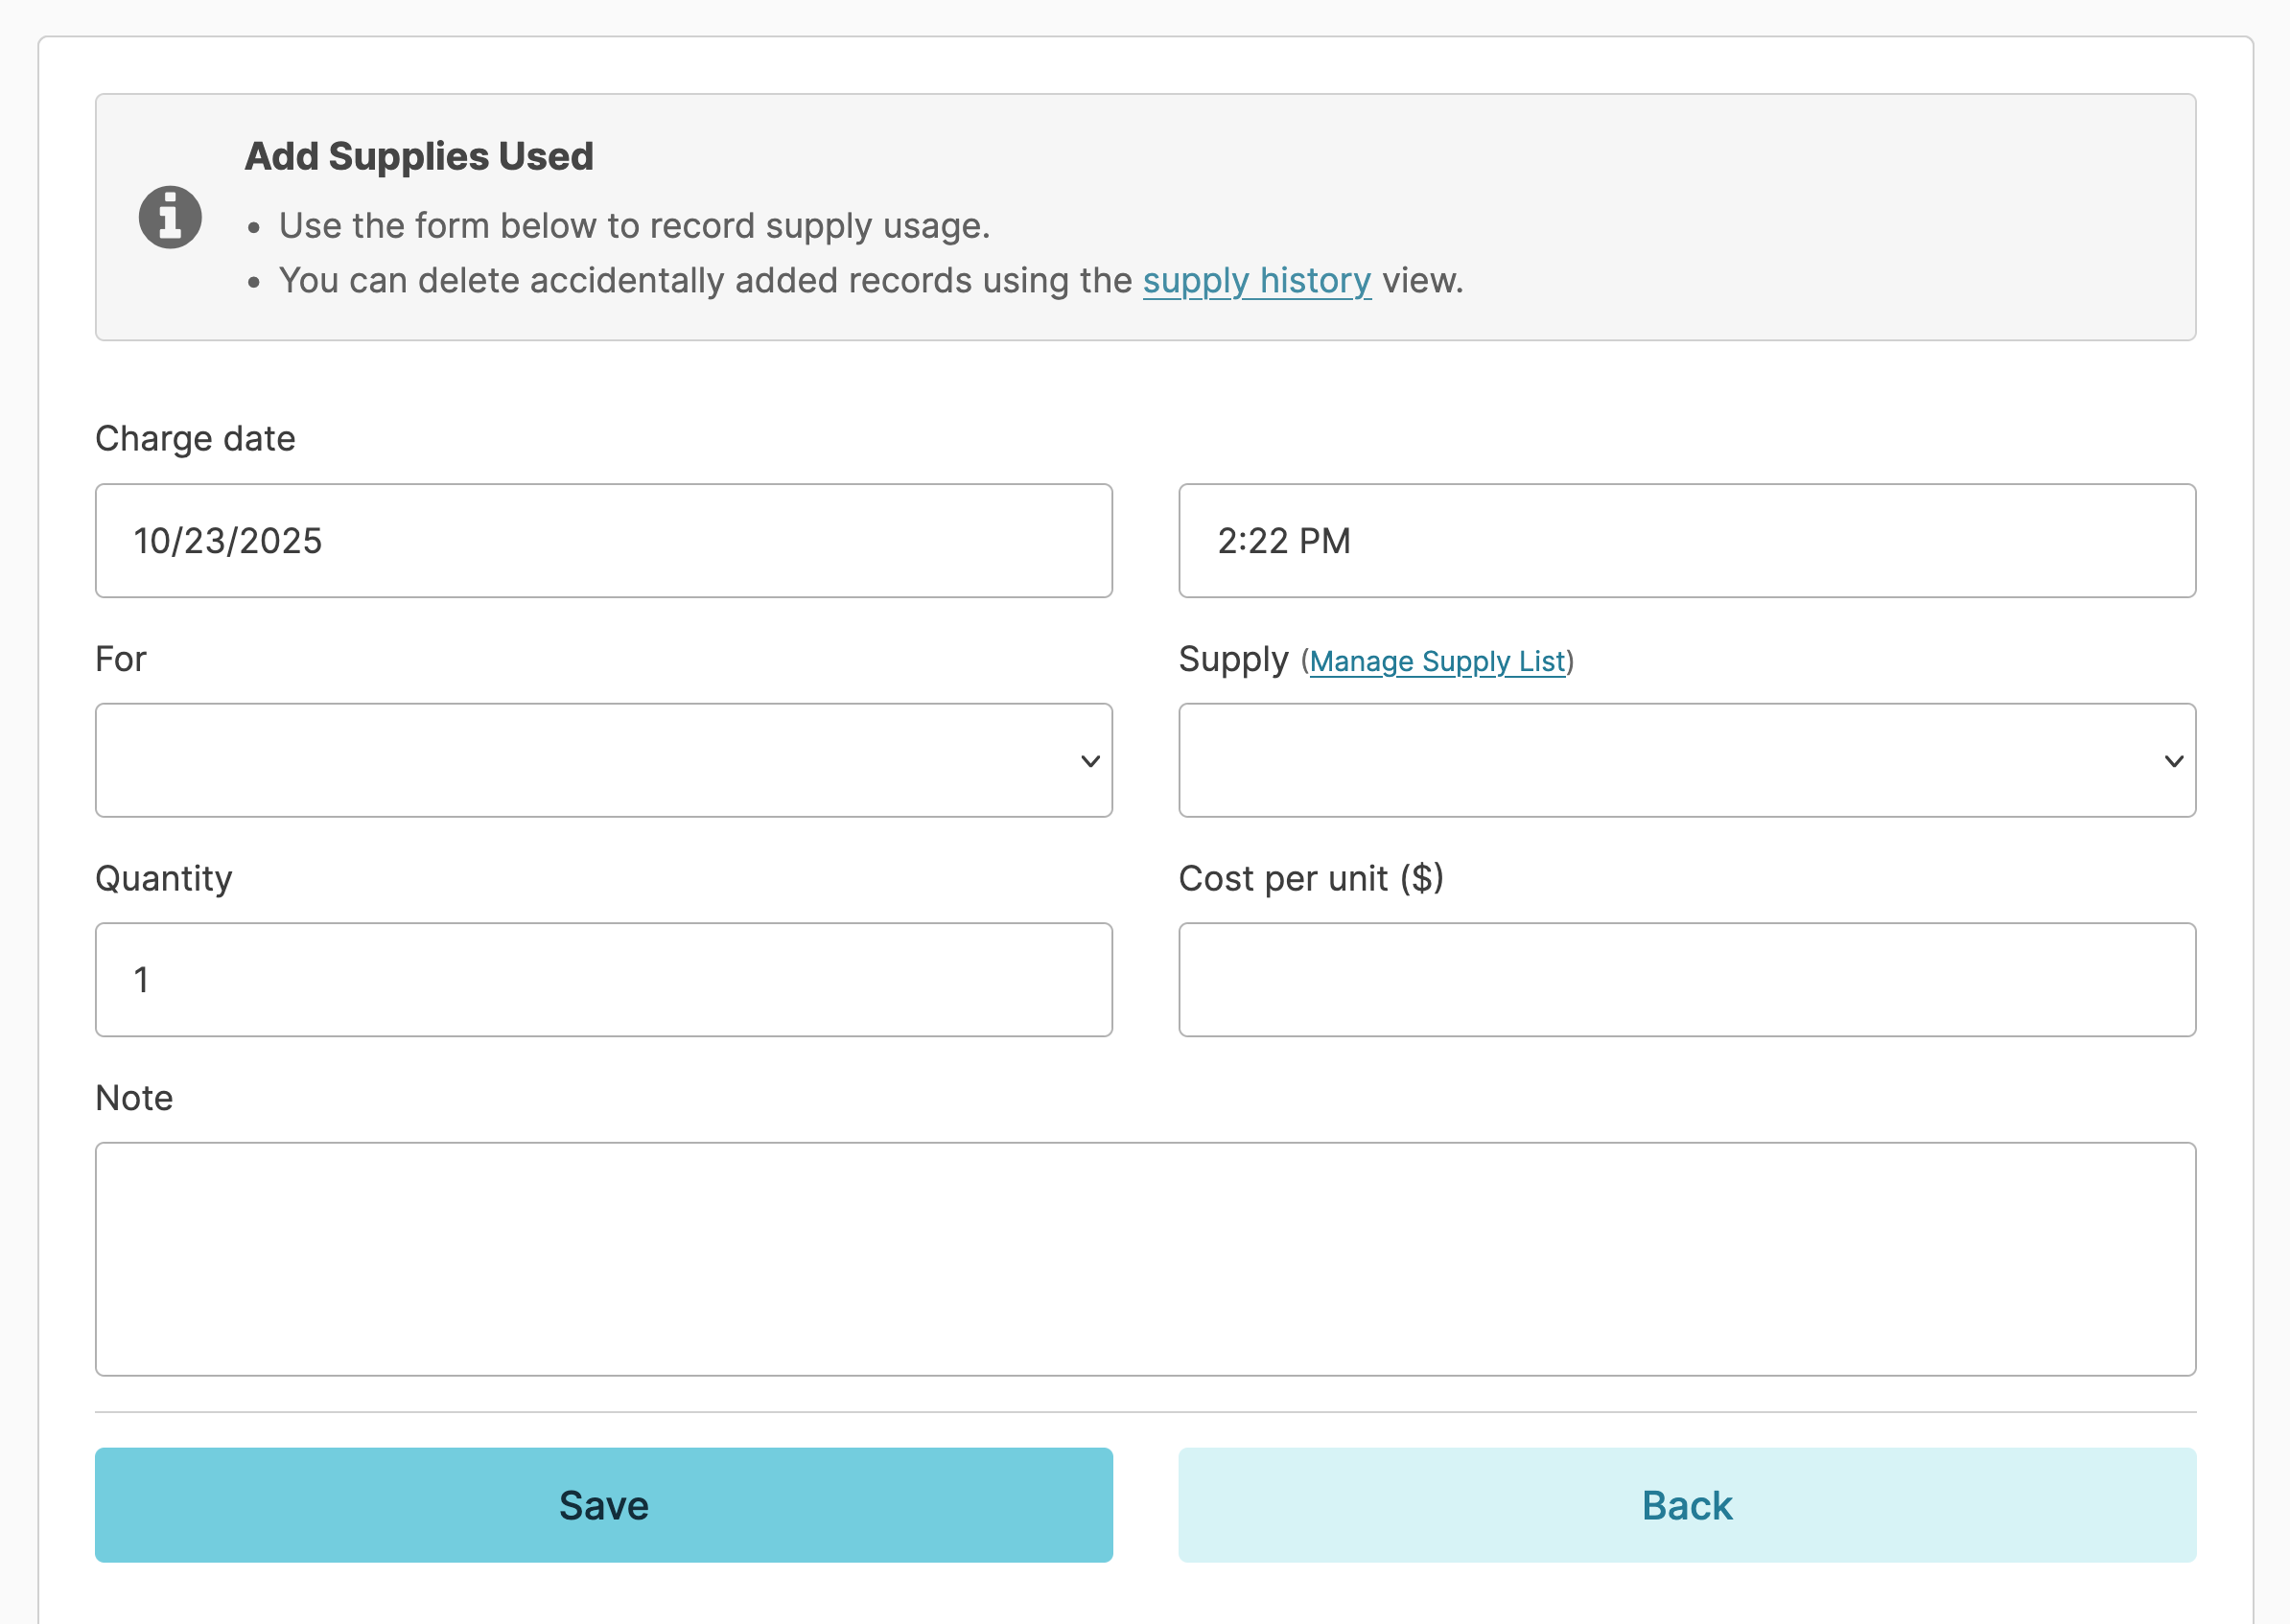
To record supply usage, navigate toResidents > Record Supply Usage and enter the following information:
- The resident from the For dropdown list
- Select the supply
- Enter the quantity, cost per unit, and any desired notes.
- Click Save.
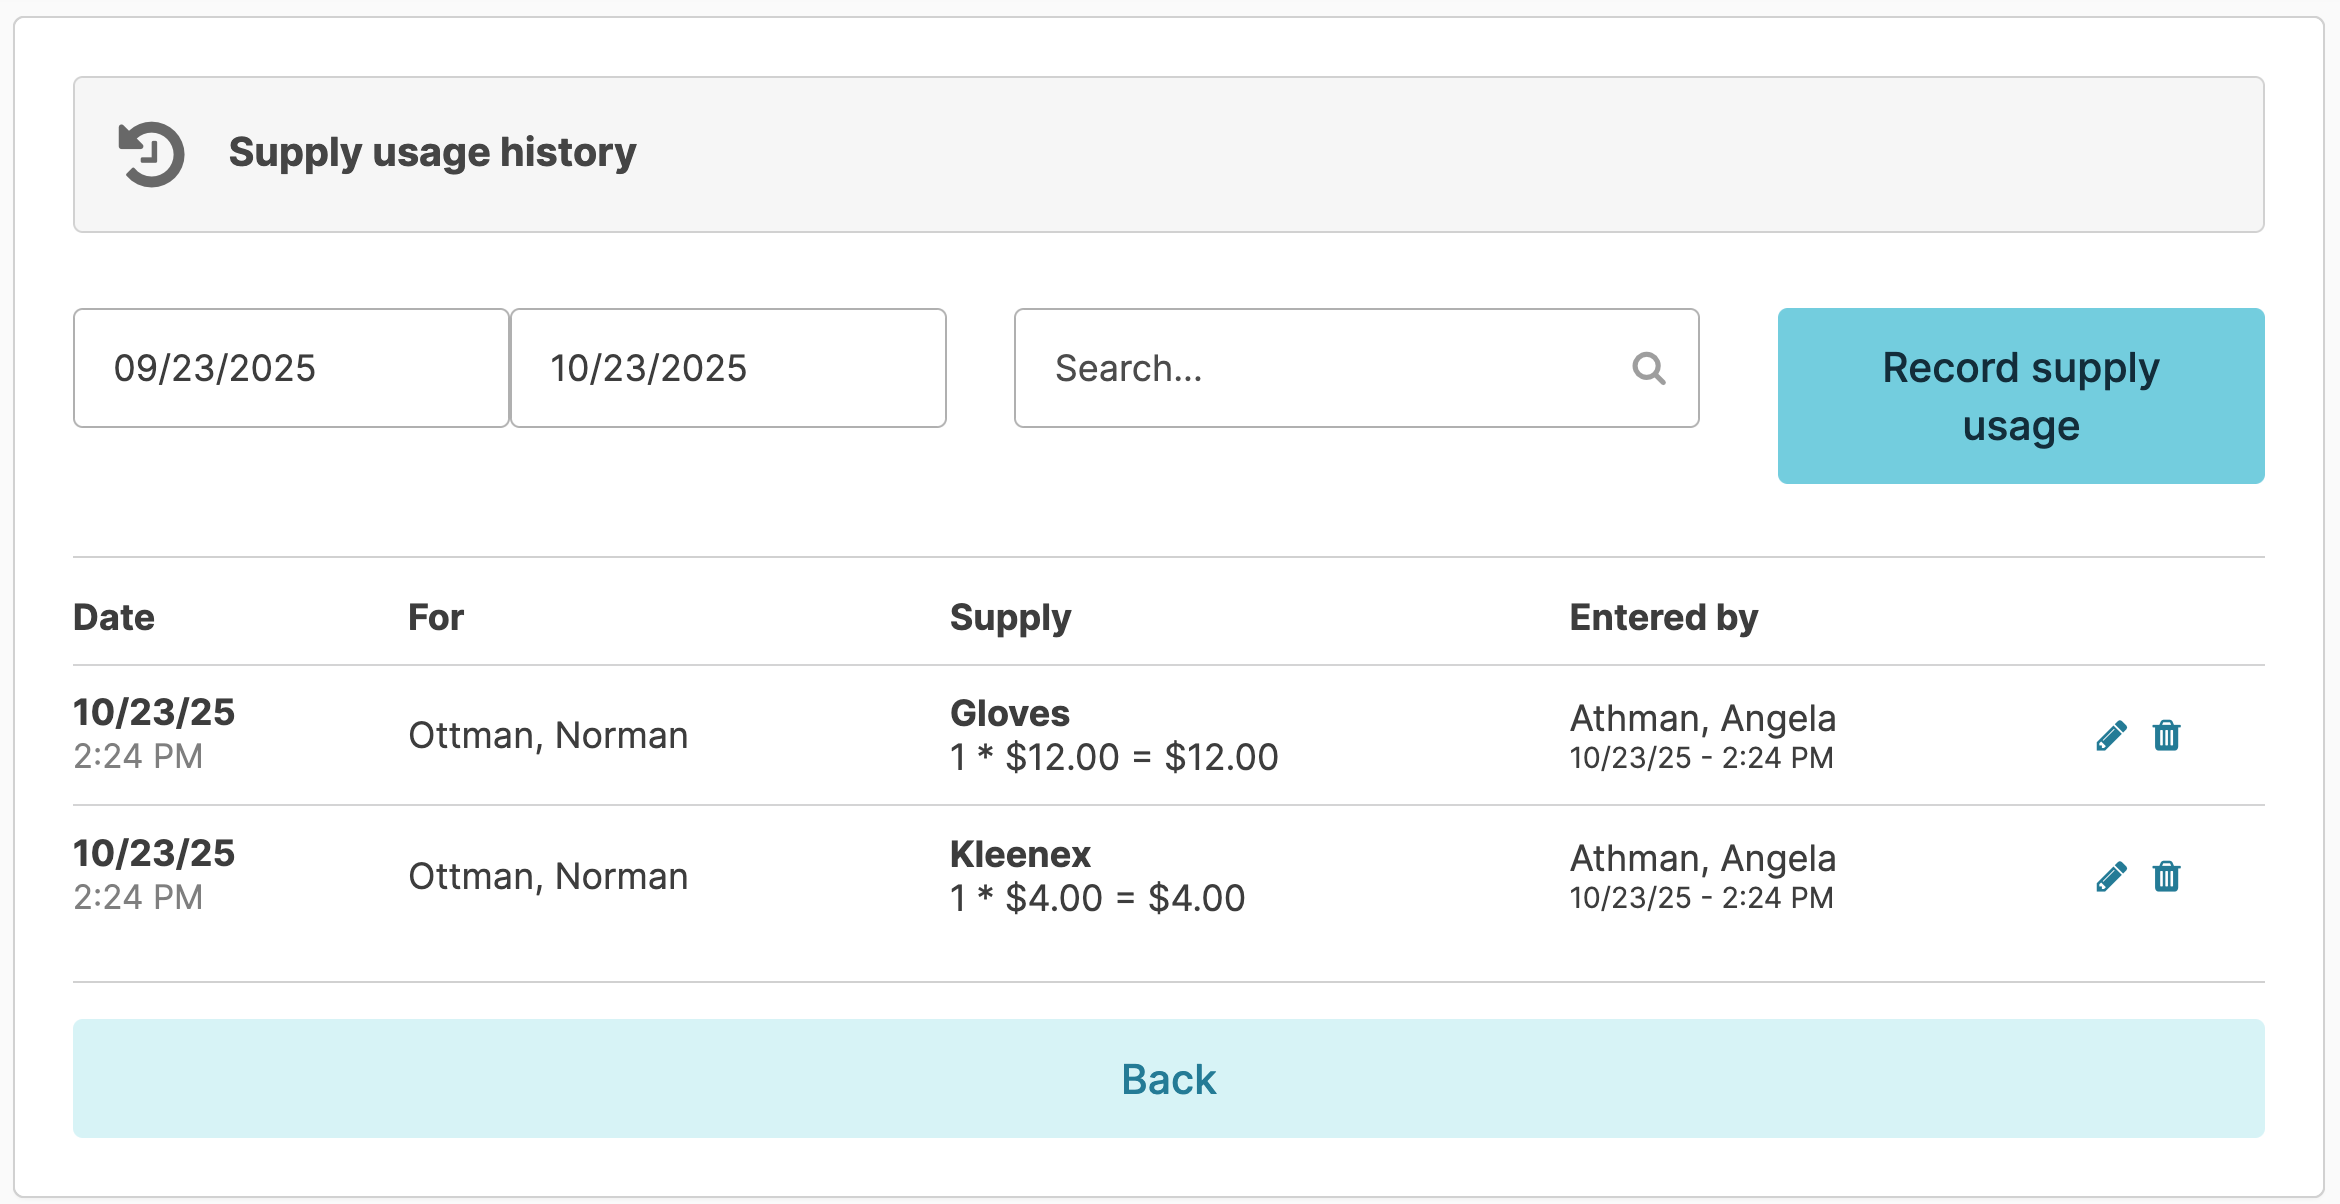
Supply Usage can be viewed by going to Residents > View supply usage history Supply history can be viewed by date range. You can also search for a keyword.
Any supply entered in error can be edited or deleted until invoices are generated. To edit a supply entry, navigate to Residents > View Supply Usage History, find the item entered in error, and press the blue pencil to edit or the blue trash can to delete. Note: Only a Nurse, Manager or Supervisor can edit supplies entered by another user.
ADS Clock-In/Clock-Out
Clock-In/Clock-Out/Current Status
The ADS clock in/out system allows you to document attendance for an Adult Day Services program. To view the scheduled attendance for a given day, navigate from the Residents > Clock In/Out Participants.
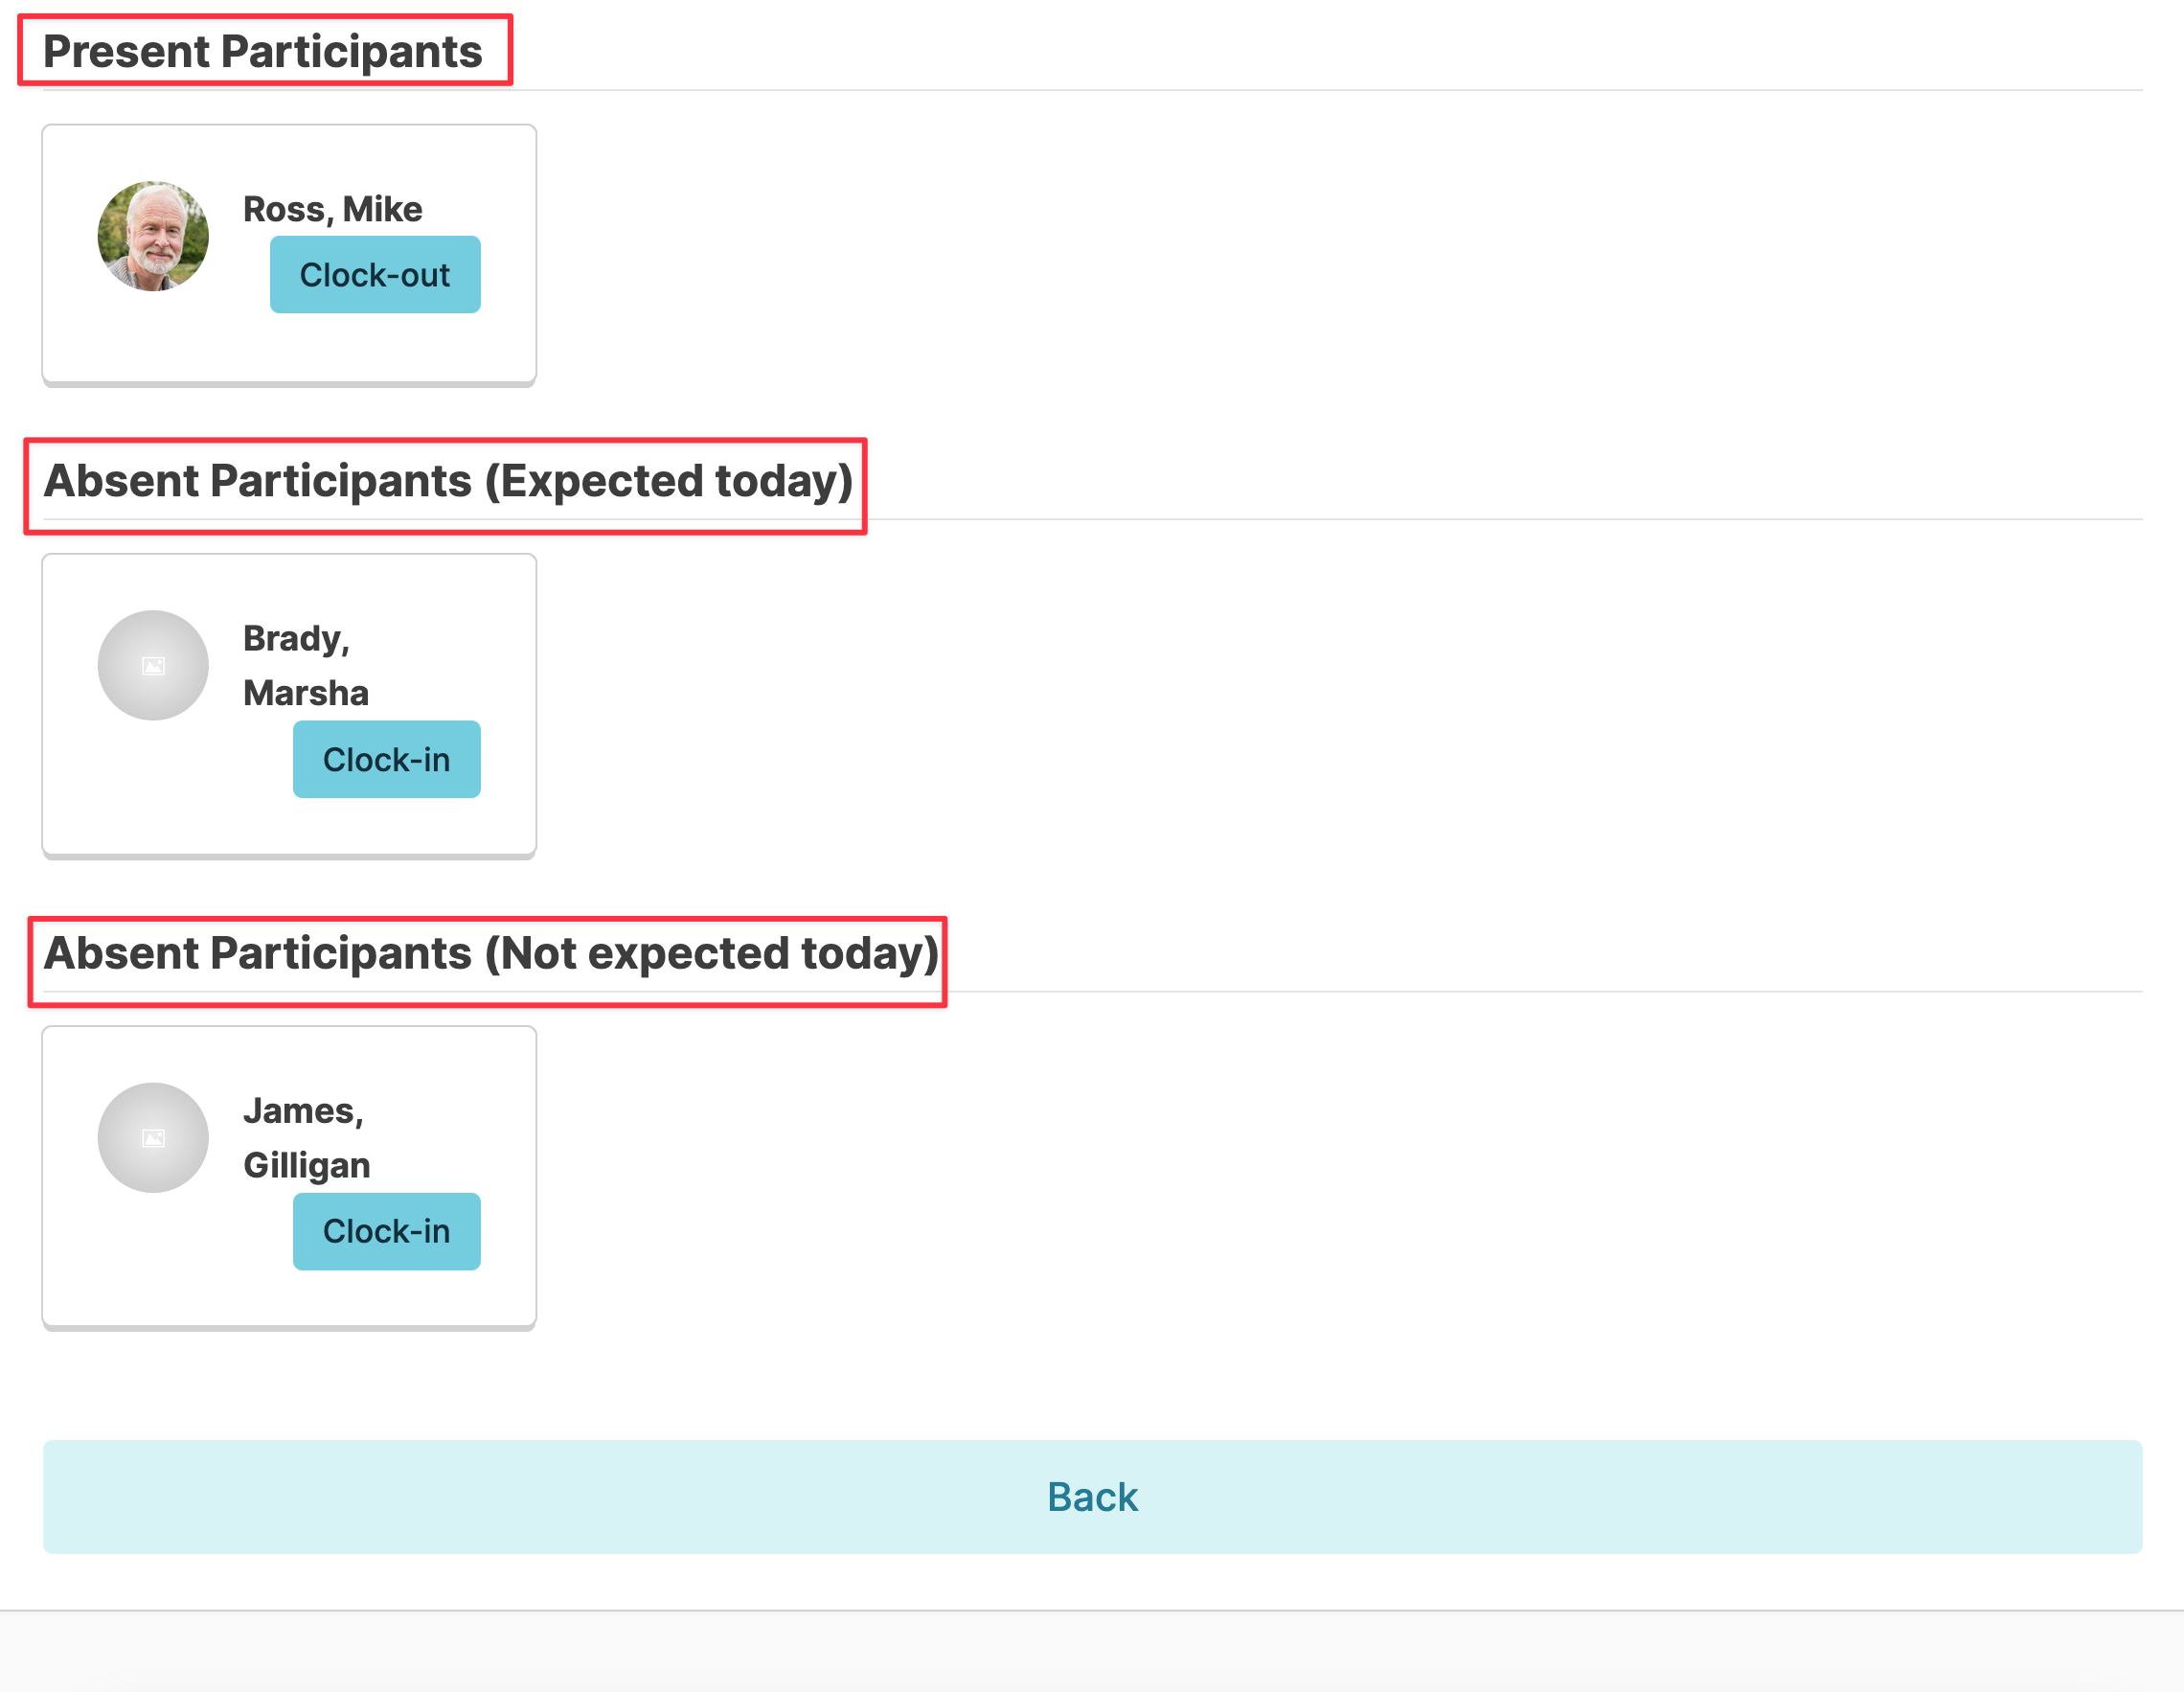
You will see:
- Participants currently clocked in (if applicable)
- Absent Participants (Expected today)
- Absent Participants (Not expected today)
Simply click on Clock-In or Clock-Out buttons to move them between these categories.
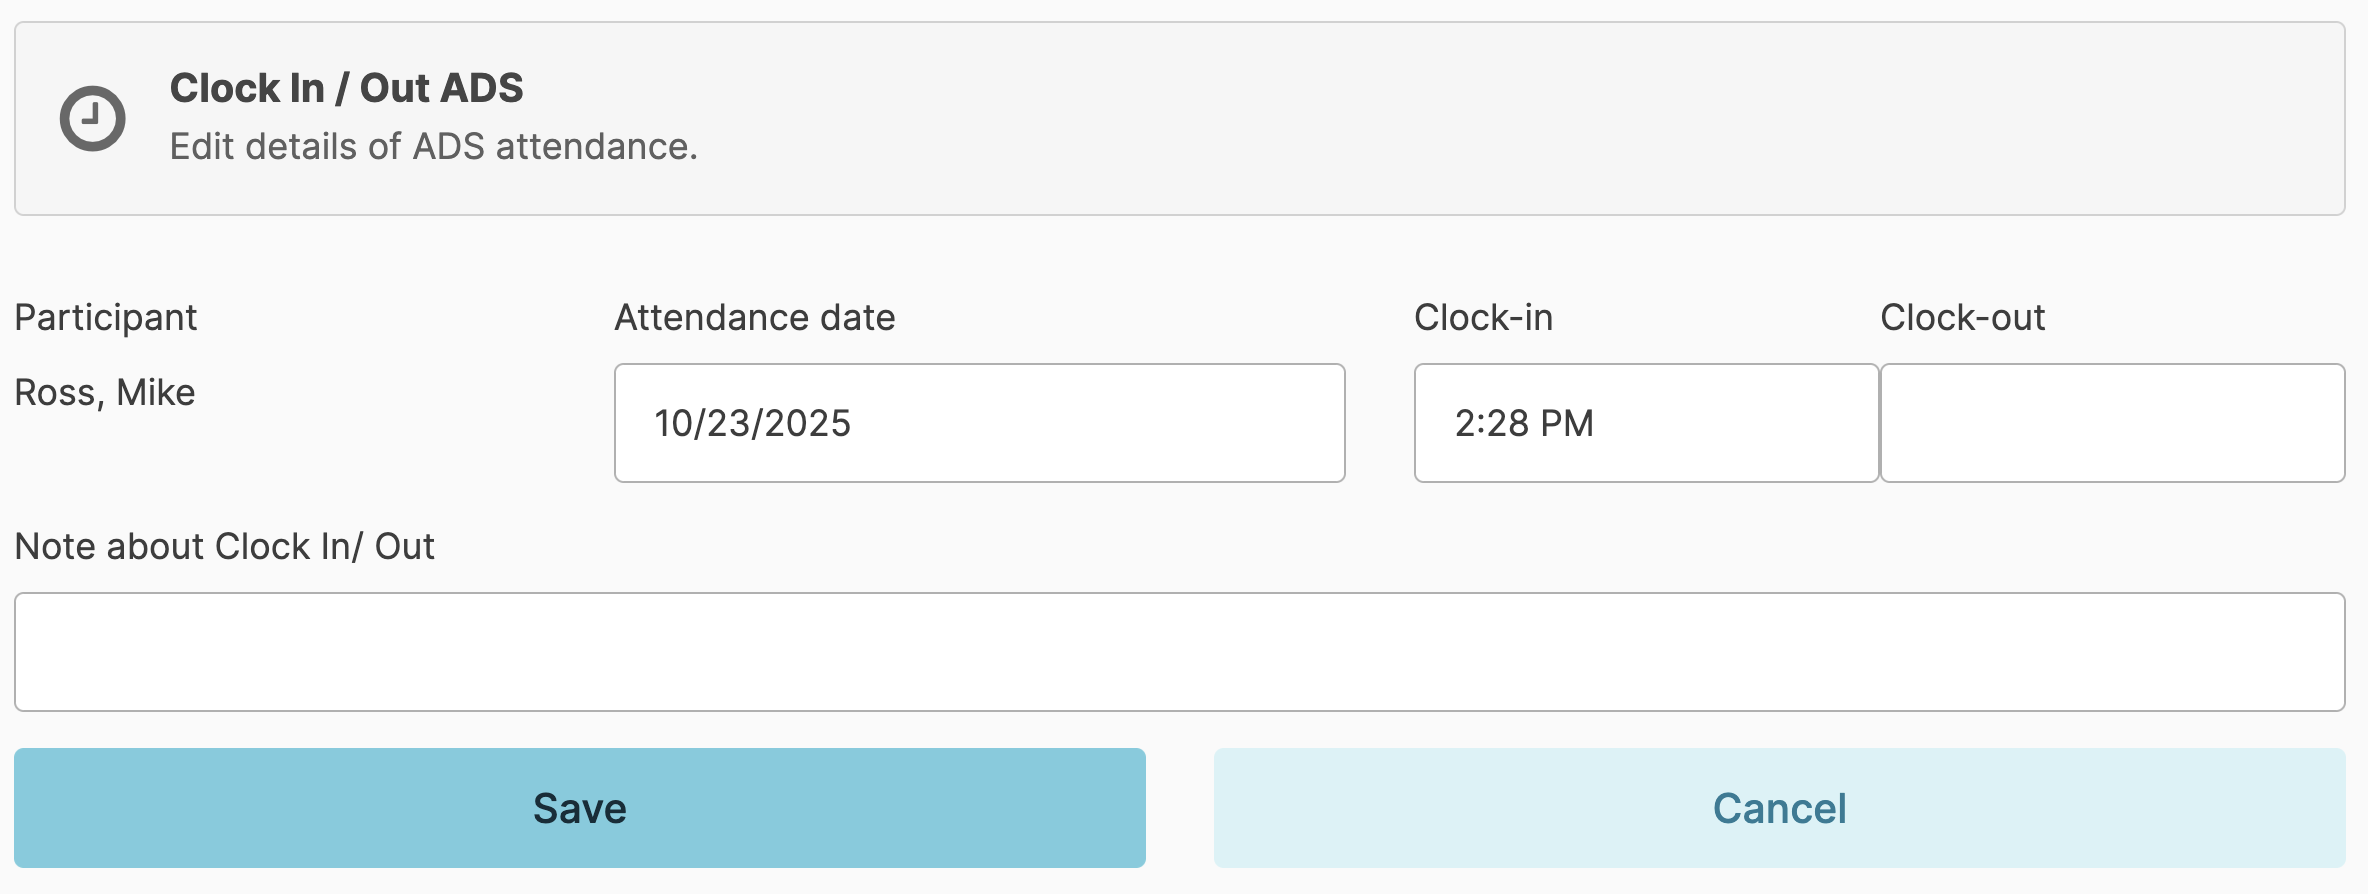
You can also click on the participant name or photo to open a window and enter the clock in/out time (this option will also allow you to enter a clock in/out time for a previous date.
To enter a resident's routine ADS attendance schedule, navigate to their Resident Profile > Service Plan>
Add New Service
- Add a service name starting with "Day" and schedule it for the day of the week the resident will be attending
- If you schedule this service for Monday, Wednesday and Friday; that resident will appear on the Residents > Clock In/Out Participants as an Absent Participants (Expected today) until they are clocked in on Monday, Wednesday and Friday. Once you clock them in, they will be moved to the Present Participants category.
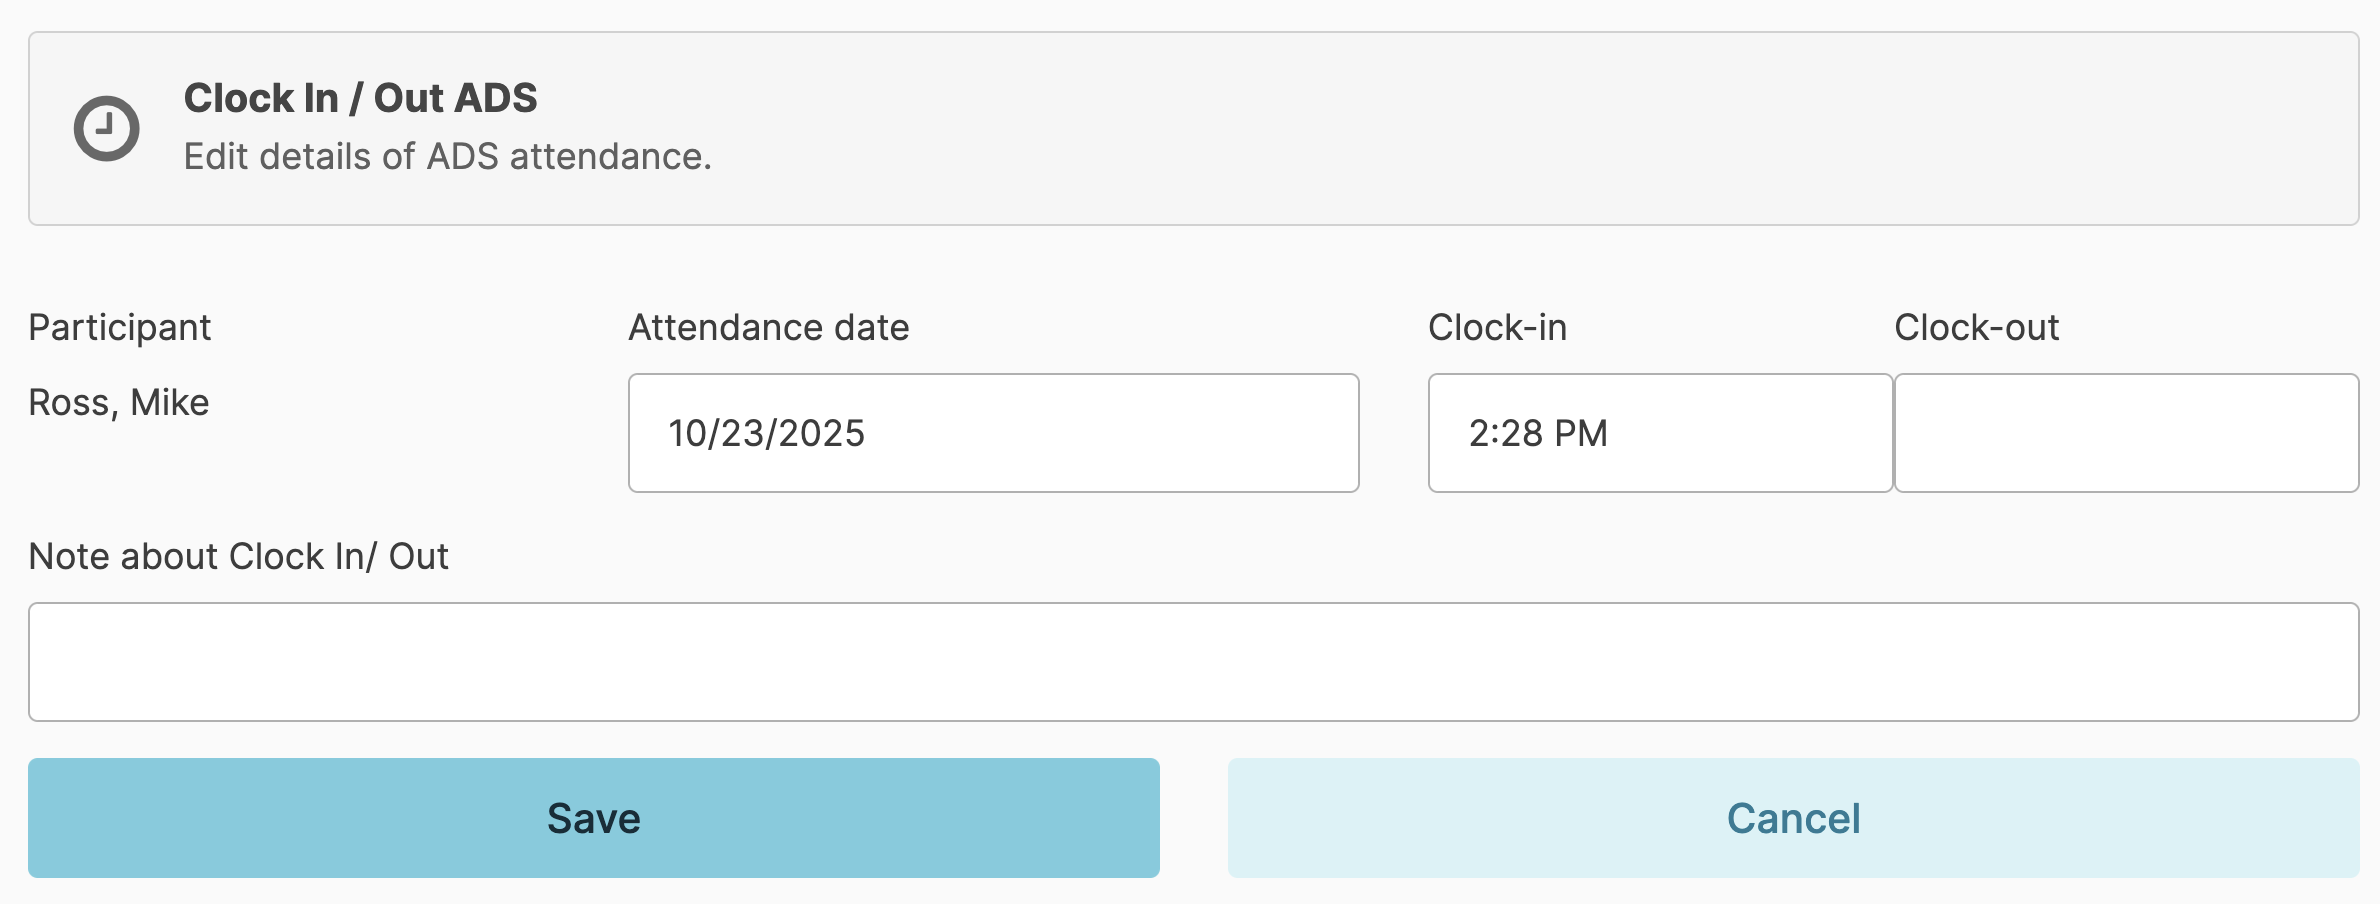
Manage ADS Clock In / Out
You can edit clock in and clock out entries for residents by navigating to Residents > Manage Clock In/Out Records option. Locate the ADS participant for whom you'd like to edit the record and click the blue pen to the far right.
Select the date and make the appropriate edits to clock in and out times. Add a note if desired and Save.